Migrate an agentless solution from NSX-V to NSX-T
The Deep Security Virtual Appliance will reach end of extended support (EOL) on 31-Dec-2027 or VMware's end of support date for NSX-4.X, whichever comes first.
This document describes how to migrate an existing agentless solution on an NSX-V environment to NSX-T 3.0 or newer.
The migration procedure depends on how your environment is configured. Refer to Co-existence of NSX for vSphere and NSX-T in the VMware documentation for descriptions of various configurations. The sections below contain instruction on how to migrate for either Use Case 1 or Use Case 2 from the VMWare document.
| Use Case 1 | Use Case 2 | |
|---|---|---|
| Location |
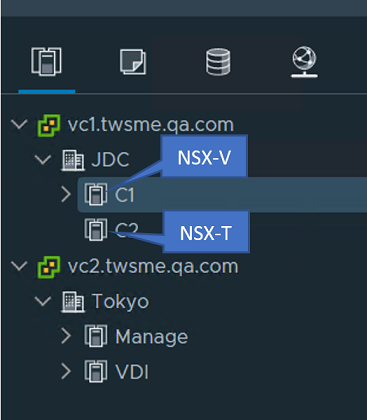
VMware NSX-V and NSX-T are registered on separate vCenter Servers. |
VMware NSX-V and NSX-T are registered on the same vCenter Server, to protect different clusters. |
| Example |

|
|
| Migration instructions | See Migration scenario 1 | See Migration scenario 2 |
Migration scenario 1
Follow the steps below:
- Before migration
- Step 1: Prepare the NSX-T infrastructure for migration
- Step 2: Import a new appliance
- Step 3: Migrate
- Step 4: Verify the new deployment and its security features
- Step 5: Uninstall NSX-V from Deep Security Manager
Before migration
- Review the system requirements. In particular:
- Deep Security Manager must be version 20 LTS Update 2020-11-26 or newer.
- NSX-T must be version 3.0 or newer.
- You should already have a Deep Security Manager with an existing vCenter connector binding to NSX-V 6.4.x.
- Refer to Use Case 1 in Co-existence of NSX for vSphere and NSX-T in the VMware documentation to configure another vCenter Server (for example, VC-2) and register it to the NSX-T Manager.
- Refer to your VMware documentation to arrange ESXi hosts and clusters for NSX-T management.
- If your NSX-V includes an Edge cluster, refer to NSX Edge Networking Setup in the VMware documentation and configure the Edge cluster for Routing or Bridge mode on NSX-T.
- Confirm network connectivity before continuing with the migration process.
Step 1: Prepare the NSX-T infrastructure for migration
Follow the steps in Prepare Fabric settings and configure NSX-T. If you have already added the new vCenter to NSX-T (for example, the VC-2 mentioned in the previous section), you can skip the "Configure a Compute Manager" step.
Step 2: Import a new appliance
Next, in Deep Security Manager, import a new Deep Security Virtual Appliance.
Step 3: Migrate
- In Deep Security Manager, add the new vCenter (VC-2 in the example above) and NSX-T. For instructions, see Add a new vCenter connector.
- Deploy the Deep Security Virtual Appliance on NSX-T.
- NSX-T has additional requirements for Guest VM activation and security policy assignment, compared to NSX-V. Complete these tasks:
- Update the security group for NSX-T
- Migrate security policies from NSX-V to NSX-T
- Prepare for activation.
If you used Method 1 or Method 2 when preparing your NSX-V environment, you may need to modify the "Assign Policy" or "Conditions" of existing event-based tasks to activate the Guest VM automatically.
When initiating a security policy migration and creation of service profiles on NSX-T, the guest VMs under the NSX-V clusters may undergo protection loss. This is because the NSX security group binding is a part of the migration. The protection will resume after the Guest VMs are migrated to an NSX-T cluster that has the NSX-T configurations ready.
- Migrate the Guest VMs:
- Link both vCenter Servers on the same SSO domain to support Cross vCenter migration. For more information, search VMware Cloud Infrastructure Software in the Broadcom documentation.
- Use vMotion to move the guest VMs from the original vCenter to the new one. For information, see vMotion between VDS/VSS and NSX-T switch.
- If you were using Network Introspection on NSX-V, after vMotion is complete and the new vCenter is on the NSX-T network, the Guest VMs need to connect at least one NIC to the Logical Switch (overlay mode) to enable the network security features on NSX-T.
- In Deep Security Manager, go to the Computers page, find the Guest VMs, and check that the Deep Security Virtual Appliance is activated and the default “Deep Security Virtual Appliance” policy is applied.
The Guest VMs should be activated and assigned security policies automatically. If a Guest VM is not activated with the expected security policy, try these steps:
- On the Computers page, right-click the vCenter and select Synchronize Now.
- If the Guest VM is still unactivated, try activating and assigning the security policies manually.
Step 4: Verify the new deployment and its security features
- Test that the Anti-Malware module is working correctly and sending events to Deep Security Manager. See Test malware scans.
- Test that the network protection modules (Web Reputation, Firewall, Intrusion Prevention) are working correctly and sending events to Deep Security Manager. See Test Web Reputation, Test Firewall rules before deploying them, and Test Intrusion Prevention.
Step 5: Uninstall NSX-V from Deep Security Manager
When you've verified that the Deep Security protection modules are functioning correctly, uninstall NSX-V from Deep Security Manager. For instructions, see Uninstall Deep Security from NSX-V manually. You're now finished the migration process.
Migration scenario 2
Follow the steps below:
- Before migration
- Step 1: Prepare the NSX-T network and vCenter infrastructure
- Step 2: Import a new appliance
- Step 3: Migrate
- Step 4: Verify the new deployment and its security features
- Step 5: Clean up NSX-V
Before migration
- Review the system requirements. In particular:
- Deep Security Manager must be version 20 LTS Update 2020-11-26 or newer.
- NSX-T must be version 3.0 or newer.
- You should already have a Deep Security Manager with an existing vCenter connector binding to NSX-V 6.4.x.
- Refer to Use Case 2 in Co-existence of NSX for vSphere and NSX-T in the VMware documentation to configure another cluster managed by NSX-T.
- Refer to your VMware documentation to arrange ESXi hosts and clusters for NSX-T management.
- If your NSX-V includes an Edge cluster, refer to NSX Edge Networking Setup in the VMware documentation and configure the Edge cluster for Routing or Bridge mode on NSX-T.
- Confirm network connectivity before continuing with the migration process.
Step 1: Prepare the NSX-T network and vCenter infrastructure
Follow the steps in Prepare Fabric settings and configure the cluster managed by NSX-T.
Step 2: Import a new appliance
Next, in Deep Security Manager, import a new Deep Security Virtual Appliance.
Step 3: Migrate
- Back up your Deep Security Manager database in case you need to roll back your changes.
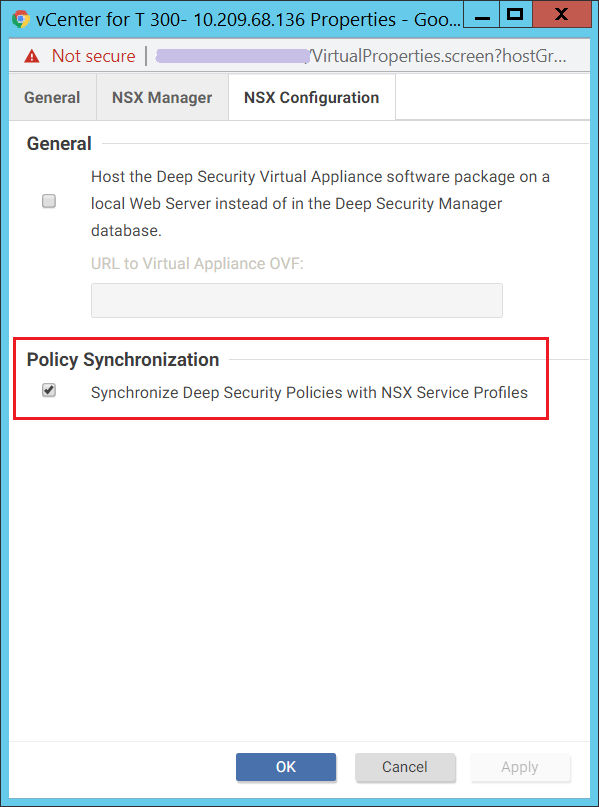
- In Deep Security Manager, go to the Computers page, right-click your vCenter connector, and select Properties. On the NSX Configuration tab, note whether the option under Policy Synchronization is selected. You'll need to know this later in the procedure.
- Remove the NSX-V binding. In Deep Security Manager, go to the Computers page, right-click your vCenter connector, and select Properties. On the NSX Manager tab, click Remove NSX Manager.
If Deep Security Manager receives system event 397 ("VMware NSX Callback Authentication Failed"), it is because the NSX settings have been removed from Deep Security Manager, but NSX-V still has the Deep Security service. This issue will be resolved when the migration is finished and you either shut down or uninstall NSX-V.
This step removes the NSX-V configurations from Deep Security Manager, but your VMs are still protected because NSX-V still has the Deep Security service. You will need to manually remove Deep Security from your NSX-V environment later (see Uninstall Deep Security from NSX-V manually).
Do not change the workloads deployed on the clusters managed by NSX-V during the migration process.
- Add the NSX-T binding. In Deep Security Manager, go to the Computers page, right-click your vCenter connector, and select Properties. On the NSX Manager tab:
- Enter the NSX-T Manager Address and Credentials.
- Click Add/Update the Certificate to add the NSX-T SSL certificates.
- Click Test Connection to check that Deep Security Manager can connect to the NSX-T Manager.
- Click OK.
- On the NSX Configuration tab, check that the option under Policy Synchronization is set how it was in step 2.
- Check that the Deep Security service has been registered to NSX-T. In the NSX-T Manager web console, go to System > Service Deployments. The "Trend Micro Deep Security" service should be registered.
- Deploy the Deep Security Virtual Appliance on NSX-T.
- Guest VM activation and security policy assignment for NSX-T has some additional tasks, compared to NSX-V. You must:
- Update the security group for NSX-T
- Migrate security policies from NSX-V to NSX-T
- Prepare for activation.
If you used Method 1 or Method 2 when preparing your NSX-V environment, you may need to modify the "Assign Policy" or "Conditions" of existing event-based tasks to activate the Guest VM automatically.
When initiating a security policy migration and creation of service profiles on NSX-T, the guest VMs under the NSX-V clusters may undergo protection loss. This is because the NSX security group binding is a part of the migration. The protection will resume after the Guest VMs are migrated to an NSX-T cluster that has the NSX-T configurations ready.
- Migrate the Guest VMs:
- Use vMotion to move the guest VMs from the original cluster to the new one. For information, see vMotion between VDS/VSS and NSX-T switch.
- If you were using Network Introspection on NSX-V, after vMotion is complete and the new vCenter is on the NSX-T network, the Guest VMs need to connect at least one NIC to the Logical Switch (overlay mode) to enable the network security features on NSX-T.
- Check the Deep Security Virtual Appliance and Guest VMs to make sure they're activated and have security policies assigned:
- Activate the appliance with the default security policy “Deep Security Virtual Appliance”.
- The guest VMs should be activated and assigned security policies automatically. If a guest VM is not activated with the expected security policy, try these steps:
- On the Computers page, right-click the vCenter and select Synchronize Now.
- If the Guest VM is still unactivated, try activating and assigning the security policies manually.
Step 4: Verify the new deployment and its security features
- Test that the Anti-Malware module is working correctly and sending events to Deep Security Manager. See Test malware scans.
- Test that the network protection modules (Web Reputation, Firewall, Intrusion Prevention) are working correctly and sending events to Deep Security Manager. See Test Web Reputation, Test Firewall rules before deploying them, and Test Intrusion Prevention.
Step 5: Clean up NSX-V
When you've verified that the Deep Security protection modules are functioning correctly, you should clean up NSX-V, following the instructions from VMware. You're now finished the migration process.
Update the security group for NSX-T
NSX-T offers group configuration with membership criteria and members categories that are different from NSX-V. You must re-create security groups on NSX-T.
| NSX-V | NSX-T (Group objects on Policy mode) | ||
|---|---|---|---|
| Dynamic membership criteria | Object type on include or exclude settings | Dynamic membership criteria | Members category |
|

|
|
|
For example, this is how you would convert a security group that uses "vCenter cluster" as the membership criteria on NSX-V to NSX-T.
On NSX-T, the vCenter cluster object is not supported. The following 3 methods provide suggestions for how to configure a supported group on NSX-T. However, you should reference your VMware documentation for more information.
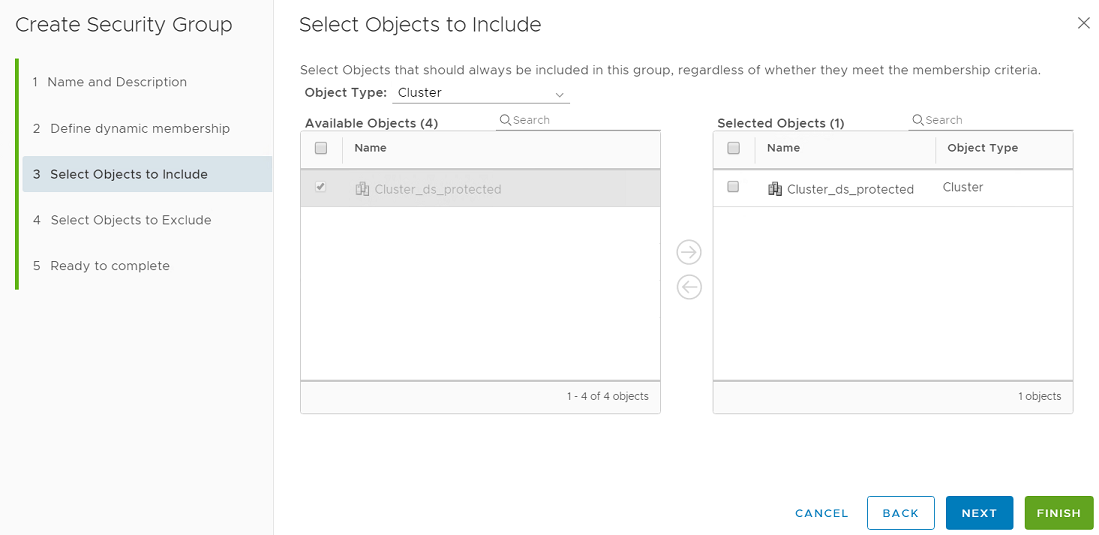
- Method 1: Define dynamic membership based on "VM name":
- Add a group. In NSX-T, go to Inventory > Groups and click ADD GROUP.

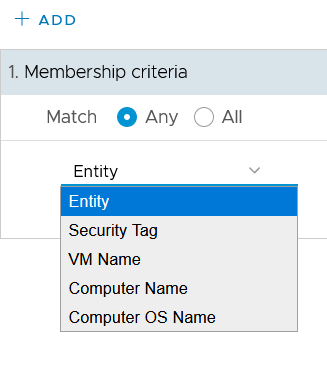
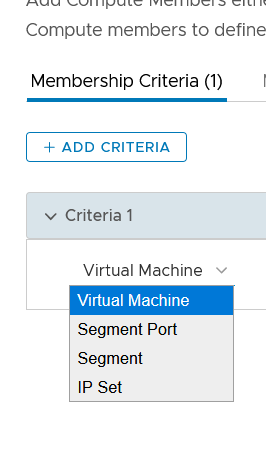
- Click Set Members, select the Membership Criteria tab and create one criteria for "Virtual Machine" and "Name".

- Add a group. In NSX-T, go to Inventory > Groups and click ADD GROUP.
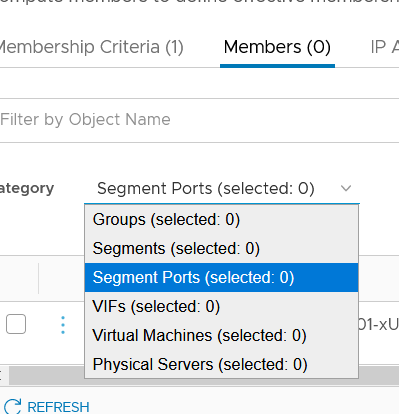
- Method 2: Define dynamic membership based on "VM name":
- Add a group. In NSX-T, go to Inventory > Groups and click ADD GROUP.
- Click Set Members and select the Members tab. In Category, select the VM whose protection you want to migrate to NSX-T.

- Method 3: Use a tag for group membership:
- In NSX-T, go to Inventory > Tag and create a tag.
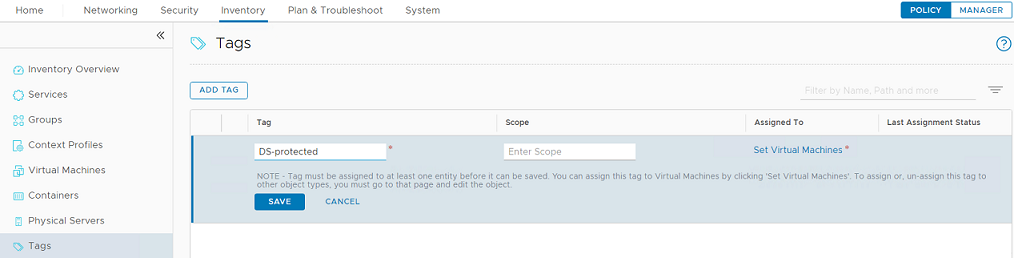
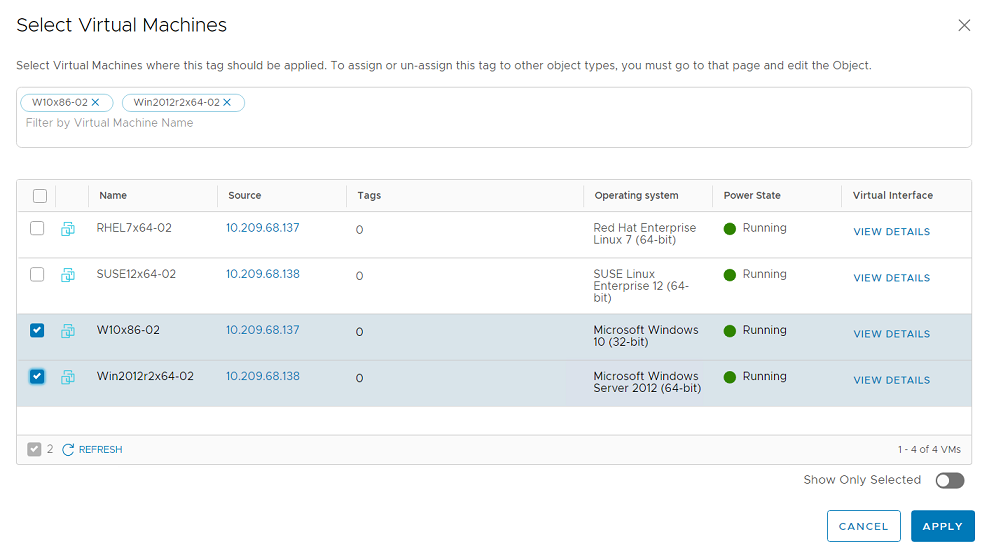
- Click Set Virtual Machines and assign a VM to the tag.
- Go to Inventory > Groups and click ADD GROUP to add a new security group.
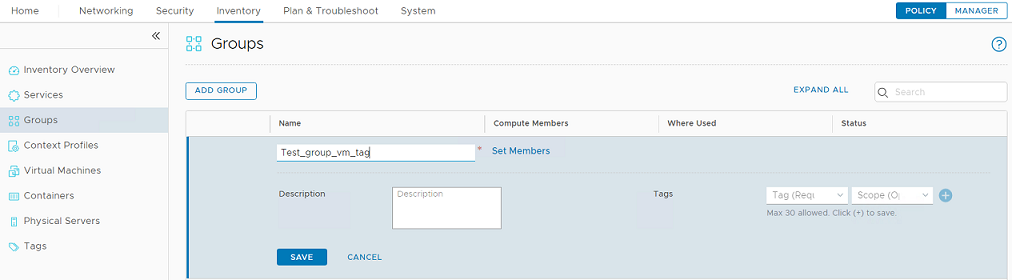
- Click Set Members and add the "Virtual Machine" and "Tag" criteria.
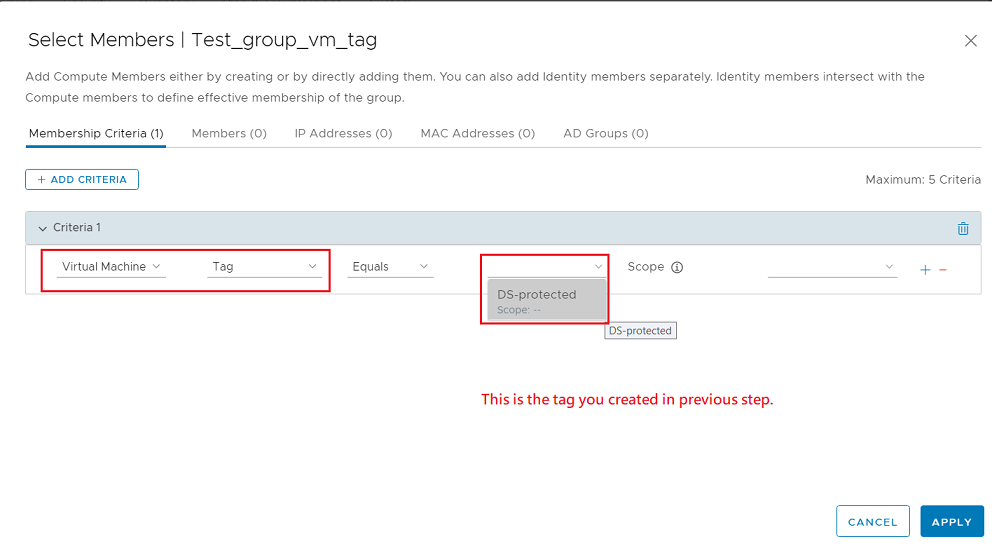
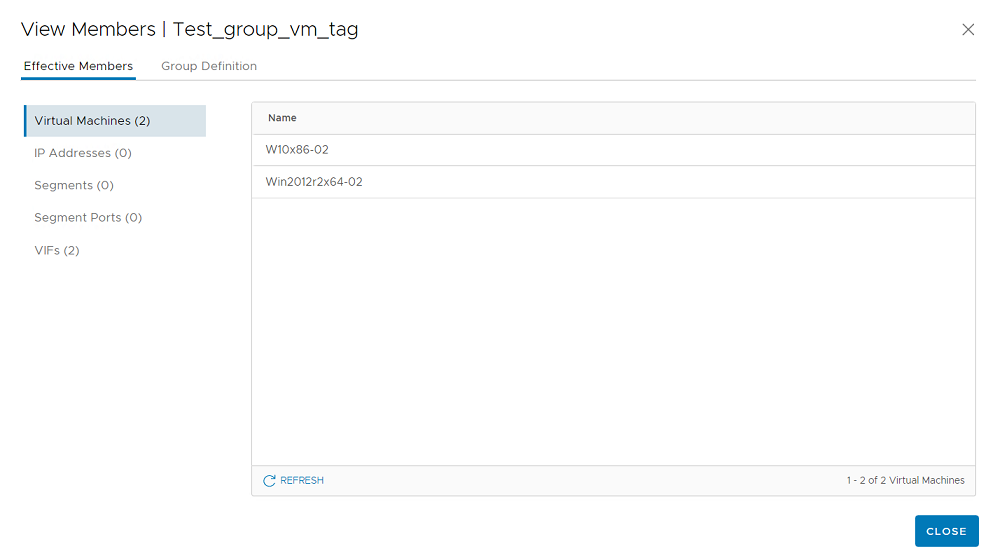
- Click View Members. The configured VM should be listed in virtual machines.
- In NSX-T, go to Inventory > Tag and create a tag.
Migrate security policies from NSX-V to NSX-T
On NSX-V, security policies contain both Guest Introspection and Network Introspection service configurations. You will need to re-create those configurations for NSX-T by following these steps:
- Check your current NSX-V configurations
- Re-create the Guest Introspection settings for NSX-T
- Re-create the Network Introspection settings for NSX-T
Check your current NSX-V configurations
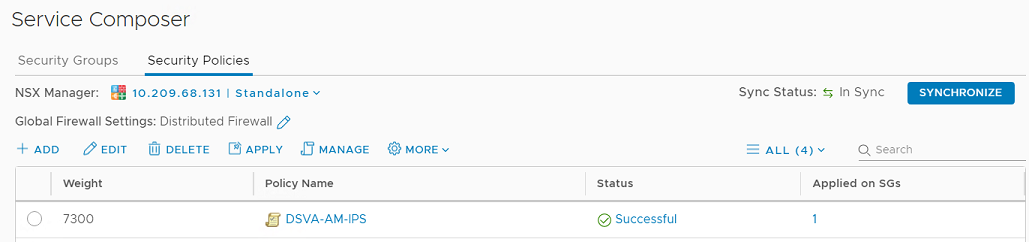
- On vCenter, go to Networking and Security > Service Composer > Security Policies. Locate the policies that were created for Deep Security services. Those are the policies that you will need to re-create for NSX-T.
- For each security policy:
- Click the policy.
- In the left pane, click Guest Introspection Services.
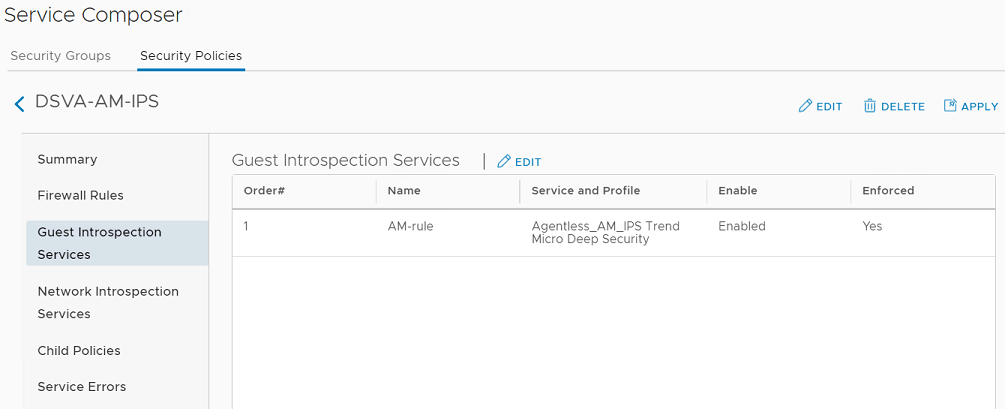
- Note the values in the Service and Profile column. You'll need that information when creating the Endpoint Protection Rules and Service Profiles for NSX-T (described in the next section).
- In the left pane, click Network Introspection Services.
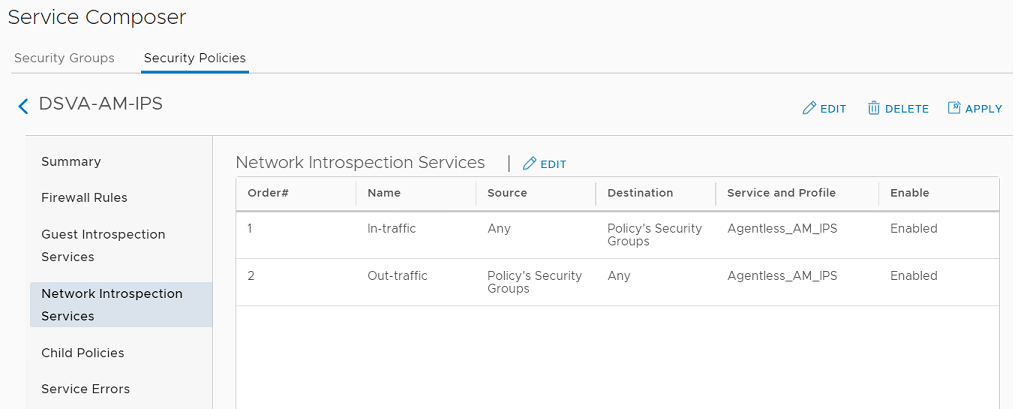
- Note the values in this table. You'll need this information when creating the Network Introspection Settings for NSX-T (described in a later section).
Re-create the Guest Introspection settings for NSX-T
- In the NSX-T web console, go to Security > Endpoint Protection Rules.
- Create a service profile. Choose the Vendor Template based on your NSX-V configuration (the value from the Service and Profile column of the Guest Introspection Service from step 2c, above).
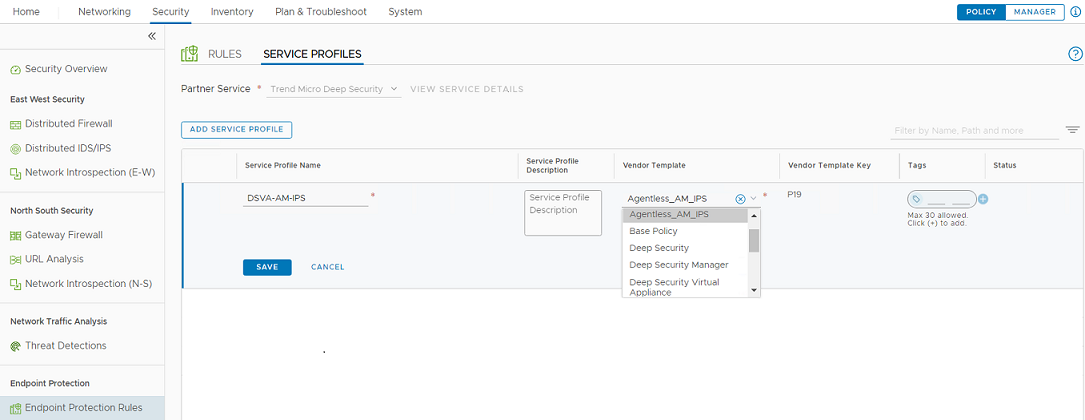
- Create a new rule to replace each rule that was defined in the Guest Introspection Services for NSX-V (see step 2c, above). For each new rule, select the corresponding Service Profile that you created in the previous step.

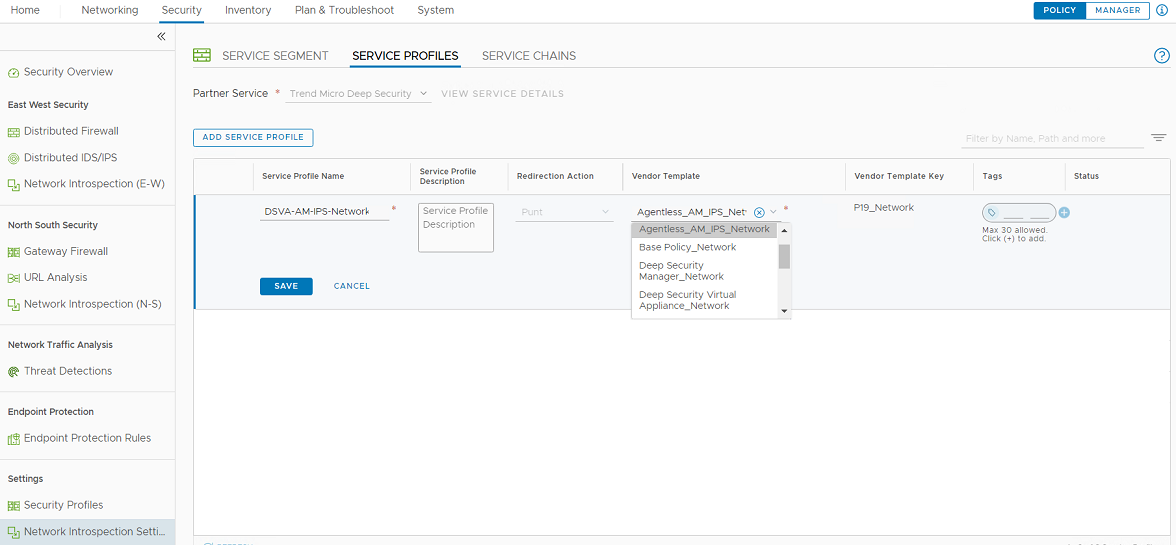
Re-create the Network Introspection settings for NSX-T
- In the NSX-T web console, go to Security > Network Introspection Settings > Service Profiles.
- Create a service profile. Choose the Vendor Template based on your NSX-V configuration (the value from the Service and Profile column of the Network Introspection Service from step 2e, above).
Find the Vendor Template name with the same prefix name, and with the full name "same_name"_Network. In this example, it is "Agentless_AM_IPS_Network".
- Go to Service Chains and create a service chain, selecting the service profile that you created in the previous step. In the Service Segments field, choose the segment you created when you deployed the Deep Security Virtual Appliance on NSX-T.

- Go to Security > Network Introspection (E-W).
- Add one policy for each security policy that you currently have in the Network Inspection Services for NSX-V (see step 2e, above) and add the rules under this policy. In the Redirect To file, select the Service Chain that you created in step 3.
