Prepare Fabric settings
You must now prepare Fabric settings.
- Configure the User Interface Mode Toggle
- Configure a Compute Manager
- Configure a Transport Zone
- Configure a Transport Node Profile
- Prepare the host
- Create a logical switch
Configure the User Interface Mode Toggle
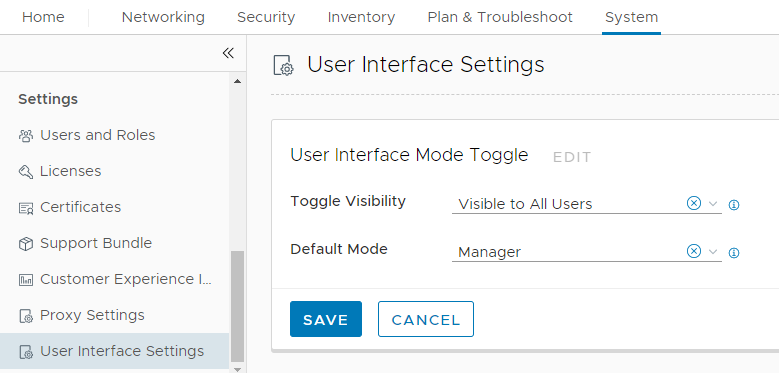
First, configure the user interface settings of NSX-T Manager so that you can access the different mode for later configurations.
- In NSX-T Manager, at the top, click System, and then click User Interface Settings on the left.
- Set Toggle Visibility and Default Mode as you like.
Configure a Compute Manager
Next, add your vCenter as a Compute Manager:
- Make sure the vCenter and ESXi servers have been configured for management.
- In NSX-T Manager, at the top, click System, and then click Fabric > Compute Managers on the left.
- Click +ADD.
- The New Compute Manager dialog box appears.
- Fill in the fields with your vCenter information. In this example, the vCenter is 10.209.48.73.
- Click Add. The vCenter is added.
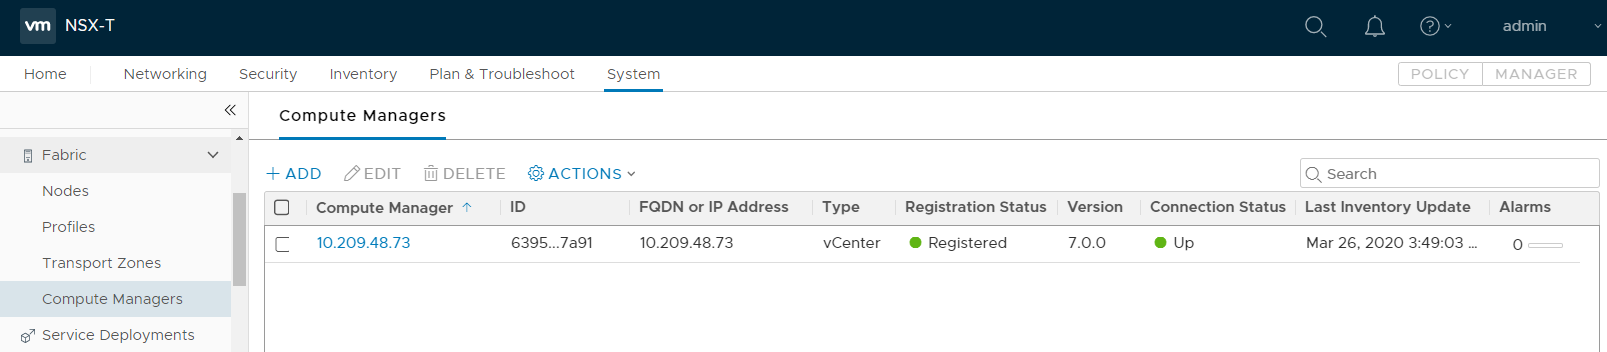
- Verify that the vCenter's Registration Status is Registered, and its Connection Status is Up.
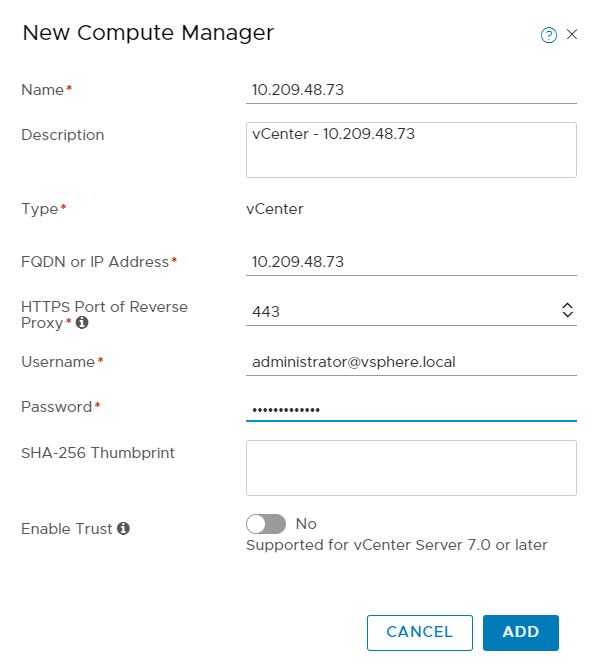
You have now added your vCenter.
Configure a Transport Zone
Next, make sure an overlay transport zone exists, and if not create one:
If you already have a transport zone, you can use it and don't need to create one.
- Still in NSX-T Manager, go to System > Fabric > Transport Zones.
- Check whether a transport zone with a Traffic Type of Overlay already exists.
- If an overlay transport zone does not exist, click +ADD to create one.
The New Transport Zone dialog box appears.
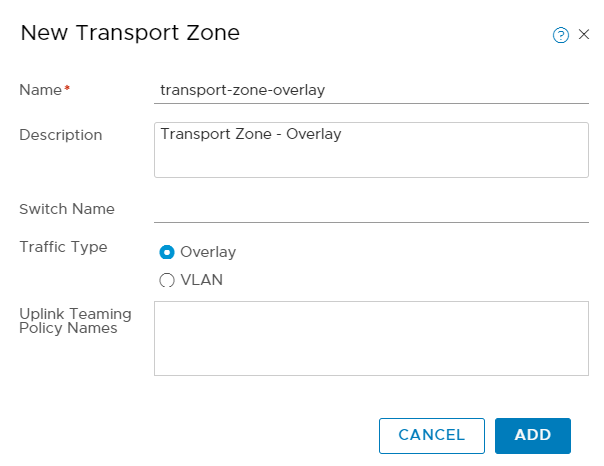
- Set the Name to the the transport zone name. Example: transport-zone-overlay.
- Set the Traffic Type to Overlay.
- Click ADD.
An overlay transport zone is created.
Configure a Transport Node Profile
Next, create a Deep Security transport node profile:
If you already have a Transport Node Profile, you can use it and don't need to create one.
- Still in NSX-T Manager, on the left, click Fabric > Profiles, and then in the main pane, click Transport Node Profiles.
- Click + ADD to create a transport node profile.
The Add Transport Node Profile dialog box appears.
- Add a Node Switch Profile depending on your requirements
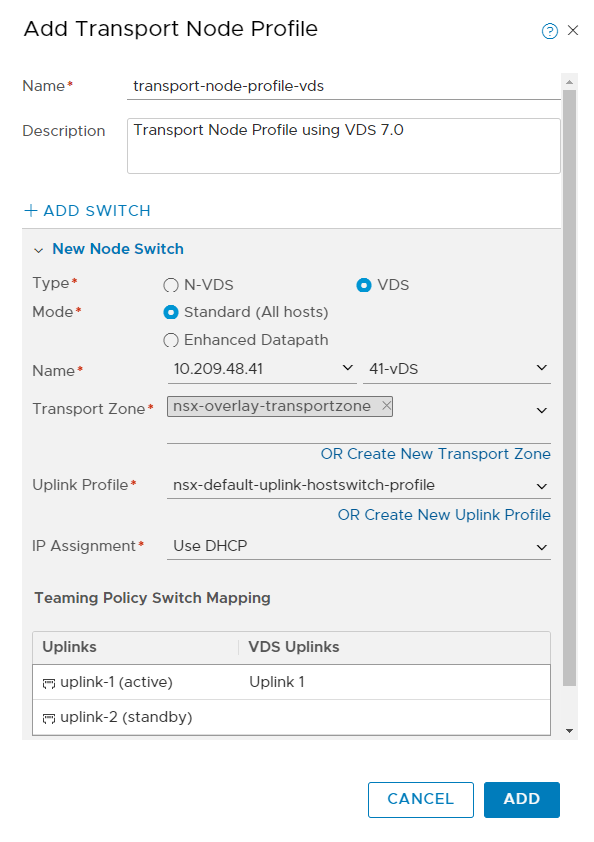
- For the Name, enter a name. Example:
transport-node-profile. - For the Description, enter a description. Example:
Transport Node Profile. - Under New Node Switch, for the Type, select VDS.
- For the Name, choose the vCenter and VDS.
- For the Transport Zone, select the transport zone created in the previous step. Example:
transport-zone-overlay. - For the Uplink Profile, select nsx-default-uplink-hostswitch-profile.
- For the IP Assignment, select either option.
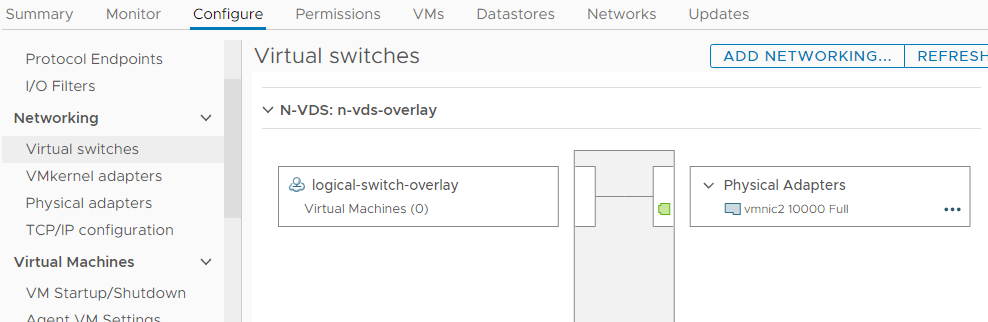
- Under Teaming Policy Switch Mapping, assign VDS Uplinks to the Uplinks. In the example, we assigned
Uplink 1to uplink-1 (active). You can check the workable uplinks in the vCenter console by clicking a host and going to Configure > Networking > Virtual switches. - For the Name, enter a name. Example: transport-node-profile.
- For the Description, enter a description. Example: Transport Node Profile.
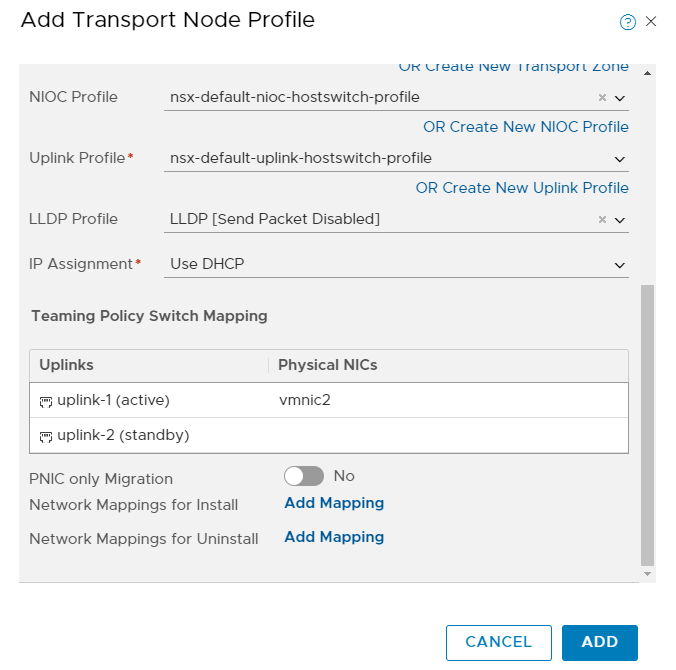
- Under New Node Switch, for the Type, select N-VDS.
- For the Mode, select either option. In the example, we selected Standard (All hosts).
- For the Name, enter a name for the switch. Example: n-vds-overlay.
- For the Transport Zone, select the transport zone created in the previous step. Example: transport-zone-overlay.
- For the NIOC Profile, select nsx-default-nioc-hostswitch-profile.
- For the Uplink Profile, select nsx-default-uplink-hostswitch-profile.
- For the LLDP Profile, select either option.
- For the IP Assignment, select either option.
- Under Teaming Policy Switch Mapping, assign valid physical NICs to the Uplinks. In the example, we assigned vmnic2 to uplink-1 (active).
- After filling out the fields, click ADD.
A transport node profile called transport-node-profile is created.
VMware recommends that new NSX deployments with ESXi 7.0 use VDS 7.0. If you have upgraded from a previous NSX-T version, you can continue to use N-VDS. For more information, see Deep Security LTS Release and VMware compatibility matrix, Deep Security Feature Releases and VMware compatibility matrix, and NSX-T release notes.
Fill out the fields as follows:
The assigned NIC(s) must be available on the ESXi servers. In the example, our ESXi hosts have vmnic2 which can be used for the N-VDS n-vds-overlay.
For details on any of the values, click  at the top of the dialog box.
The bottom portion of the dialog box now looks similar to the following:
Prepare the host
Next, apply the Deep Security transport profile to your clusters.
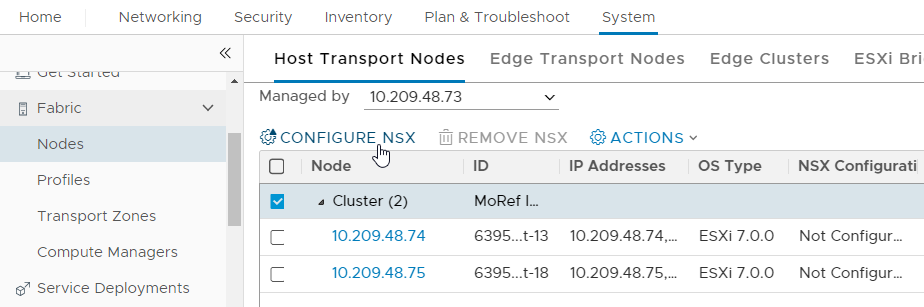
- Still in NSX-T Manager, click Fabric > Nodes, and in the main pane click Host Transport Nodes.
- From the Managed by drop-down list, select the vCenter you added previously. In this example, the vCenter is 10.209.48.73.
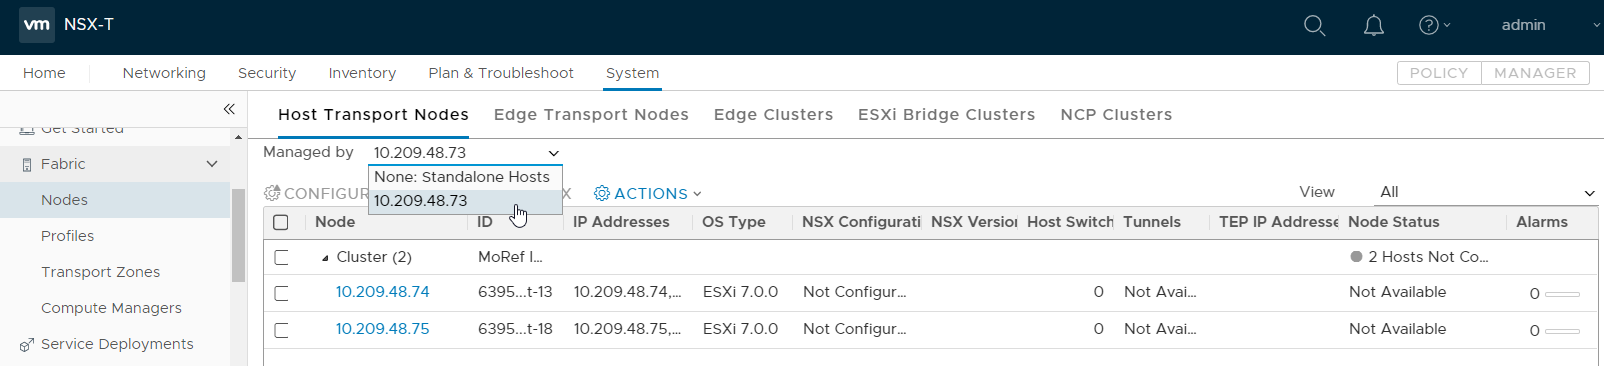
- Select a cluster that contains the VMs that you want to protect with Deep Security Virtual Appliance. If there is more than one cluster, select all the ones that you want to protected with Deep Security Virtual Appliance.
- Click CONFIGURE NSX.
- From the Select Deployment Profile drop-down list, select transport-node-profile or whatever you called your transport node profile.
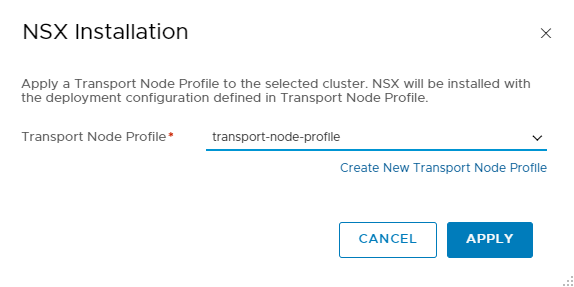
- Click SAVE. The following occurs:
- The Deep Security transport node profile is applied to the clusters.
- While the profile is being applied, an Applying Profile message may appear and you can check the installation progress on each node.
- When the operation finishes, each node's NSX Configuration changes to Success and its Node Status changes to Up. If you have multiple ESXi servers, they should all be marked with Success and Up.

You have now configured the target cluster.
Create a logical switch
Next, if you are using NSX Data Center Advanced, NSX Data Center Enterprise Plus or NSX Data Center for Remote Office Branch Office Edition, you must configure the logic switch for network traffic inspection. If you are using another NSX edition, skip this section.
If you already have a logical switch, you can use it and don't need to create a new one.
- Still in NSX-T Manager, at the top, click Networking and toggle to MANAGER.
- On the left, click Logical Switches.
- In the main pane, click + ADD.
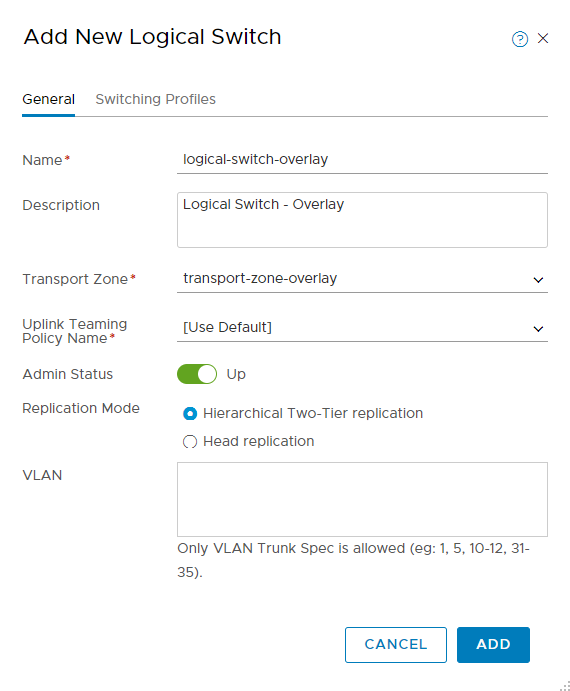
The Add New Logical Switch dialog box appears.
-
On the General tab:
- For the Name, enter a name for your logical switch. Example: logical-switch-overlay.
- For the Transport Zone, choose the overlay transport zone created previously. Example: transport-zone-overlay.
- For the Uplink Teaming Policy Name, select [Use Default].
- For the Admin Status, keep the default value.
- For the Replication Mode, select either option.
- For the VLAN, leave the field blank.
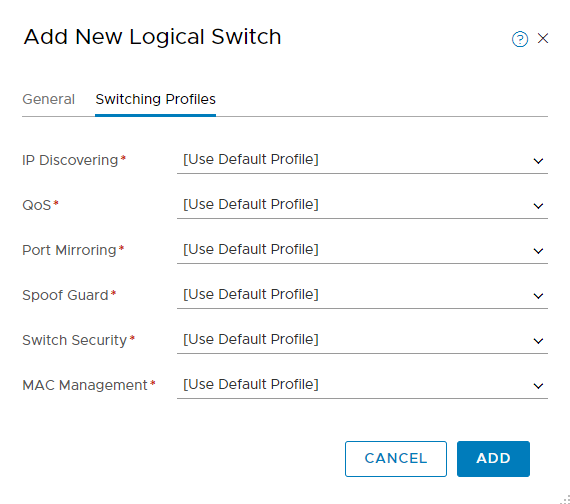
- On the Switching Profiles tab, select the profile you want for each item. In the example, we kept [Use Default Profile] for all items.
- Click ADD.
A logical switch is created. You can check the switch status on your host(s) through vSphere Client.
You have now prepared the Fabric settings in NSX-T Manager.