Configure activation
Topics:
- Prepare for activation
- Trigger an activation and policy assignment
- Check that VMs are activated and assigned a policy
Prepare for activation
You must now prepare for activation. You can use Method 1, 2, or 3:
- Method 1: Create a 'Computer Created' event-based task
- Method 2: Create an 'NSX Security Group Change' event-based task
- Method 3: Synchronize your Deep Security policies to NSX-T 3.x
- Some methods aren't supported with some NSX versions. Consult the table below for details.
- Method 1: With this method, any VMs that you newly create in your system are automatically activated and assigned a policy.
- Method 2: With this method, new and existing VMs are automatically activated and assigned a policy when they are moved into a designated NSX security group.
- Method 3: With this method, new and existing VMs are activated and assigned a policy when they are moved into a designated NSX security group. This is similar to method 2. However, unlike method 2, Deep Security policies are assigned through the VMware UI instead of through a Deep Security event-based task.
| Deep Security Virtual Appliance deployment | |||||||||
| NSX for vSphere (NSX-V) 6.4.x | NSX-T 3.x | ||||||||
|---|---|---|---|---|---|---|---|---|---|
| Method |
Standard OR NSX for vShield Endpoint (free) |
Advanced | Enterprise | NSX Data Center Standard |
NSX Data Center Professional |
NSX Data Center Advanced |
NSX Data Center Enterprise Plus |
NSX Data Center for Remote Office Branch Office |
All license types |
|
Method 1 |
✔ | ✔ | ✔ | ✔ | ✔ | ✔ | ✔ | ✔ | ✔ |
|
Method 2 |
X | ✔1 | ✔1 | X | X | ✔1 | ✔1 | ✔1 | ✔ |
|
Method 3 |
X | ✔1 | ✔1 | X | X | ✔1 | ✔1 | ✔1 | ✔ |
1 Requires VMware's Network Introspection Service.
• Requires the following software combination: Deep Security Manager FR 2019-12-12 (build 12.5.494) or newer with Deep Security Agent Linux FR 2020-04-02 (build 12.5.0-814) or newer.
Method 1: Create a 'Computer Created' event-based task
The instructions below are task-based. For more explanatory information on event-based tasks, see Automated policy management in NSX environments.
- In Deep Security Manager, click Administration at the top.
- On the left, click Event-Based Tasks.
- In the main pane, click New.
- From the Event drop-down list, select Computer Created (by System). Click Next.
- Select Activate Computer and set it to 5 minutes.
- Select Assign Policy and select a policy from the drop-down list, for example, Windows Server 2016.You can click the arrows to view child policies. Click Next.
- Specify the conditions that restrict when the event-based task is triggered. Add this condition:
vCenter Name matches <your_vCenter_name>
- Add more conditions to further restrict when the event-based task is triggered. For example, if you have a naming convention for your VMs that includes a 'Windows' prefix on all Windows VMs, you would set:
Computer Name matches Windows*
Click Next.
- In the Name field, enter a name for the task that reflects the policy you assigned, for example, Activate Windows Server 2016.
- Select Task Enabled and then click Finish.
- Create additional event-based tasks, one per Deep Security policy you plan on assigning. The event-based task must have an event type of Computer Created (by System) and must be configured to activate the computer and assign a policy.
You have now set up your event-based tasks to activate and assign policies to newly-created VMs. As soon as a VM is created, all the Computer Created (by System) event-based tasks are reviewed. If the conditions in a task are met, the task is triggered, and the VM is activated and assigned the associated policy.
Method 2: Create an 'NSX Security Group Change' event-based task
The instructions below are task-based. For more explanatory information on event-based tasks, see Automated policy management in NSX environments.
To start, create or modify the Activate event-based task:
- In Deep Security Manager, click Administration at the top.
- On the left, click Event-Based Tasks.
- In the main pane, look for the event-based task called Activate <your_vCenter_name>. It may or may not exist.
- If the Activate event-based task exists, double-click it and review the table below make sure it is configured properly. If it doesn't exist, click New and run through the wizard, making sure to conform to the table below.
- Create additional Activate event-based tasks if you added multiple vCenter servers to the manager.
Settings in the table below may appear in a different order from shown.
| To configure the 'Activate' event-based task, set... | To... |
|---|---|
| Name | A name for the task that reflects the action and vCenter assigned under Conditions, for example, Activate your_vCenter_name>. |
| Event | NSX Security Group Change
The NSX Security Group Change event is triggered when the manager receives a notification from the data plane (the Deep Security Virtual Appliance). |
| Task Enabled | Enabled. |
| Activate Computer | 5 minutes. |
| Assign Policy | A policy, for example, Windows Desktop.You can click the arrows to view child policies. |
| Conditions |
Mandatory condition to restrict when the event-based task is triggered:
Examples of optional conditions to further restrict triggering:
|
Next, create or modify the Deactivate event-based task:
- Still in Deep Security Manager, in the main pane, look for the event-based task called Deactivate <your_vCenter_name>. It may or may not exist.
- If the Deactivate event-based task exists, double-click it and review the table below make sure it is configured properly. If it doesn't exist, click New and run through the wizard, making sure to conform to the table below.
- Create additional Deactivate event-based tasks if you added multiple vCenter servers to the manager.
Settings in the table below may appear in a different order from shown.
| To configure the 'Deactivate' event-based task, set... | To... |
|---|---|
| Name |
A name for the task that reflects the action and vCenter assigned under Conditions, for example, Deactivate your_vCenter_name>. |
| Event | NSX Security Group Change
The NSX Security Group Change event is triggered when the manager receives a notification from the data plane (the Deep Security Virtual Appliance). |
| Task Enabled | Enabled. |
| Deactivate Computer | Enabled. |
| Conditions |
|
You have now set up your event-based tasks to activate your VMs. If the conditions in a task are met, the task is triggered, and the VM is activated (and assigned the associated policy).
Method 3: Synchronize your Deep Security policies to NSX-T 3.x
The instructions below are task-based. For more explanatory information on synchronizing policies, see Synchronize Deep Security policies with NSX.
To start, configure Deep Security Manager:
- Log in to Deep Security Manager.
- Make sure that all of the policies in Deep Security Manager have a unique name before they are synchronized with NSX. All the default ones have unique names.
- At the top, click Computers.
- On the left, right-click the vCenter where you want to enable synchronization and select Properties.
- On the NSX Configuration tab, select Synchronize Deep Security Policies with NSX Service Profiles. Click OK.
Next, check that your policies are loading into NSX-T Manager:
- In NSX-T Manager, click Security at the top, switch to the POLICY mode.
- On the left, find Settings and click Network Introspection Settings.
- In the main pane, click SERVICE PROFILES and from the Partner Service drop-down list, select Trend Micro Deep Security.
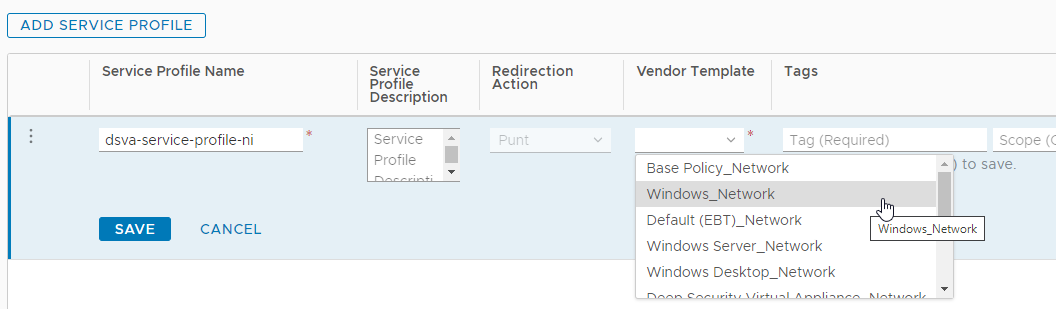
- Click ADD SERVICE PROFILE.
- Check the Vendor Template drop-down list. Your Deep Security policies should appear in this list in the format
<Deep_Security_Policy_Name>_Network. - You have now checked that your policies are loading.
- Click Cancel to return to the main page.
You have now added your Deep Security policies as vendor templates in NSX.
Finally, reconfigure east-west security and Endpoint Protection:
- Go back to Create a group for protection and run through the steps again to create more groups. For example,
Windows_Group. - Go back to Configure east-west security and run through the steps again, this time selecting one of the Deep Security policies from Vendor Template (instead of Default (EBT)_Network) and selecting one of the new groups.
- Go back to Configure Endpoint Protection and run through the steps again, this time selecting one of the Deep Security policies from Vendor Template (instead of Default (EBT)) and selecting one of the new groups. The policy and group must match the one use for east-west security.
Make sure to match the template under east-west security and Endpoint Protection for a particular group. For example, if you select MyWindowsPolicy_Network under east-west security, select MyWindowsPolicy under Endpoint Protection.
You have now set up policy synchronization to activate VMs, including existing and newly-created ones.
Trigger an activation and policy assignment
Your VMs are now ready to be activated and assigned a policy.
- If you chose Method 1, you'll need to manually synchronize the vCenter. Go to Deep Security Manager, right-click the vCenter on the left, and select Synchronize Now. Your existing VMs should now be protected.
- If you chose Method 2 or 3, all VMs should be activated and assigned policy automatically now. To check, see the next step.
Check that VMs are activated and assigned a policy
You must now check that VMs were activated and assigned a policy successfully.
To check:
- In Deep Security Manager, click Computers at the top.
- On the left, expand Computers > <your_vCenter> > Virtual Machines.
- Check the TASK(S) and STATUS and columns. (Click Columns at the top to add them if they are not visible.) The TASK(S) column should indicate Activating, and your VMs should move from the Unmanaged (Unknown) status, to the Unmanaged (No Agent) status, to the Managed (Online) status. You may see the VMs move into the VMware Tools Not Installed status, but this is temporary.
- Check the POLICY column to make sure the correct Deep Security policy was assigned.
You have now deployed Deep Security Virtual Appliance and protected your VMs with it.