Deep Security 11 has reached end of support. Use the version selector (above) to see more recent versions of the Help Center.
Integrate with VMware Site Recovery Manager
You can integrate Deep Security with VMware vCenter Site Recovery Manager (SRM) to provide disaster recovery, high availability (HA), and failover for your Deep Security-protected VMs. This topic describes this integration, and assumes you are using VMware vCenter SRM 8.1 as well as the Deep Security Virtual Appliance.
To keep things simple, an example configuration has been chosen as the basis for the instructions here. The expectation is that you will customize and build upon these instructions to implement a custom disaster recovery plan of your own.
Topics:
- Integration overview
- Pre-integration tasks
- Step 1: Set up a recovery plan in SRM
- Step 2: Check your recovery plan on vSphere Client
- Step 3: Deploy Deep Security Manager, its database, and a relay
- Step 4: Deploy Deep Security Virtual Appliance
- Step 5: Configure agent-initiated activation
- Step 6: Disable the default event-based tasks
- Step 7: Assign policies and activate VMs on the protected site
- Ready to test
Integration overview
For an overview of the integration, see these sub-topics:
Architecture
The following diagram shows the disaster recovery architecture that will be used in this example.
The diagram uses these abbreviations:
- Rep appl: VMware Replication appliance
- SRM: VMware Site Recovery Manager
- NSX: VMware NSX Data Center for vSphere
- vCenter: VMware vCenter Server
- VM: guest Virtual Machine
- External PSC: external VMware Platform Services Controller
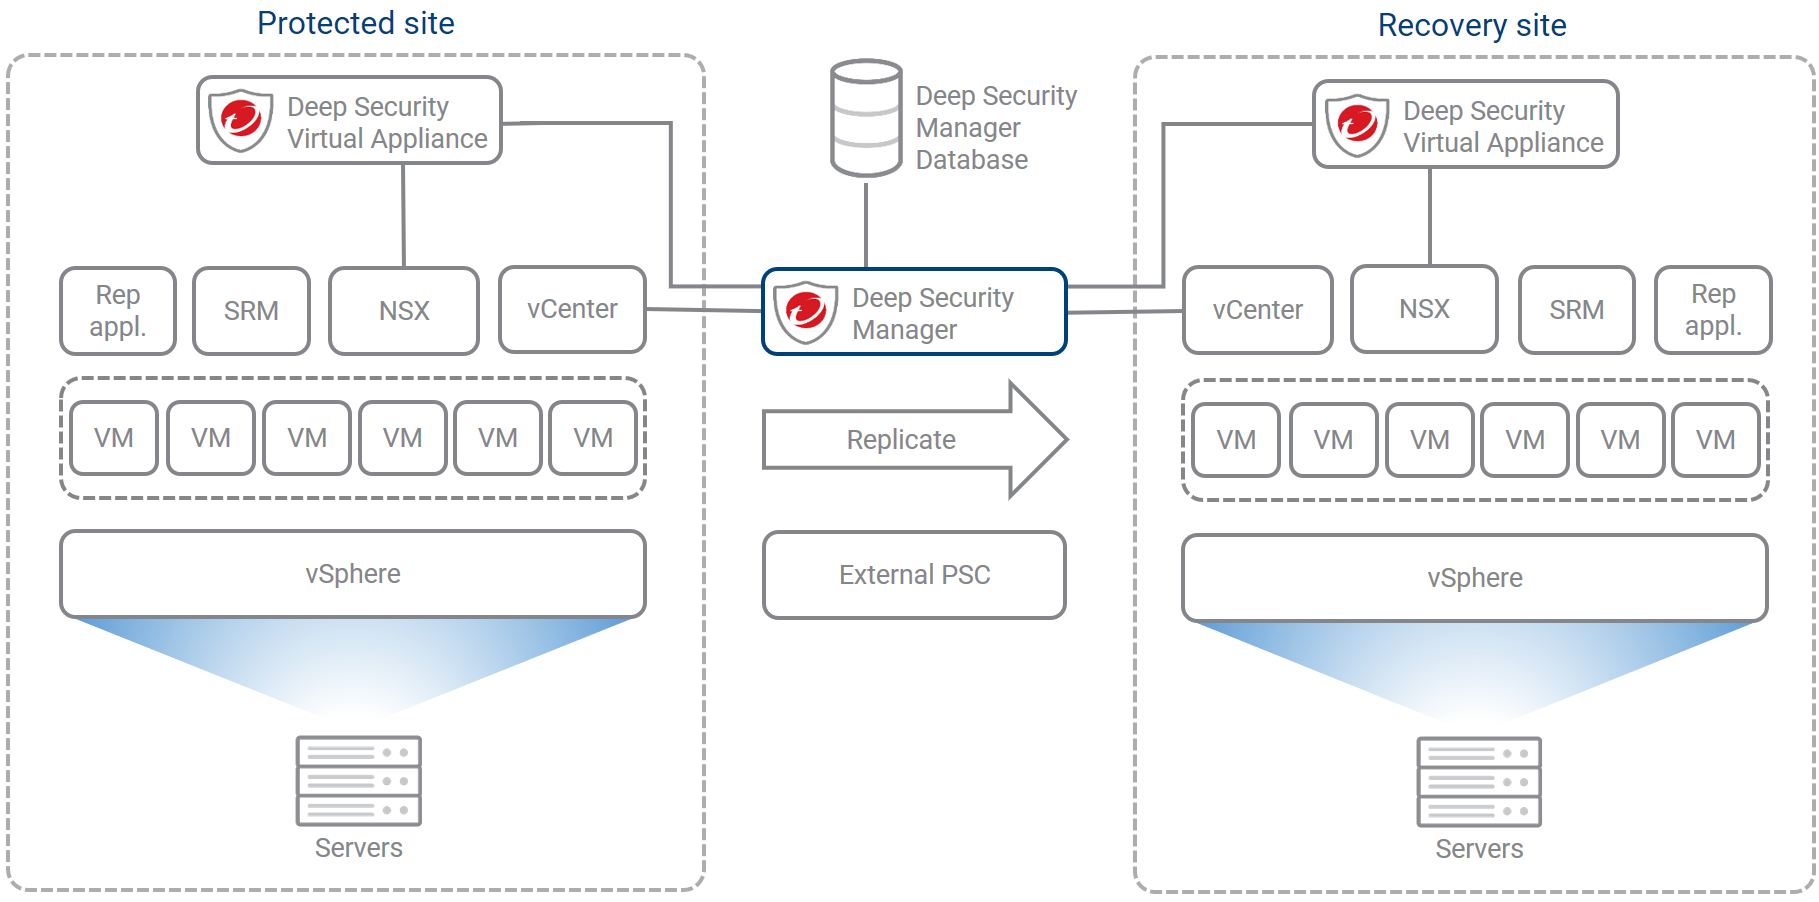
Note the following:
- Some components are installed at both the protected and recovery sites. Examples: guest VMs, NSX, SRM. Others exist as standalone servers outside the protected and recovery sites. Examples: Deep Security Manager, VMware Platform Services Controller (PSC).
- NSX is deployed as standalone server for each vCenter server. You can use cross-vCenter NSX if you want.
- vSphere Replication appliance is configured to use its embedded database.
- SRM is configured to use its embedded database.
- Although this architecture shows a single Deep Security Manager and database, you can run Deep Security Manager on multiple nodes (connected to a shared database), or you can run separate managers at each site (each with its own database). A recovery plan for the manager and its database should be configured separately. These configurations are outside the scope of this topic.
- PSC is installed as an external PSC (as opposed to embedded within the vCenter server). You can use an embedded PSC if you want.
Component list and versions
The example configuration in this topic uses the following components.
Trend Micro components:
- Deep Security Manager 11.0.270
- Deep Security Manager database (Microsoft SQL Sever 2014)
- Deep Security Virtual Appliance (appliance SVM) 11.0.0.211
- Deep Security Agent (for Windows x64) 11.0.0.439 (used for the Deep Security Relay)
- Deep Security Agent (for Red Hat 7 x64) 11.0.0.439 (used for the Deep Security Virtual Appliance's embedded agent. The appliance comes with version 11.0.0.211 of the agent, but it was upgraded to 11.0.0.439 for this example.)
VMware components:
- vCenter 6.7 U1 (6.7.0-10244745)
- PSC (available with vCenter)
- ESXi 6.7 U1 (6.7.0-10302608)
- NSX 6.4.3-9927516
- SRM 8.1.0-9569154
- Replication appliance 8.1.0.1 (8.1.0-8310693)
Supported Deep Security features
The SRM integration supports the same Deep Security features as the basic Deep Security Virtual Appliance deployment. For a list of supported features, see VMware deployments with the virtual appliance and NSX 6.3 or higher. For a more detailed list that includes supported sub-features, see Deep Security Virtual Appliance (NSX) supported guest OS's.
Pre-integration tasks
Before you begin your SRM/Deep Security integration,
Do:
- Make sure you have installed all VMware components listed in Component list and versions.
For instructions on installing and configuring VMware components, see the VMware documentation.
Do not:
- Set up a recovery site or SRM recovery plan. The recovery plan setup is explained in this topic. If you have already set up a recovery plan, review this topic to make sure you've done it properly and change the plan if needed.
- Set up any Trend Micro components listed in Component list and versions. The component installation is explained in this topic. If you've already set up these components, review this topic to make sure you've done the setup properly and change the configurations if needed.
Step 1: Set up a recovery plan in SRM
You must set up a recovery site and recovery plan in SRM. The high-level steps are below. For detailed steps, see your SRM documentation.
- Pair sites.
- Choose the protected site and the recovery site.
- Plan and configure the resource mappings.
- Create replications.
- You can use vSphere Replication (VR) or array-based replication with storage replication adapters (SRAs).
- In this example, we chose vSphere Replication (VR) to create individual VM replications which are referenced in the recovery plan.
- Create protection groups. In this example, we created protection groups of type Individual VMs (vSphere Replication).
- Create and execute the recovery plan.
- Configure protection groups in the recovery plan.
- Run the recovery plan.
- Reprotect the VMs.
Step 2: Check your recovery plan on vSphere Client
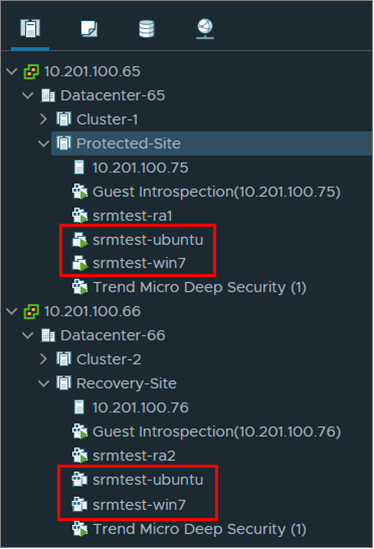
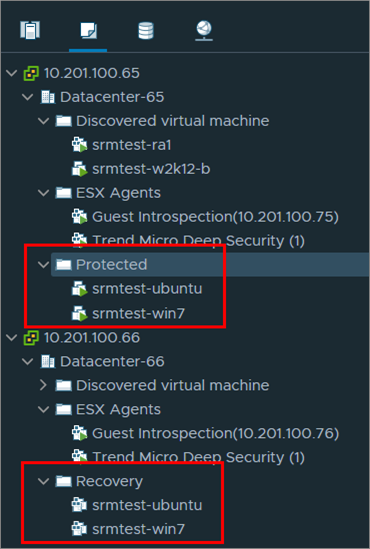
After running the recovery plan and reprotecting the VMs, you must check that your VMs are present on the protected and recovery sites. In our example configuration, there are 2 VMs in the recovery plan, srmtest-ubuntu and srmtest-win7, so they must appear on both sites.
To check that your VMs appear on both sites:
- Go to vSphere Client.
- Check that your VMs appear in separate Protected-Site and Recovery-Site folders in Host and Clusters:
- Check that your VMs also appear under Protected and Recovery folders in VMs and Templates:
Step 3: Deploy Deep Security Manager, its database, and a relay
- Prepare a database for Deep Security Manager. In our example, we installed Microsoft SQL Server 2014.
- Install Deep Security Manager. In our example, we installed Deep Security Manager on Windows Server 2012 R2.
- Install Deep Security Relay. In our example,we installed a relay-enabled agent as part of the manager installation. We used Deep Security Agent (for Windows x64) 11.0.0.439.
Step 4: Deploy Deep Security Virtual Appliance
Deploy the appliance following the steps in Deploy the Deep Security Virtual Appliance with NSX When working through those steps:
- Make sure you run through the steps twice: once for the protected site, and once for the recovery site.
- Skip these steps for both sites:
You can safely skip these steps because alternative instructions are provided in this topic.
After running through the steps in Deploy the Deep Security Virtual Appliance with NSX on both sites, skipping some steps as indicated above, you'll observe the following:
- In Deep Security Manager, under Computers, both the protected site VMs and recovery site VMs are displayed as separate computers under Computers in the manager. The VM status appears as follows:
- For VMs on the protected site: Unmanaged (Unknown)
- For VMs on the recovery site: Unmanaged (VM Stopped)
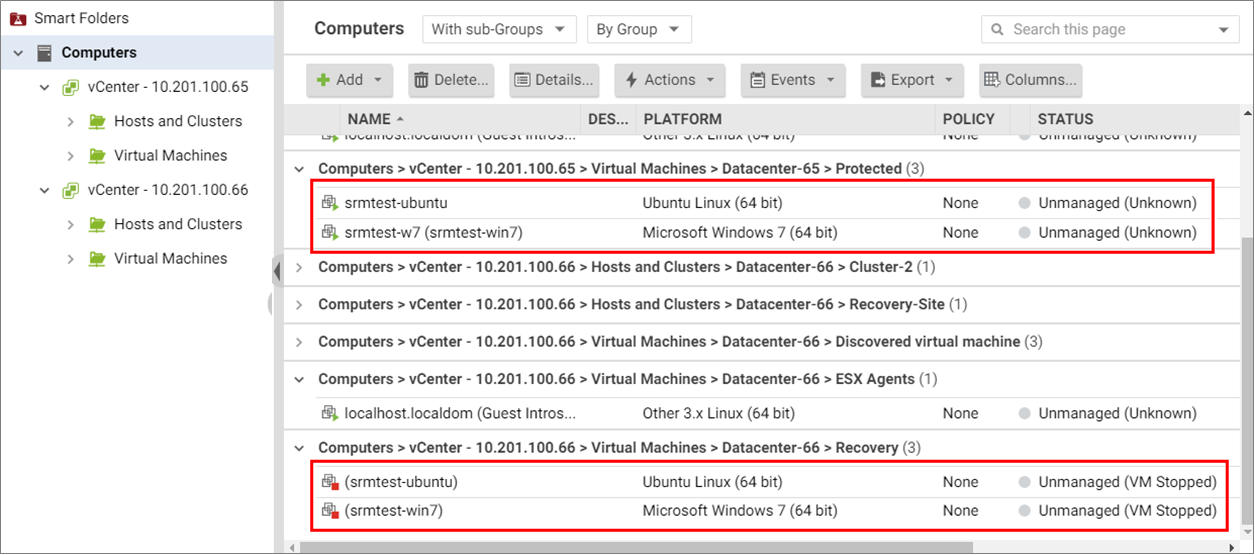
- In vSphere client:
- the Trend Micro Deep Security service appears on the NSX Manager at the protected site and the recovery site.
- the Guest Introspection service—if you deployed it—also appears on the NSX Manager at the protected site and the recovery site.
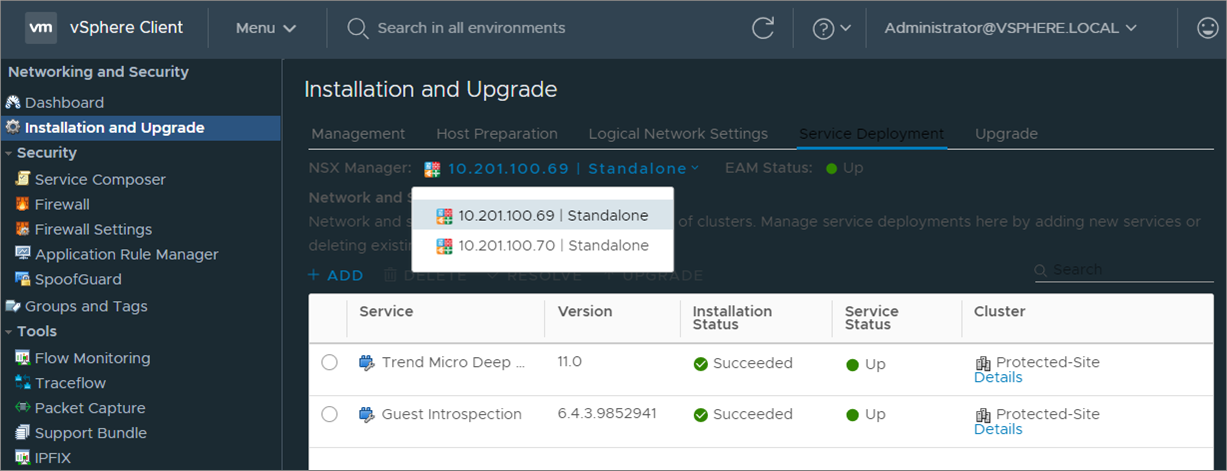
- In NSX Manager on the protected site and recovery site, your NSX security groups appear:


Step 5: Configure agent-initiated activation
- In Deep Security Manager, go to Administration > System Settings.
- In the main pane, click the Agents tab.
- Enable Allow Agent-Initiated Activation and select For Any Computers.
- From the drop-down list on the right, select Re-activate the existing Computer.

The following table shows the current BIOS UUIDs of the 2 VMs that are part of the recovery plan. Notice how their UUIDs are different on the protected and recovery sites.
The UUIDs shown below are abbreviated. Typically, a UUID is a lot longer and looks more like this: 421e2ecd-41ea-8298-2b13-4d0793b6c07f.
VM BIOS UUID (UUIDs are DIFFERENT at each site) VM Name Protected-Site Recovery-Site (VM Stand-by/ Off) srmtest-ubuntu AAA ZZZ srmtest-win7 BBB YYY
Step 6: Disable the default event-based tasks
You must disable the default EBTs to avoid unexpected issues when activating and deactivating VMs through the manager. These issues are related to duplicated VM UUIDs, which occur when a recovery plan is executed.
- In Deep Security Manager, go to Administration > Event-Based Tasks.
- Look for the default EBTs shown in the image below. There should be two Activate vCenter EBTs, and two Deactivate vCenter EBTs. There are duplicate EBTs because they map to the two vCenters: one on the protected site (*.65), and one on the replicated site (*.66).
- Right-click each and select Disable.
- (Optional) Leave any other EBTs enabled.
- When you have finished disabling the default EBTs, Deep Security Manager should look like this:

Step 7: Assign policies and activate VMs on the protected site
- In Deep Security Manager, go to Computers and find the protected site. In our example, it's under the [...] Datacenter-65 > Protected heading.
- Under the protected site, right-click a VM and select:
- Action > Assign Policy to assign a policy to the VM manually.
- Action > Activate/Reactivate to activate the VM manually.
At the time of writing, only manual activation and deactivation have been tested and are supported.
In this example, srmtest-ubuntu was assigned the Ubuntu Linux policy, and srmtest-w7 was assigned the Windows Desktop policy. Both were then activated. After activation, the VMs appear in Deep Security Manager like this:

Ready to test
You have now set up an SRM recovery plan and enabled Deep Security protection on your VMs. You must now test your SRM recovery plan. Go to Test the VMware Site Recovery Manager integration.