Deep Security 11 has reached end of support. Use the version selector (above) to see more recent versions of the Help Center.
Test the VMware Site Recovery Manager integration
After integrating Deep Security with VMware Site Recovery Manager (SRM), you are ready to test the integration. Follow these steps:
- Step 1: At the protected site, assess rules
- Step 2: At the protected site, test agentless protection
- Step 3: Fail over
- Step 5: At the recovery site, test agentless protection
- Step 6: Fail back
- Step 7: At the protected site, test agentless protection
- Test list and expected results
Step 1: At the protected site, assess rules
Before attempting a failover, you'll need to assess the Intrusion Prevention and Integrity Monitoring rules assigned to VMs on your protected site. It is important to know which rules are in use so that you can re-assign them to VMs on the recovery site after a failover.
To assess the assigned rules:
- Go to Deep Security Manager and click Computers.
- Look for the protected site. In our example, the protected site is listed under the [...] Datacenter-65 > Protected heading.
- (Optional) Right-click a VM on the protected site and run a recommendation scan and assign the recommended rules manually or automatically. In this example, we run recommendation scans on srmtest-w7 and srmtest-ubuntu and assign all recommended rules.
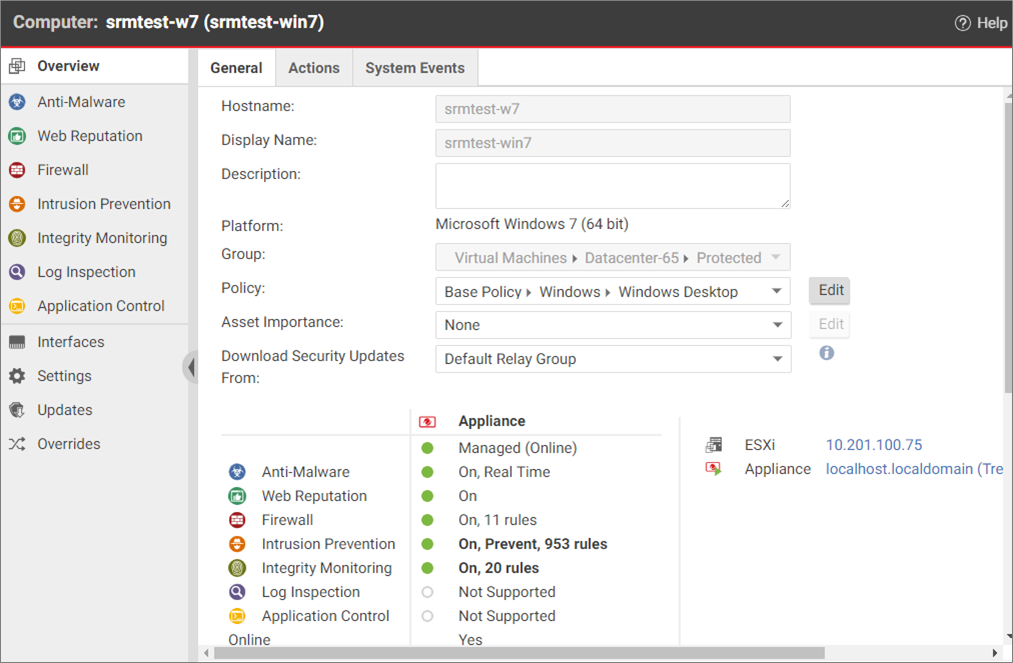
- Double-click a protected VM and on its General tab, look for the Intrusion Prevention and Integrity Monitoring fields.
- Write down how many rules are assigned. In our example, we assigned 953 Intrusion Prevention rules and 20 Integrity Monitoring rules to srmtest-w7.
These rules will not be carried over to the recovery site.

Step 2: At the protected site, test agentless protection
Before attempting a failover, go to the protected site and test agentless protection on the VMs to ensure that everything is working.
The types of tests you should conduct and the expected results are described in Test list and expected results.
Step 3: Fail over
You are now ready to fail over to the recovery site. Follow these steps:
- 3a. Run the SRM recovery plan
- 3b. Check that the correct VMs are powered on and off
- 3c. Check your Deep Security events
- 3d. Deactivate the protected site VMs
- 3e. Reprotect the recovery site VMs
- 3f. Activate and assign policies to the recovery site VMs
- 3g. Assign rules on the recovery site VMs (run a recommendation scan)
3a. Run the SRM recovery plan
See your SRM documentation for instructions on running the SRM recovery plan. When the plan executes, your VMs are migrated from the protected site to the recovery site. The images below show the recovery plan being run. You can see that the Status changes from ready, to 'in progress', to complete.


After the recovery plan has completed, the VMs on the protected site are powered off and the VMs on the recovery site are powered on.
3b. Check that the correct VMs are powered on and off
- Go to Deep Security Manager and click Computers.
- Look for the protected site. In our example, the protected site is listed under the [...] Datacenter-65 > Protected heading.
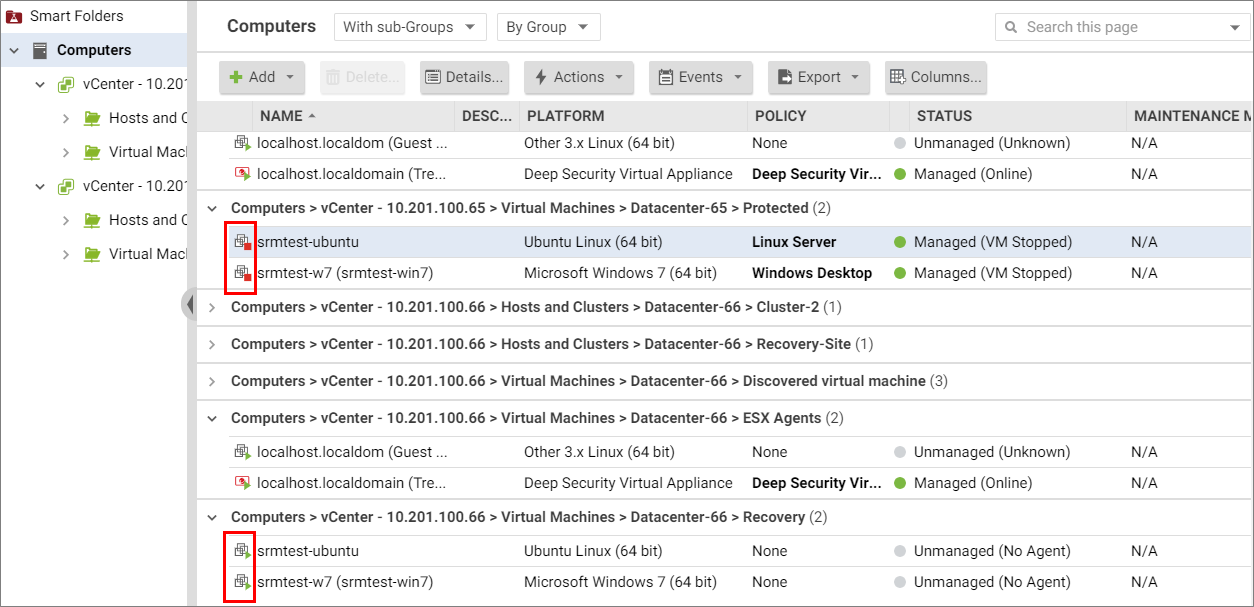
- Check that the VMs on the protected site have switched from...
 to...
to...
- Check that the icons for the VMs on the recovery site have changed from...
 to...
to...

The following table shows the BIOS UUIDs of the 2 VMs that are part of the recovery plan. Notice how their UUIDs are now the same on the protected and recovery sites. (The UUIDs from the protected site have been replicated on the recovery site.) The UUIDs remain the same until you trigger a reprotection (coming up later).
| VM BIOS UUID (UUIDs are the SAME at each site) | ||
|---|---|---|
| VM Name | Protected site (VM Stand-by/ Off) | Recovery site |
| srmtest-ubuntu | AAA | AAA |
| srmtest-win7 | BBB | BBB |
3c. Check your Deep Security events
- Go to Deep Security Manager and click Events & Reports > System Events.
- Check the System Events page. You may see Duplicate Unique Identifiers Detected events as a result of the UUIDs being the same for the protected and replicated VMs. This event is expected and can be ignored.
3d. Deactivate the protected site VMs
- Go to Deep Security Manager and click Computers.
- Find the protected site. In our example, it's under the [...] Datacenter-65 > Protected heading.
- Deactivate the VMs on the protected site by right-clicking them and selecting Actions > Deactivate. Their status changes from Managed (VM Stopped) to Unmanaged (VM Stopped). The green dot changes to grey.

3e. Reprotect the recovery site VMs
See your SRM documentation for details.
The reprotect process unfolds in two stages:
- First, SRM reverses the direction of protection.
- Next, SRM synchronizes the storage between the new protected site and the new recovery site.
Below is the recovery plan status after the reprotect operation. You can see the direction has been updated (*.66 and *.65 have been swapped).

The following table shows the current BIOS UUIDs of the 2 VMs that are part of the recovery plan. Notice how their UUIDs are now different. New UUIDs have been created for the protected site.
| VM BIOS UUID (UUIDs are the DIFFERENT at each site) | ||
|---|---|---|
| VM Name | Protected site (VM Stand-by/ Off) | Recovery site |
| srmtest-ubuntu | MMM | AAA |
| srmtest-win7 | NNN | BBB |
3f. Activate and assign policies to the recovery site VMs
- Go to Deep Security Manager and click Computers.
- Find the recovery site. In our example, it's under the [...] Datacenter-65 > Recovery heading.
- Under the recovery site, right-click a VM and select:
- Action > Assign Policy to assign a policy to the VM manually.
- Action > Activate/Reactivate to activate the VM manually.
At the time of writing, only manual activation and deactivation have been tested and are supported.
In this example, srmtest-ubuntu was assigned the Ubuntu Linux policy, and srmtest-w7 was assigned the Windows Desktop policy. Both were then activated. After activation, the VMs appear in Deep Security Manager like this:

3g. Assign rules on the recovery site VMs (run a recommendation scan)
- Go to Deep Security Manager and click Computers.
- Look for the recovery site. In our example, the recovery site is listed under the [...] Datacenter-65 > Recovery heading.
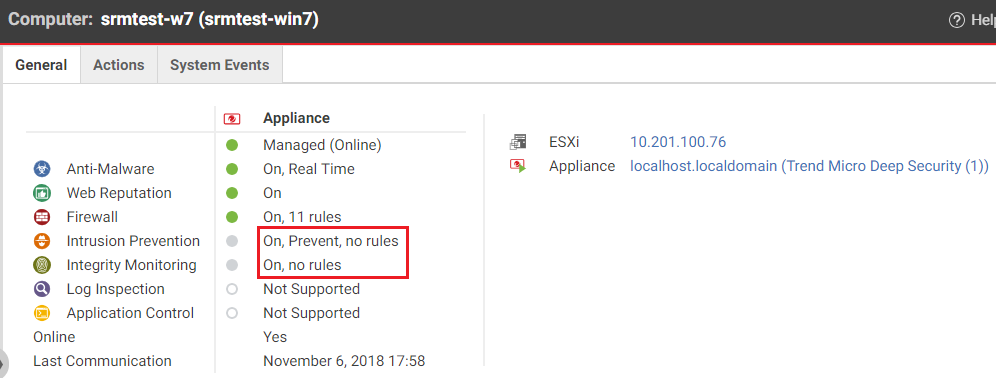
- Double-click a protected VM and on its General tab, look for the Intrusion Prevention and Integrity Monitoring fields. Notice that the Intrusion Prevention and Integrity Monitoring modules are on, but there are no rules assigned. Rules are not carried over to the VMs on the recovery site.

- Assign rules by right-clicking a VM on the recovery site and running a recommendation scan and then assigning the proposed rules. In this example, we run recommendation scans on srmtest-w7 and srmtest-ubuntu and assign all recommended rules.
- Check that the assigned rules on the VM on the recovery site.
Your rules should match in number to those on the pre-failover protected site.
Step 5: At the recovery site, test agentless protection
At the recovery site, test agentless protection on the VMs to ensure that failover has succeeded.
The types of tests you should conduct and the expected results are described in Test list and expected results.
Step 6: Fail back
Run the SRM recovery plan again to migrate your VMs from the recovery site back to the protected site (failback). For high-level steps, see below. For detailed steps, see Step 3: Fail over but complete the steps on the opposite site than the one indicated. In other words, when you're told to complete a task on the protected site, do it on the recovery site, and vice versa.
The high-level steps to fail back are:
- Run the SRM recovery plan to migrate VMs back to the protected site.
- Check that the correct VMs are powered on and off. The recovery site VMs are powered off; the protected site VMs are powered on.
- Check your Deep Security events.
- Deactivate the recovery site VMs.
- Reprotect the protected site VMs.
- Activate and assign policies to the protected site VMs.
- Assign rules on the protected site VMs (run a recommendation scan).
Step 7: At the protected site, test agentless protection
At the protected site, test agentless protection on the VMs to confirm that failback has succeeded.
The types of tests you should conduct and the expected results are described in Test list and expected results.
Test list and expected results
The table below shows the tests you should perform on your VMs and the expected results. The tests should be performed on the active site, whichever one that may be (either the protected site or recovery site).
If you obtain the expected results, you'll know your agentless protection is working on the active site.
| Test | Expected result | |
|---|---|---|
| srmtest-ubuntu (Linux VM) | srmtest-win7 (Windows VM) | |
| Test activation. Instructions. | Pass | Pass |
| Test Anti-Malware real-time. Instructions. |
Not supported |
Pass |
| Test Web Reputation. Instructions. | Pass | Pass |
| Test Firewall rules. Instructions. | Pass | Pass |
| Test Intrusion Prevention. Instructions. | Pass | Pass |
| Test Integrity Monitoring. Instructions. |
Not supported |
Pass |
| Do not test Log Inspection. It is not supported. |
Not supported |
Not supported |
| Do not test Application Control. It is not supported. |
Not supported |
Not supported |
At the time of writing, only manual activation and deactivation have been tested and are supported.