Deep Security 12 FR has reached end of support. Use the version selector (above) to see more recent versions of the Help Center.
Upgrade the appliance
After completing the pre-upgrade tasks, you are ready to upgrade the appliance. You have a few upgrade options:
- Option 1: Upgrade an existing appliance SVM automatically.
- Option 2: Upgrade an existing appliance SVM manually. Use this option if protection loss of your guest VMs during the upgrade is unacceptable.
- Option 3: Upgrade the agent embedded on the appliance SVM and apply OS patches. Use this option if you want the latest protection features offered by the newest agent software without having to complete a full appliance SVM upgrade.
If you are using NSX-T, you can use Option 2 or 3.
If you are using NSX-V, you can use any Option.
See also Upgrade the NSX license for more Deep Security features.
Upgrade an existing appliance SVM automatically
With this upgrade option, your guest VMs lose protection during the upgrade process, which takes five to fifteen minutes depending on the resources of your VMware components and network stability. If you would like to maintain protection of the guest VMs, see instead Upgrade an existing appliance SVM manually.
Any resource adjustments or custom configurations you may have made to the current appliance SVM, such as extending the CPU or memory or changing a password, will not be carried over to the new appliance SVM after the upgrade. You will need to manually re-apply these configurations when the upgrade finishes.
To upgrade the appliance SVM automatically, follow these steps:
- Step 1: Set up permissions
- Step 2: Import the new virtual appliance packages into the manager
- Step 3: Upgrade the appliance SVM in the manager
- Step 4: Final step
Step 1: Set up permissions
- Make sure that the vCenter account that you specified in Deep Security Manager has these permissions:
- VirtualMachine.Interaction.Power Off, and
- VirtualMachine.Inventory.Remove, and
- ESX Agent Manager.Modify
- Make sure that the NSX Manager account that you specified in Deep Security Manager belongs to one of these NSX Manager roles:
- Security Engineer, or
- Security Administrator, or
- Enterprise Administrator
Step 2: Import the new virtual appliance packages into the manager
After completing the tasks in Before deploying the appliance, you are ready to import the appliance ZIP into Deep Security Manager.
As an alternative to importing the appliance ZIP, you can place the OVF file at a URL location to make it faster for NSX to download. For details, see Configure the appliance OVF location.
- Go to:
-
Download the Deep Security Virtual Appliance package. Check the version requirements in system requirements.
You can import multiple versions of the appliance. The manager will choose the newest package.
- On Deep Security Manager, go to Administration > Updates > Software > Local.
-
Click Import and upload the package to Deep Security Manager.
On import, Deep Security Manager also automatically downloads and imports an agent that is compatible with the operating system of the virtual appliance VM. This agent has the same protection modules as Deep Security Agent for 64-bit Red Hat Enterprise Linux.
-
If you want to specify a different embedded agent, go to Administration > System Settings > Updates and look for Virtual Appliance Deployment. By default, the Virtual Appliance Deployment option is set to Latest Available (Recommended). This indicates to the manager to upgrade the virtual appliance to use the newest imported, embedded agent. Change this setting, as required.
Step 3: Upgrade the appliance SVM in the manager
- In Deep Security Manager, click Computers at the top.
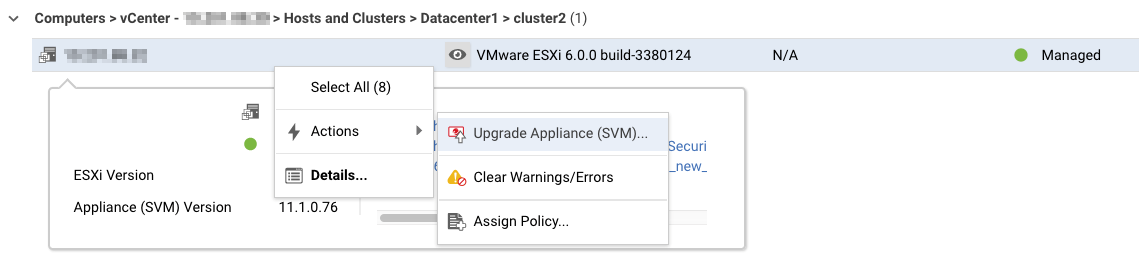
- Find the ESXi host where your existing appliance SVM is located. The ESXi host has its PLATFORM column set to VMware ESXi <version_build> (see image below). (It is not a computer with a PLATFORM of Deep Security Virtual Appliance.)
- Right-click the ESXi host and select Actions > Upgrade Appliance (SVM).
You can use Shift+click to select multiple ESXi hosts, if you want to upgrade several at once.
The Upgrade Appliance (SVM) option is only available if the latest virtual appliance package in Local Software is newer than the one that's currently in use. To make the option available, try importing the latest appliance package. If that doesn't work, it's likely because you're already using the latest version of the appliance SVM. To check, look at the Appliance (SVM) Version property on the computer details page of the appliance virtual machine.
The Upgrade Appliance (SVM) page appears with a check box, warnings, and a note.
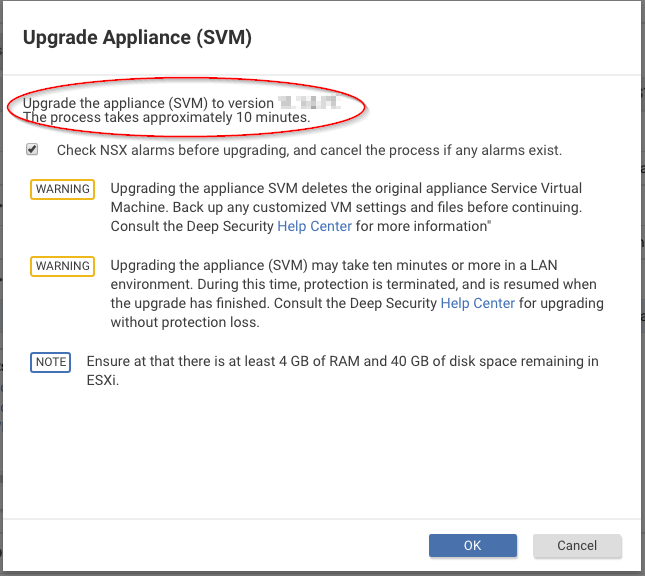
During the upgrade, the appliance (SVM) will be shut down for about 3 - 10 minutes depending on your vCenter and ESX resources.
- (Optional.) Select Check NSX alarms before upgrade, and cancel the process if any alarms exist if you want the manager to check the service status from NSX Manager before the upgrade begins. Deselect the check box if you want to skip the check and proceed with the upgrade despite possible alarms.
- Review the warnings and note on the page.
- Click OK.
The upgrade process begins, including a pre-upgrade service status check, if you enabled it.
- (Optional.) Still in the manager, go back to the Computers page, find your ESXi host, and look at its TASK(S) column to view the status of the upgrade.
If you previously shift+clicked several ESXi hosts on which to perform an upgrade, the ESXi hosts are processed sequentially (one at a time). You can look at the TASK(S) column to find out which server is currently being processed.
The TASK(S) column displays one of the following:
- Upgrading Appliance (SVM) (Pending): The manager has received the upgrade request, but has not yet put it into the queue.
- Upgrading Appliance (SVM) (In Queue): The manager has queued the process, and will start the upgrade soon.
- Upgrading Appliance (SVM) (In Progress): The manager is processing the upgrade.
- (Optional.) Still in the manager, go to the Computer Details page of one of your ESXi hosts and click the System Events tab to verify that the upgrade is proceeding successfully.
Below is a sample of the system events you'll see when an upgrade is successful. For more events, see this complete list of appliance SVM upgrade events.

If you see the Appliance (SVM) Upgrade Failed system event, see Troubleshooting the 'Appliance (SVM) Upgrade Failed' system event.
Troubleshooting the 'Appliance (SVM) Upgrade Failed' system event
If you see the Appliance (SVM) Upgrade Failed system event, review its detailed description for the reason and possible fix. In the worst case scenario, you can go to the NSX Manager console and click the Resolve button (see the image below). Clicking this button manually resolves any alarms and redeploys the appliance. Guest VMs are activated according to how you set up activation when you deployed your old Deep Security Virtual Appliance. For details on activation set up, see the activation section of Deploy the appliance (NSX-V).
Step 4: Final step
The appliance SVM should be upgraded successfully. Go to the manager's Computers page and double-check that the appliance SVM and all the guest VMs are back in their protected state (green dot).
Upgrade an existing appliance SVM manually
With a manual upgrade, you'll use the vMotion mechanism to preserve the guest VMs' protection while the upgrade occurs.
To upgrade the appliance SVM, follow these steps:
- Step 1: Import the new virtual appliance packages into the manager
- Step 2: Review or restore identified files
- Step 3: Migrate guest VMs to another ESXi host
- Step 4: Upgrade your old appliance SVM
- Step 5: Check that maintenance mode was turned off
- Step 6: Check that the new appliance SVM is activated
- Step 8: Final step
Step 1: Import the new virtual appliance packages into the manager
After completing the tasks in Before deploying the appliance, you are ready to import the appliance ZIP into Deep Security Manager.
As an alternative to importing the appliance ZIP, you can place the OVF file at a URL location to make it faster for NSX to download. For details, see Configure the appliance OVF location.
- Go to:
-
Download the Deep Security Virtual Appliance package. Check the version requirements in system requirements.
You can import multiple versions of the appliance. The manager will choose the newest package.
- On Deep Security Manager, go to Administration > Updates > Software > Local.
-
Click Import and upload the package to Deep Security Manager.
On import, Deep Security Manager also automatically downloads and imports an agent that is compatible with the operating system of the virtual appliance VM. This agent has the same protection modules as Deep Security Agent for 64-bit Red Hat Enterprise Linux.
-
If you want to specify a different embedded agent, go to Administration > System Settings > Updates and look for Virtual Appliance Deployment. By default, the Virtual Appliance Deployment option is set to Latest Available (Recommended). This indicates to the manager to upgrade the virtual appliance to use the newest imported, embedded agent. Change this setting, as required.
Step 2: Review or restore identified files
- Review or restore identified files as necessary because identified files will be lost when you move your VMs or delete the Deep Security Virtual Appliance.
Step 3: Migrate guest VMs to another ESXi host
Skip this section if you are using NSX-T 3.x.
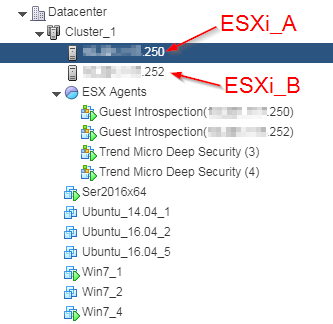
For brevity, this procedure uses these terms:
- ESXi_A is the ESXi server with the virtual appliance that you want to upgrade.
-
ESXi_B is the ESXi server where guest VMs are migrated to while the appliance SVM upgrade occurs. We assume it is under the same cluster as ESXi_A.
- Enable DRS for the cluster and make sure it has an automation level of Fully Automated. See this VMware article for details.
- Find ESXi_A and place this ESXi server in maintenance mode.
When you enter maintenance mode:
- ESXi_A's guest VMs are migrated automatically (using vMotion) to ESXi_B in your cluster.
- The Deep Security Virtual Appliance that is protecting ESXi_A is shut down automatically.
- Your guest VMs can no longer be powered on until ESXi_A is out of maintenance mode.
Step 4: Upgrade your old appliance SVM
- Go to VMware vSphere Web Client > Hosts and Clusters.
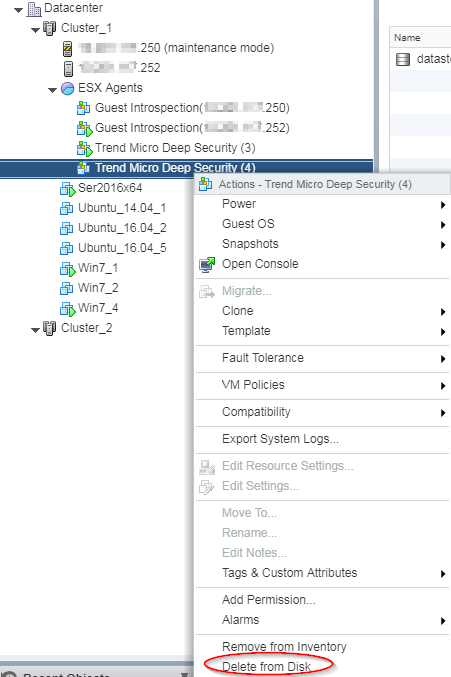
- Find the Trend Micro Deep Security appliance SVM that is powered off. It's the one without a green arrow (shown in the following image). The appliance SVM was automatically powered off when you put the corresponding ESXi server into maintenance mode.
- Right-click the Trend Micro Deep Security appliance SVM that is powered off and select Delete from Disk.
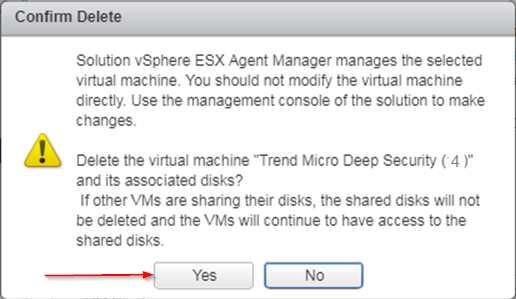
- If you see a Confirm Delete message, click Yes.
- If the deletion fails with this message...
This operation not allowed in the current state
Do this:
- Right-click the Trend Micro Deep Security appliance SVM again, and this time select Remove from Inventory (which appears just above Delete from Disk). This removes the appliance SVM from vCenter but preserves it in the datastore.
- In the navigation pane, select the datastore tab and select the datastore where the old virtual appliance resides.
- In the main pane, select the Files tab.
- Right-click the old appliance SVM folder and select Delete File.

- If you are using NSX-V, skip to The NSX-V instructions
If you are using NSX-T 2.x, skip to The NSX-T 2.x instructions.
The NSX-V instructions
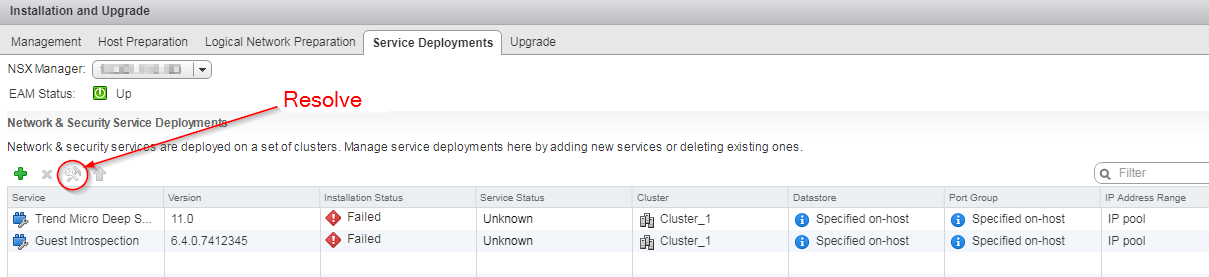
- Open VMware vSphere Web Client, go to Home > Networking and Security > Installation > Service Deployments.
You see the following:
- The deleted Trend Micro Deep Security appliance SVM Installation Status column shows Failed.
- If you are in maintenance mode, the Guest Introspection service also shows as Failed.
- Click the Resolve button on the Guest Introspection service if its Installation Status is Failed. The Failed status changes to Enabling and then to Succeeded. The Guest Introspection service is powered on and maintenance mode is exited.
Click the Resolve button on the Trend Micro Deep Security service that is Failed.The Failed status changes to Enabling and then to Succeeded. The following occurred:
- The Trend Micro Deep Security appliance SVM was redeployed with the latest software that you loaded into Deep Security Manager.
- The appliance SVM was activated.
- The embedded agent on the appliance SVM was auto-upgraded to the latest compatible version in Local Software by default.
This ends the NSX-V instructions. You can proceed to Step 5: Check that maintenance mode was turned off.
The NSX-T 2.x instructions
- Open the NSX-T Manager and go to System > Service Deployments > DEPLOYMENT.
- You see the following:
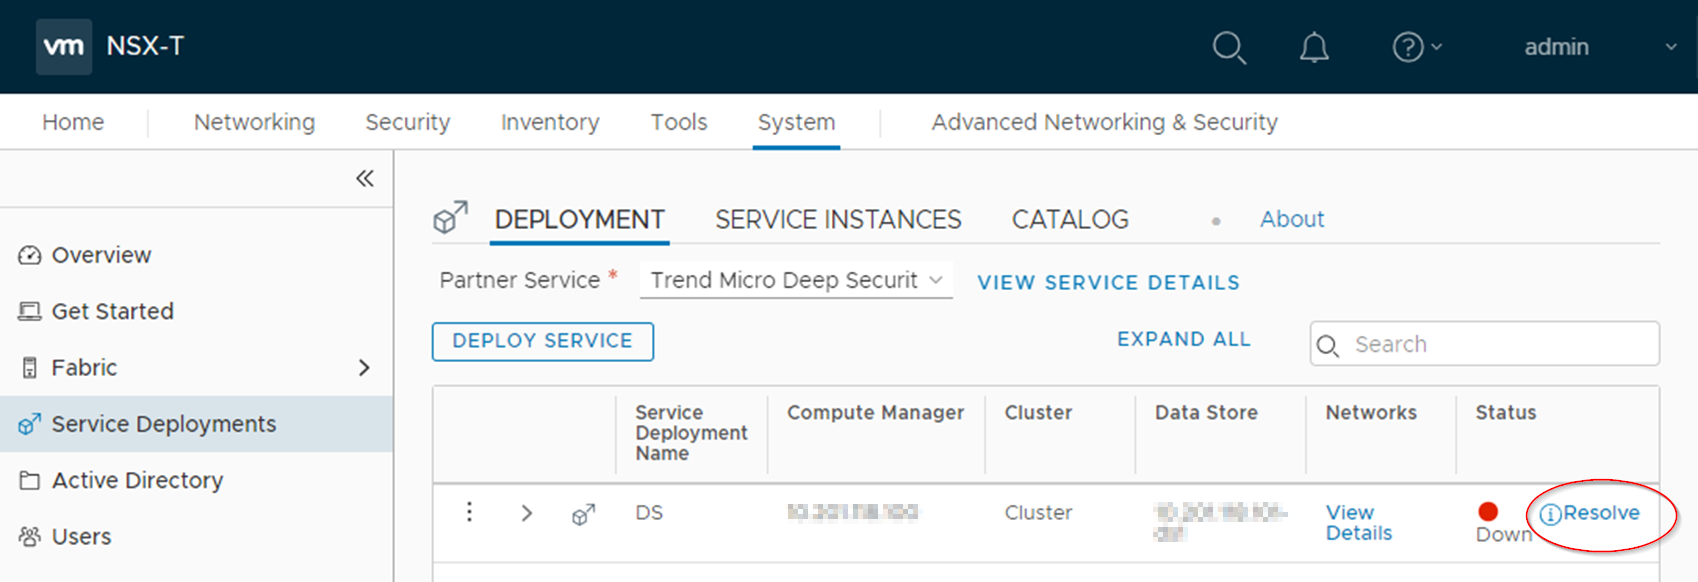
- Click Resolve > RESOLVE ALL > OK. The Status should change from Down, to In Progress, to Up.
This ends the NSX-T 2.x instructions. You can proceed to Step 5: Check that maintenance mode was turned off.
In NSX-T Manager, go to System > Service Deployments > DEPLOYMENT.
Click the menu icon (three dots) > Change Appliance.

c. Select the appliance that you want to update and click UPDATE button.
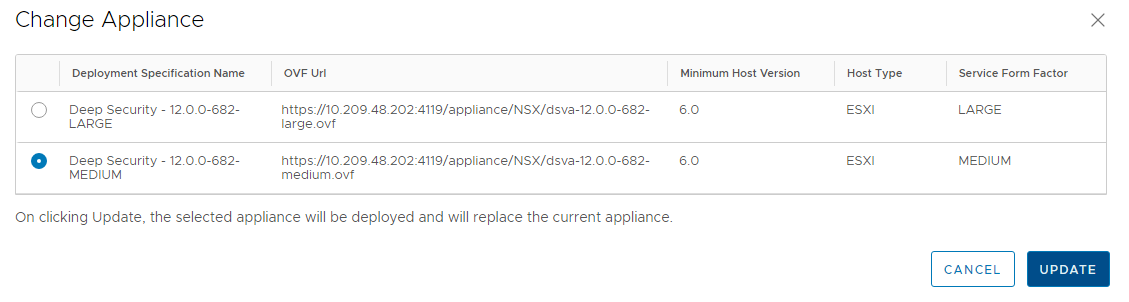
Wait for the upgrade process to complete, and then go directly to Step 6: Check that the new appliance SVM is activated.
Step 5: Check that maintenance mode was turned off
Skip this section if you are using NSX-T 3.x.
- Check that maintenance mode was turned off if you enabled it previously. If it is still on, turn it off now.
Step 6: Check that the new appliance SVM is activated
- In Deep Security Manager, at the top, click Computers.
- Find Trend Micro Deep Security in the list and double-click it. This is the appliance.
- Check the following:
- Check that the status is set to Managed (Online). This indicates that the agent was successfully activated.
- Check that the Virtual Appliance Version is set to the version of the embedded Deep Security Agent. This version should match the version of the newest agent software found under Administration > Updates > Software > Local or a specific version you set in Administration > System Settings > Updates > Virtual Appliance Deployment.
- Check that the Appliance (SVM) Version is set to the version of the newest Deep Security Virtual Appliance package under Administration > Updates > Software > Local.

You have now upgraded your appliance SVM.
Step 8: Final step
- Repeat all the steps in this section, starting at Step 2: Review or restore identified files and ending at Step 6: Check that the new appliance SVM is activated for each appliance SVM that needs to be upgraded.
Guest VMs are activated according to how you set up activation when you deployed your old Deep Security Virtual Appliance. For details on activation setup, see the activation section in Deploy the appliance (NSX-T 3.x), Deploy the appliance (NSX-T 2.x), or Deploy the appliance (NSX-V) .
Upgrade the agent embedded on the appliance SVM and apply OS patches
You can upgrade just the Deep Security Agent that's embedded on the appliance SVM, and apply OS patches at the same time, without redeploying the appliance SVM.
When you upgrade just the embedded agent, the appliance SVM’s original end-of-support date remains in effect. For details, see Deep Security LTS life cycle dates.
Follow these instructions to upgrade the embedded agent on the appliance SVM.
- Determine which versions of the appliance SVM and embedded agent you're using. You'll need this information to complete the remaining steps in this procedure.
- Import appliance patches, if they exist (failure to do so generates system event 740 to indicate that the patch was not imported):
- Log in to Deep Security Manager.
- On the left, expand Updates > Software > Download Center.
- In the main pane, enter Agent-DSVA in the search bar on the top-right and press Enter.
One or more patches appear with the name Agent-DSVA-CentOS<version>-<patch-version>-<date>.x86_64.zip. - Select a patch that is compatible with your appliance SVM. Consult the compatibility table that follows for guidance. If you don't see a compatible patch, it's because it doesn't exist for the version of the appliance SVM you're running, and no patch needs to be installed.
- Click the button in the Import Now column to import the patch into Deep Security Manager.
- On the left, click Local Software to verify that the patch was imported successfully.
- Repeat for any additional patches.
- Import the compatible agent:
- Still in Deep Security Manager, on the left, expand Updates > Software > Download Center.
- Select the agent software that is compatible with your appliance SVM. Consult the compatibility table that follows for guidance.
- Click the button in the Import Now column to import the agent into Deep Security Manager.
- On the left, click Local Software to verify that the agent was imported successfully.
You have now imported the patches and Deep Security Agent that are compatible with your appliance SVM version. You are ready to upgrade the agent on the appliance SVM and apply the patches.
- Upgrade the agent on the appliance SVM and apply the patches:
- Click Computers and double-click your appliance computer.
- Click Actions > Upgrade Appliance.
- Select the agent version to install on the appliance. This is the agent you just imported.
- Click OK.
- Click Events & Reports and search on 710 to find the report about the installation of the update file.
You have now upgraded the agent on the appliance SVM and installed one or more OS patches (if they existed).
If you upgraded the Deep Security Agent before importing the OS patch for the appliance SVM, you will see system event 740. To fix this problem, use the following procedure.
- Import the appliance patches for the version of the appliance SVM that you are upgrading. See above in this section for instructions. The appliance patches appear on the Local Software page in Deep Security Manager.
- Go to the Computers page.
- Right-click the virtual machine where you want to upgrade the appliance and click Send Policy. The appliance downloads and installs the patches.
If the appliance fails to download the patches, it could be that the relay hasn’t received the patch files yet. Wait until the relay receives the files and then click Send Policy. For information on relays, see Deploy additional relays.
Compatibility table: appliance, agent
| Appliance SVM version | Image OS | Compatible agent software |
| Appliance-ESX-10.0 or higher | CentOS 7 |
Agent-RedHat_EL7-<version>.x86_64.zip where <version> is the version of the agent software. Select the latest version. This version of the agent will be used as the embedded agent. |