Deep Security 12 FR has reached end of support. Use the version selector (above) to see more recent versions of the Help Center.
Deploy the appliance (NSX-T 2.x)
After completing the tasks in Before deploying the appliance, you are ready to deploy the appliance on NSX-T 2.x Data Center. Follow the steps below.
- Step 1: Import the appliance package into Deep Security Manager
- Step 2: Prepare Fabric settings
- Step 3: Add vCenter to Deep Security Manager
- Step 4: Install the Deep Security Virtual Appliance on NSX-T
- Step 5: Configure Endpoint Protection
- Step 6: Prepare for activation on NSX-T
- Step 7: Trigger an activation and policy assignment
- Step 8: Check that VMs are activated and assigned a policy
- Next steps (how to add new VMs)
You can also Upgrade the appliance to protect against new OS vulnerabilities.
Step 1: Import the appliance package into Deep Security Manager
After completing the tasks in Before deploying the appliance, you are ready to import the appliance ZIP into Deep Security Manager.
As an alternative to importing the appliance ZIP, you can place the OVF file at a URL location to make it faster for NSX to download. For details, see Configure the appliance OVF location.
- Go to:
-
Download the Deep Security Virtual Appliance package. Check the version requirements in system requirements.
You can import multiple versions of the appliance. The manager will choose the newest package.
- On Deep Security Manager, go to Administration > Updates > Software > Local.
-
Click Import and upload the package to Deep Security Manager.
On import, Deep Security Manager also automatically downloads and imports an agent that is compatible with the operating system of the virtual appliance VM. This agent has the same protection modules as Deep Security Agent for 64-bit Red Hat Enterprise Linux.
-
If you want to specify a different embedded agent, go to Administration > System Settings > Updates and look for Virtual Appliance Deployment. By default, the Virtual Appliance Deployment option is set to Latest Available (Recommended). This indicates to the manager to upgrade the virtual appliance to use the newest imported, embedded agent. Change this setting, as required.
Step 2: Prepare Fabric settings
First, add your vCenter through NSX-T Manager:
- Make sure the vCenter and ESXi servers have been configured for management.
- In NSX-T Manager, at the top, click System, and then click Fabric > Compute Managers on the left.
- Click +ADD.
- The New Compute Manager dialog box appears.
- Fill in the fields with your vCenter information. For example:
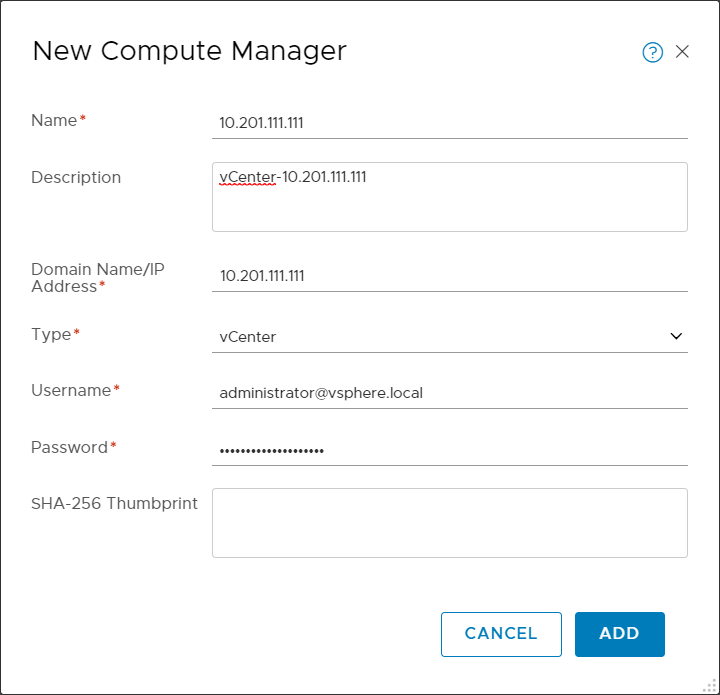
- Click ADD. The vCenter is added.
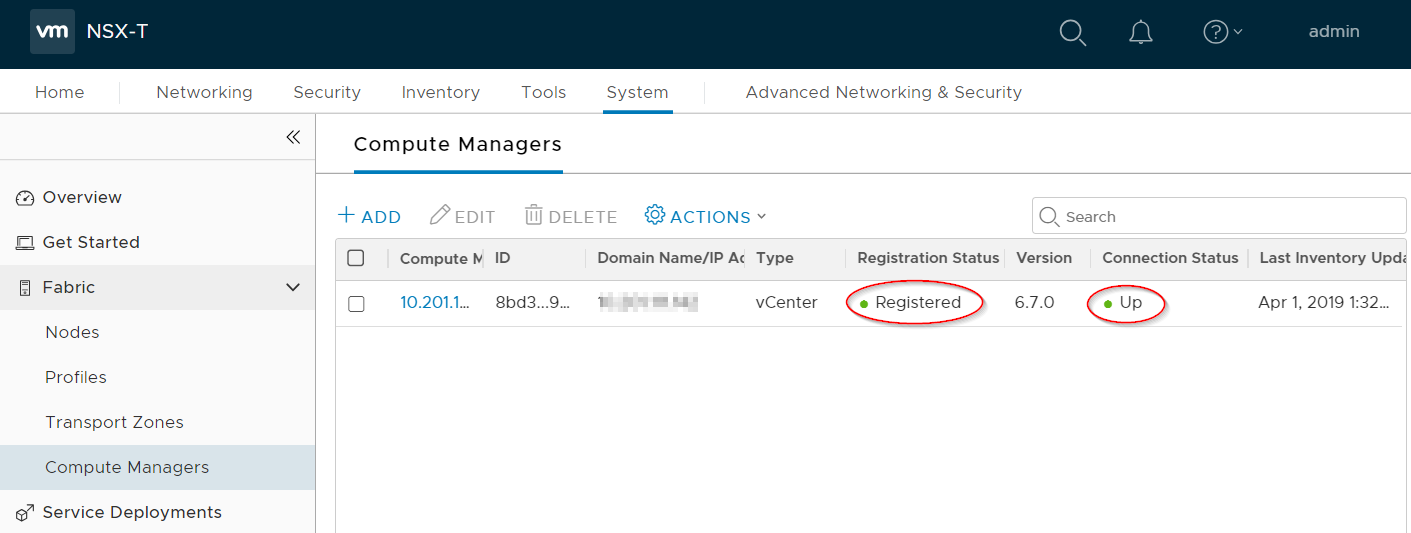
- Verify that the vCenter's Registration Status is Registered, and its Connection Status is Up.
You have now added your vCenter.
Next, make sure an overlay transport zone exists, and if not create one:
- Still in NSX-T Manager, go to System > Fabric > Transport Zones.
- Check whether a transport zone with a Traffic Type of Overlay already exists.
- If an overlay transport zone does not exist, click +ADD to create one.
The New Transport Zone dialog box appears.
- Fill in the fields. Set Traffic Type to Overlay. Other fields can be set according to your needs.
- Click ADD.
An overlay transport zone is created.
![]()
Next, create a Deep Security transport node profile:
- Still in NSX-T Manager, on the left, click Fabric > Profiles, and then in the main pane, click Transport Node Profiles.
-
Click + ADD to create a transport node profile.
The Add Transport Node Profile dialog box appears.
- Fill out the fields as shown in the image above. Make sure to move the Deep Security transport zone to the Selected column.
- Click N-VDS at the top of the dialog box, and fill out the fields as follows:
- For the N-VDS Name, select DSVA or whatever name you specified when you created your Deep Security transport zone.
- For the NIOC Profile, select nsx-default-nioc-hostswitch-profile.
- For the Uplink Profile, select nsx-default-uplink-hostswitch-profile.
- For the LLDP Profile, select LLDP [Send Packet Enabled].
- For the IP Assignment, select Use IP Pool or Use DHCP. Use the one you want.
- If IP Pool is visible, click OR Create and Use new a new IP Pool, and create an IP pool with a Name of dsva-ip-pool and then use it as the IP Pool value.
- If Physical NICs is visible, add a physical NIC. For example, use vmnic2 with uplink-1.
The assigned NIC(s) must be available on the ESXi servers. In the example, our ESXi hosts have vmnic2 which can be used for the N-VDS n-vds-overlay.
- After filling out the General and N-VDS tabs, click ADD.
A transport node profile called Deep Security Transport Node Profile is created.
For details on any of the values, click  at the top of the dialog box.
The dialog box now looks similar to the following:

Next, apply the Deep Security transport node profile to your clusters:
- Click Fabric > Nodes, and in the main pane click Host Transport Nodes.
- From the Managed by drop-down list, select the vCenter you added previously. In this example, the vCenter is 10.201.111.111.

- Select a cluster that contains the VMs that you want to protect with Deep Security Virtual Appliance. If there is more than one cluster, select all the ones that you want to protect with the Deep Security Virtual Appliance.
- Click CONFIGURE NSX.
- From the Select Deployment Profile drop-down list, select Deep Security Profile or whatever you called your Deep Security transport node profile.
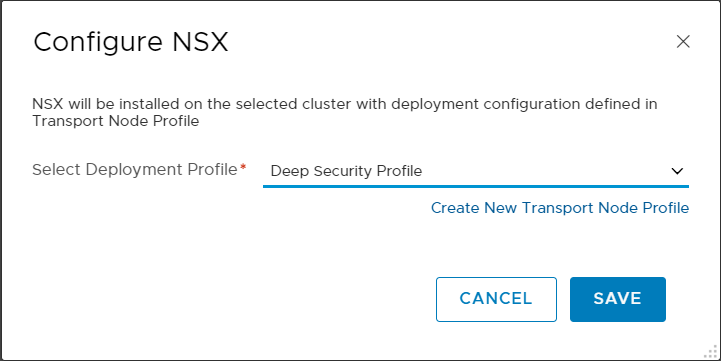
- Click SAVE.
The following occurs:
- The Deep Security transport node profile is applied to the clusters.
- While the profile is being applied, an NSX Install in Progress message may appear.
- When the operation finishes, each node's Configuration Status changes to Success and its Node Status changes to Up. If you have multiple ESXi servers, they should all be marked with Success and Up.

You have now prepared the Fabric settings in NSX-T Manager.
Step 3: Add vCenter to Deep Security Manager
Follow the instructions in Add a VMware vCenter.
After you have finished:
- your guest VMs are displayed in Deep Security Manager.
- the Trend Micro Deep Security service is registered with NSX-T.
Step 4: Install the Deep Security Virtual Appliance on NSX-T
You must install the Deep Security Virtual Appliance to each of your clusters.
- In NSX-T Manager, click System, and then select Service Deployments.
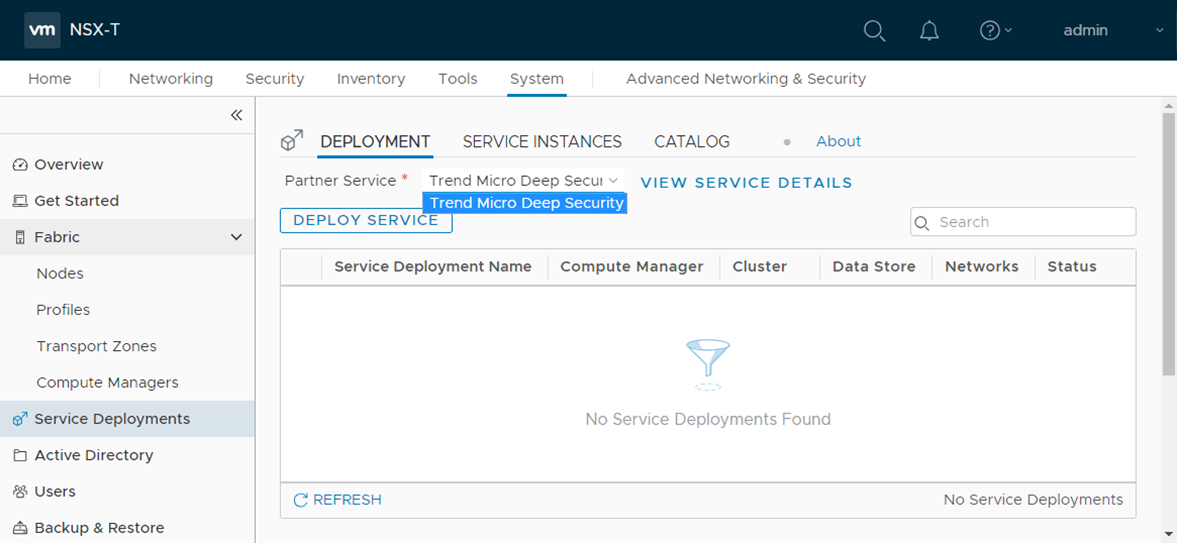
- From the Partner Service drop-down list, select Trend Micro Deep Security. This Trend Micro Deep Security service was registered when you added your vCenter in Deep Security Manager previously.
- Click DEPLOY SERVICE.
- Fill out the fields as follows:
- For the Service Deployment Name, enter a name. If you have multiple clusters, consider using a name that includes the name of the cluster to which you're deploying. The cluster is listed under the Cluster heading on the same page. Example: DSVA Cluster 1.
- For the Compute Manager, select the vCenter you added previously. In our example, vCenter is 10.201.111.111.
- For the Cluster, select a cluster you configured previously. The Trend Micro Deep Security service will be installed to all the ESXi servers in this cluster. If you have multiple clusters, pick one now. You can come back later to pick another cluster.
- For the Data Store, select the option that is appropriate for your environment. In our example, we selected Specified on Host.
- For Networks, click Set or Edit Details, whichever is available, and then configure ens0 - MANAGEMENT. Set Network to Specified on Host or DVPG, and Network Type to DHCP or Static IP Pool. Click SAVE.
If Specified on Host or DVPG are not visible or selectable, refer this knowledge base page for a workaround.
- For Deployment Specification, select Deep Security - Medium.
- For Deployment Template, select EPP_Attributes_For_OVF_Env_Vars.
Your service deployment details should look similar to the following:
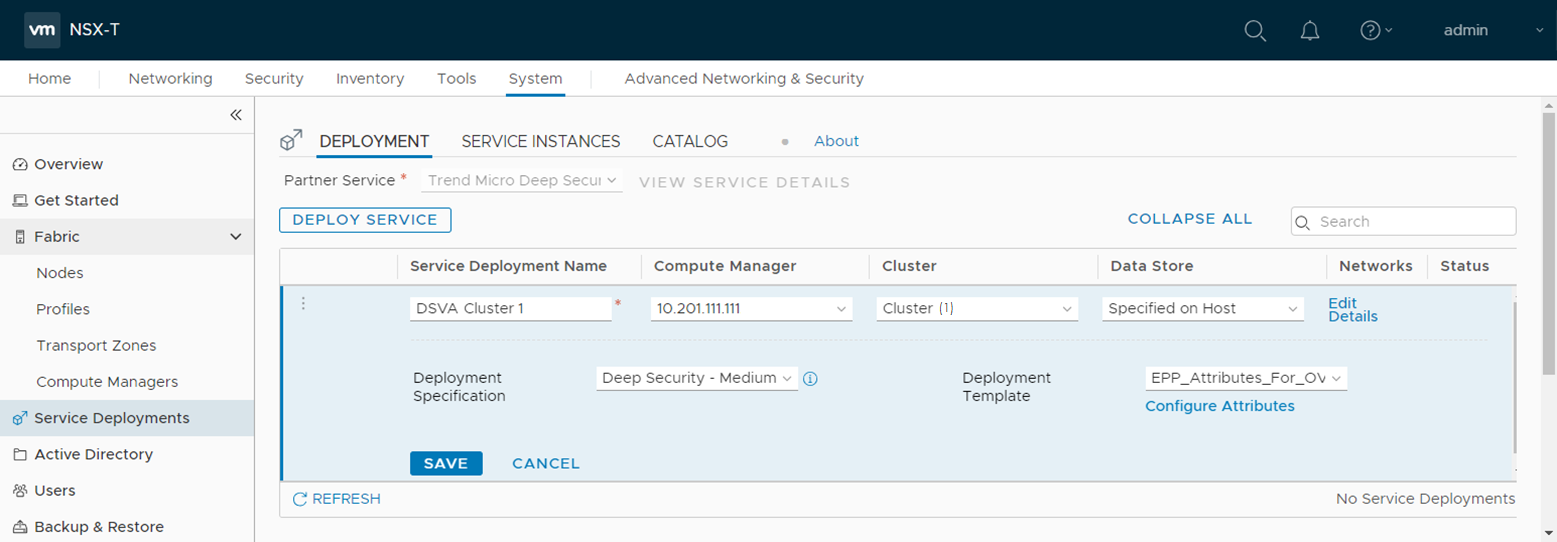
- Click SAVE.
The service deployment begins.
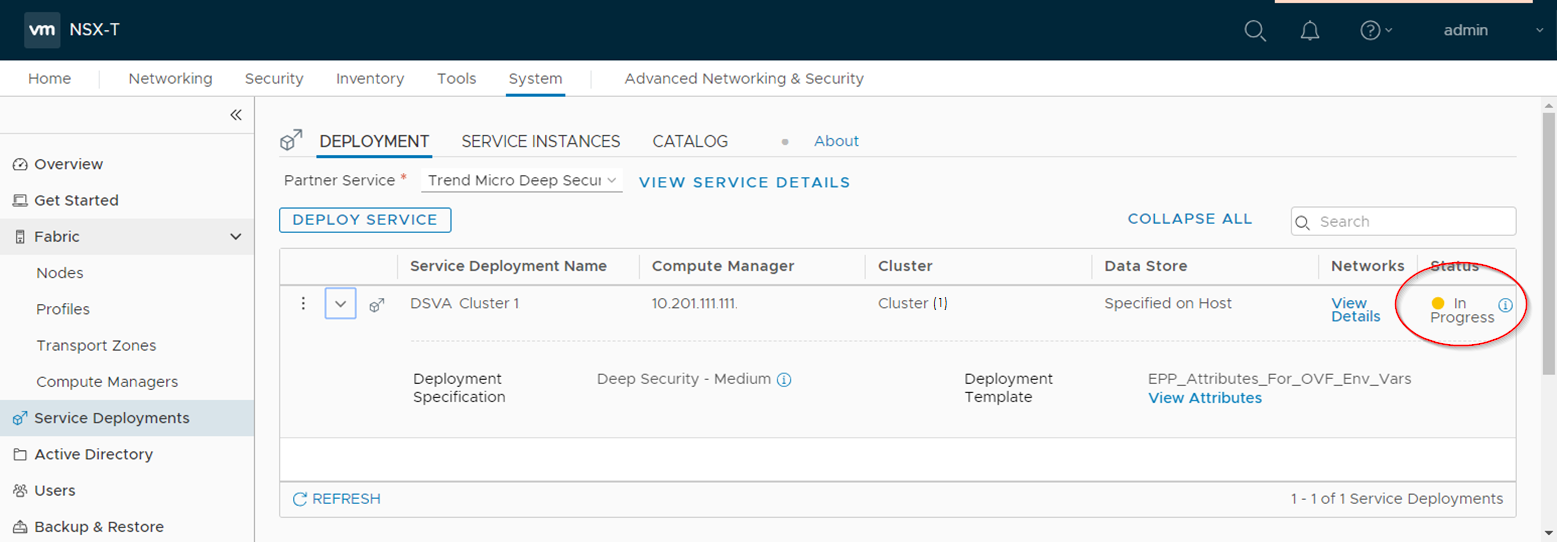
The Status column in NSX-T Manager indicates In Progress.
- Wait. When the deployment is finished, the Status changes to Up.
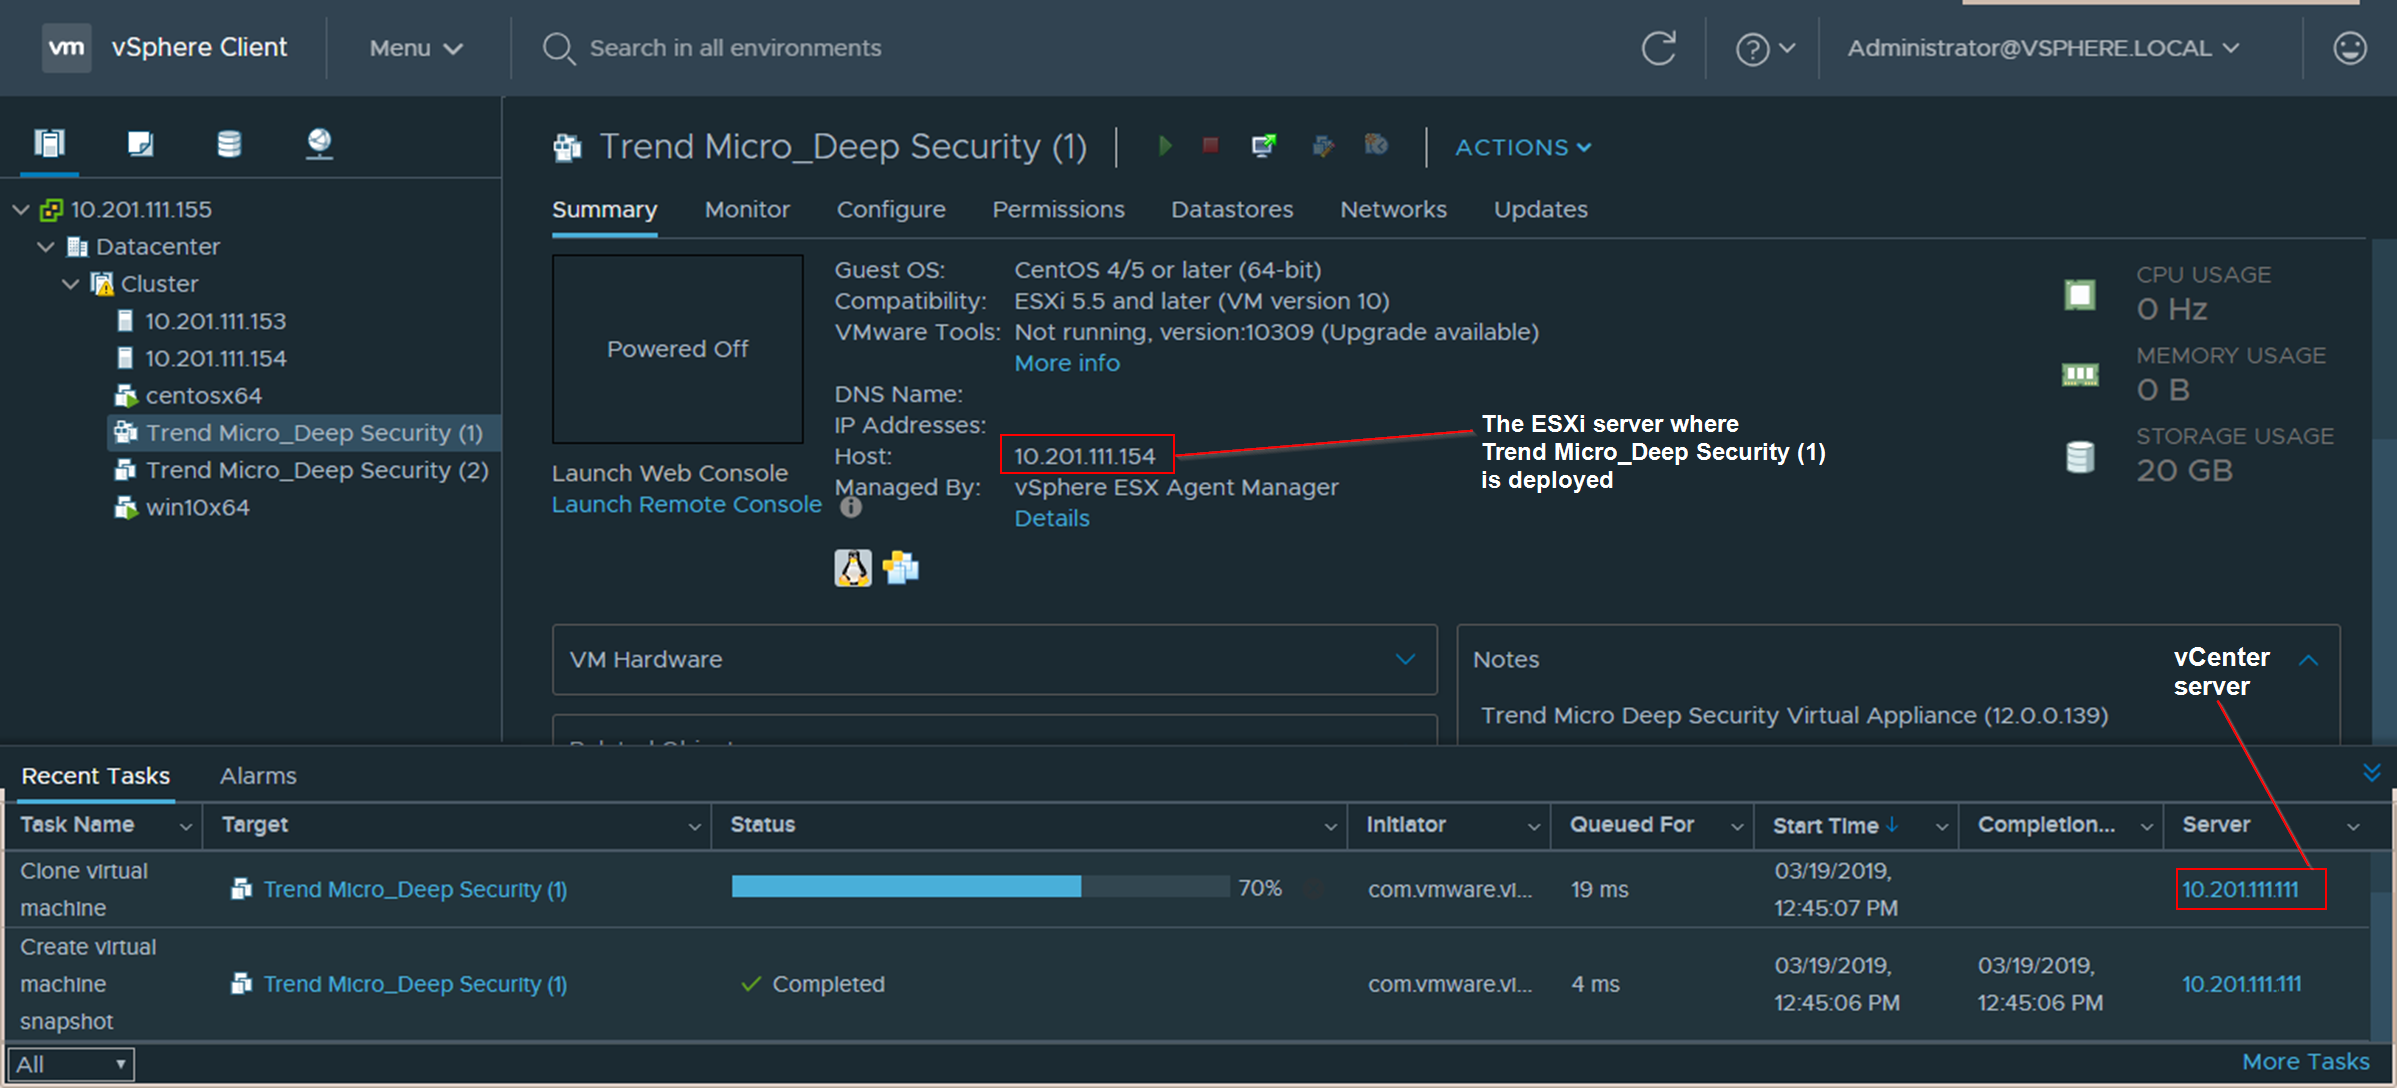
If you have multiple ESXi servers in the assigned cluster, then a Trend Micro Deep Security service is deployed onto each ESXi server. The services will be labeled as follows to differentiate them:
- Trend Micro_Deep Security (1) (for the first ESXi server)
- Trend Micro_Deep Security (2) (for the second ESXi server)
...and so on.
- (Optional) Check the status of the deployment by accessing vCenter through the vSphere Client. The vSphere Client shows the progress in more detail. Wait until the Status changes to Complete.
In the image below, you see two Trend Micro Deep Security services listed on the left. Two services were deployed because there were two ESXi servers in the cluster.
- Verify the deployment in Deep Security Manager by clicking Computers at the top and then on the left, expanding the vCenter where the Trend Micro Deep Security service was deployed.
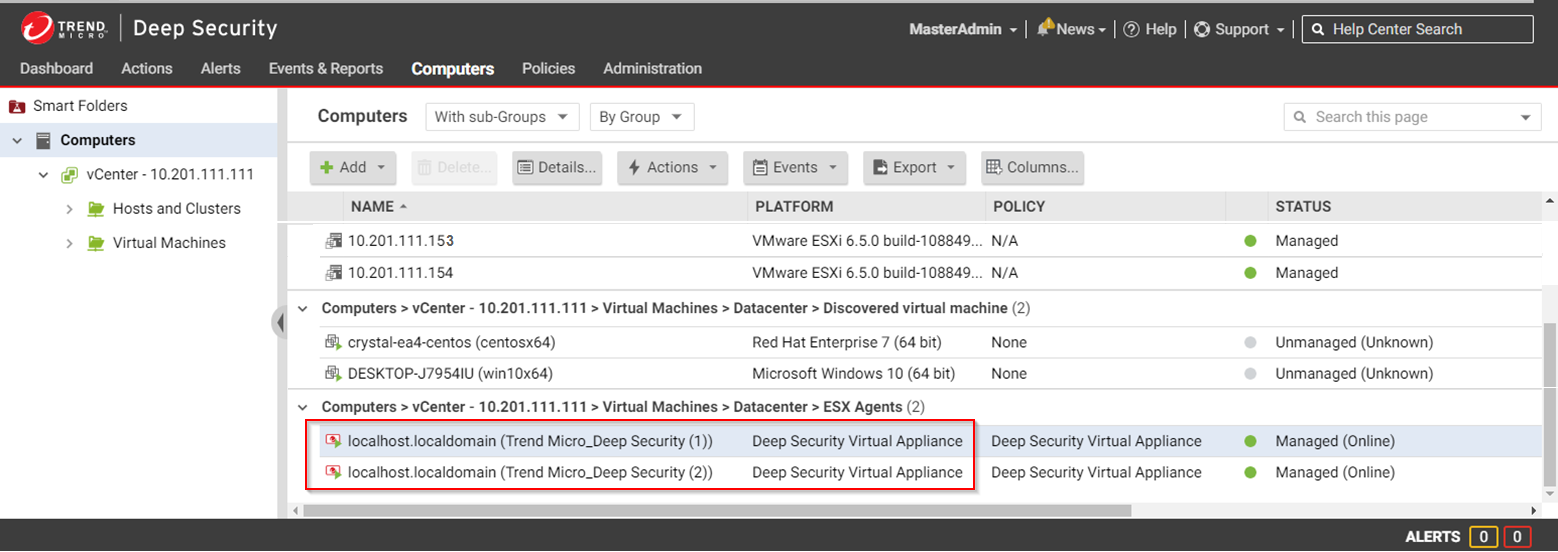
Trend Micro_Deep Security (1) appears under Virtual Machines > Datacenter > ESX Agents with a Platform of Deep Security Virtual Appliance. You see one virtual appliance per ESXi server in your cluster.
- Repeat all the steps in Step 4: Install the Deep Security Virtual Appliance on NSX-T for each cluster.
Although your VMs appear in Deep Security Manager, they are not yet protected.
Step 5: Configure Endpoint Protection
To start, create a group that will contain the VMs you want to protect with the Deep Security Virtual Appliance:
- Still in NSX-T Manager, at the top, click Inventory and then on the left, click Groups.
- Click ADD GROUP to create a group which will contain the VMs protected by Deep Security Virtual Appliance. Fill out the fields as follows:
- For the Name, enter a name for your group. Example: DSVA-Protection-Group.
- For the Domain, select default, or create a new domain under Inventory > Domains.
- For the Compute Members, click Set Members to select which VMs will go in the group.
The following instructions demonstrate the simplest way to add members. For more complex ways, such as the use of Membership Criteria, see the NSX-T documentation.
- Click Members (0) at the top, and then select VirtualMachine (selected: 0).
- Click Refresh at this bottom if your VMs are not visible.
- Select the guest VMs you want to add to the group. These VMs will become protected by the Deep Security Virtual Appliance.
Your Select Members dialog box now looks similar to the following, with guest VMs selected, and Trend Micro_Deep Security deselected because the virtual appliance does not need to be protected:
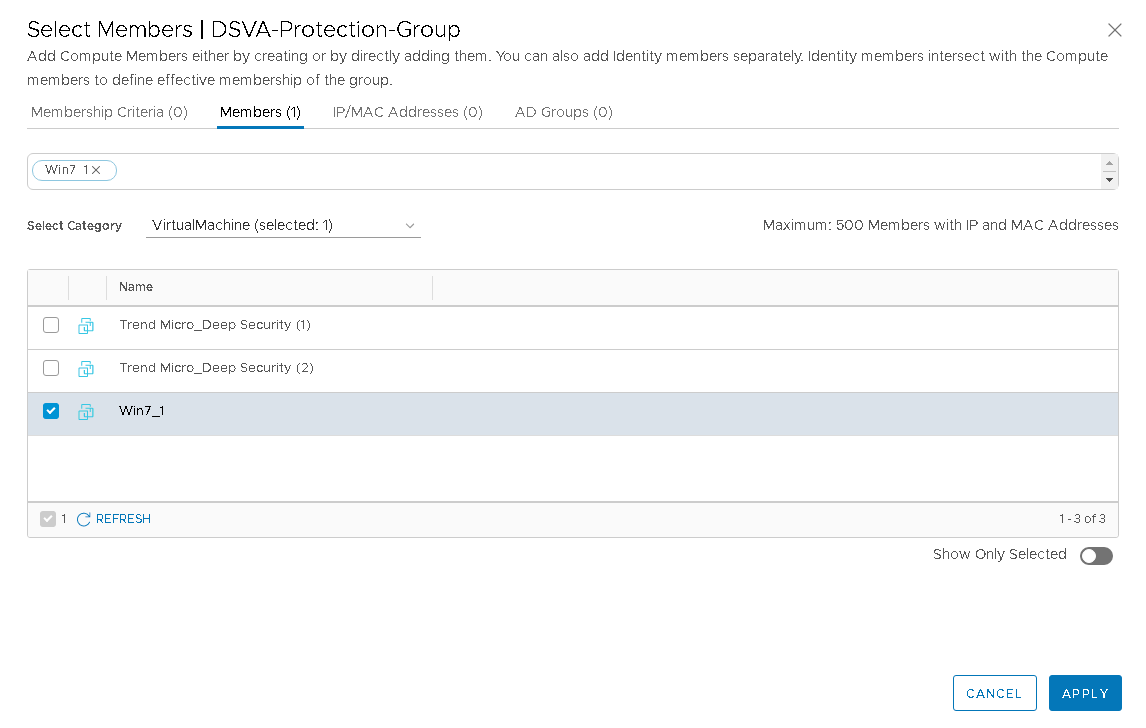
- Verify the VM count in the Members tab near the top. In the example above, the count is 1.
- Click APPLY.
The ADD GROUP page now shows an updated count.

- Click SAVE.
You have now added a group with some members.
Next, configure a service profile for the Deep Security Virtual Appliance:
- Still in NSX-T Manager, click Security at the top, and then on the left, click Endpoint Protection.
- In the main pane, click SERVICE PROFILES.
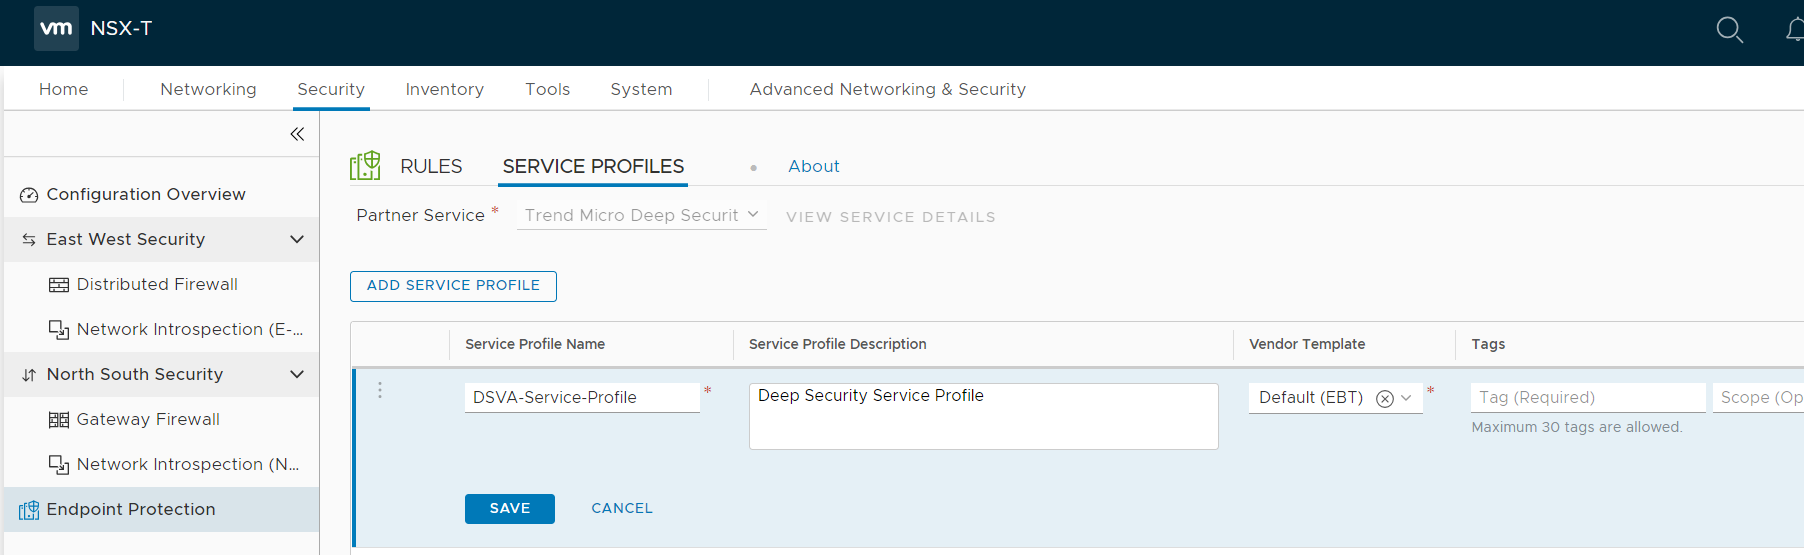
- From the Partner Service drop-down list, select Trend Micro Deep Security if it is not already selected.
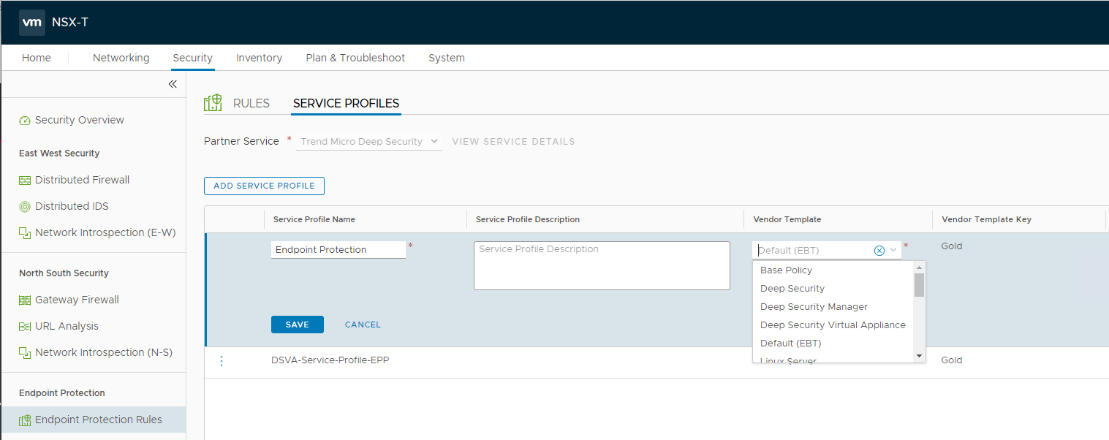
- Click ADD SERVICE PROFILE and fill out the fields as follows:
- For the Service Profile Name field, specify a name. Example: DSVA-Service-Profile
- For the Service Profile Description, enter a description. Example: Deep Security Service Profile
- For the Vendor Template, select Default (EBT). This template was loaded at the same time as the Trend Micro Deep Security service.
The ADD SERVICE PROFILE page should now look similar to the following:
- Click SAVE.
Next, map the service profile to the group:
- Switch to RULES and click + ADD POLICY.
- In the Name column, click within the New Policy cell and change the name. For example, use: DSVA-Policy
- Select the check box next to DSVA-Policy and click + ADD RULE. A rule appears under DSVA-Policy.
-
Name the rule and select the corresponding groups and service profiles. For example, name the rule DSVA-Rule, and select DSVA-Protection-Group and DSVA-Service-Profile. There is now a mapping between the VMs in the DSVA-Protection-Group and the Default (EBT) template specified in the DSVA-Service-Profile.
The policy should now look similar to the following:
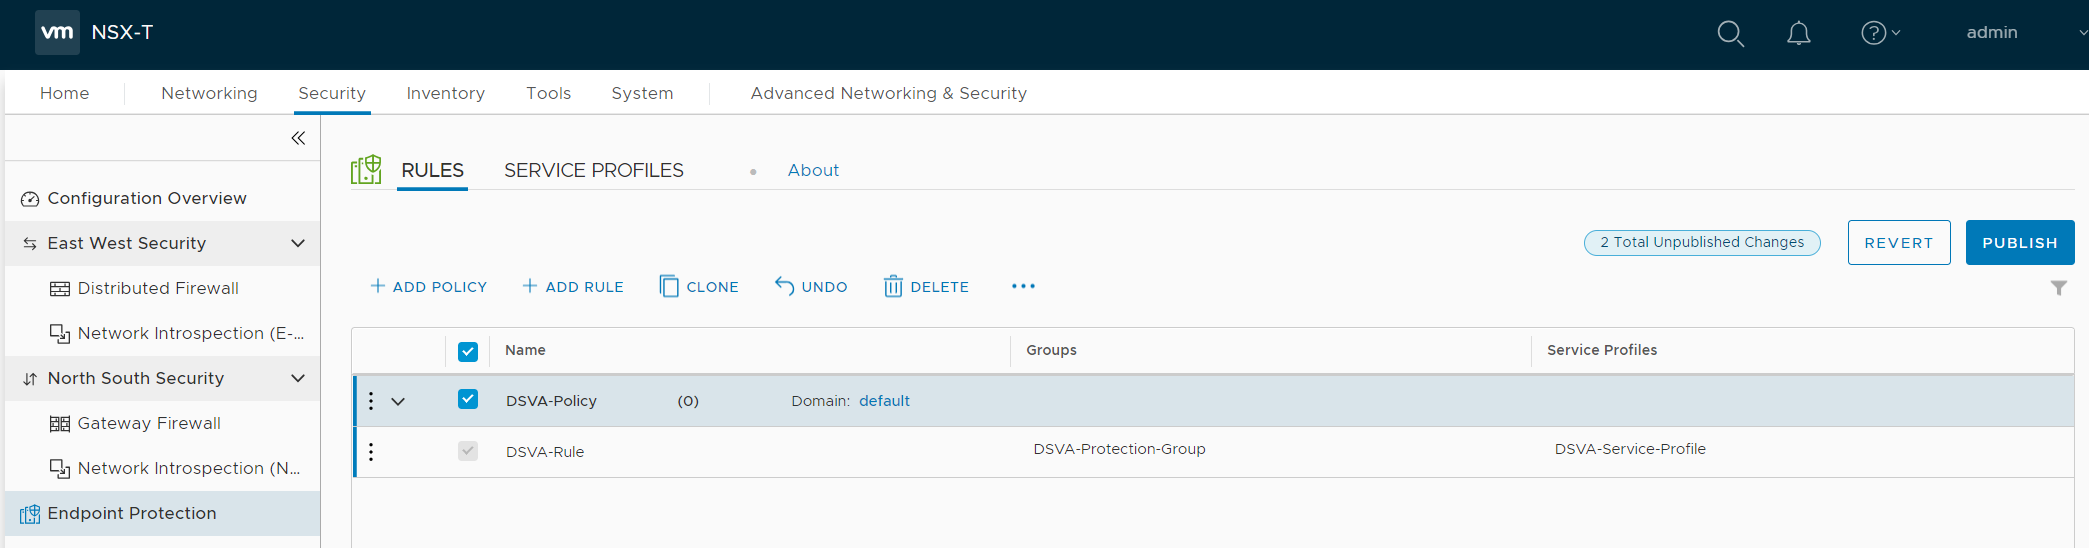
- Click PUBLISH to finish the policy and rule creation.
You have now configured Endpoint Protection in NSX-T. Your VMs are not yet protected.
Step 6: Prepare for activation on NSX-T
To prepare for activation, you can use Method 1, 2, or 3:
- Method 1: Create a 'Computer Created' event-based task
- Method 2: Create an 'NSX Security Group Change' event-based task
- Method 3: Synchronize your Deep Security policies to NSX-T
- Some methods aren't supported with some NSX versions. Consult the table below for details.
- Method 1: With this method, any VMs that you newly create in your system are automatically activated and assigned a policy.
- Method 2: With this method, new and existing VMs are automatically activated and assigned a policy when they are moved into a designated NSX security group.
- Method 3: With this method, new and existing VMs are activated and assigned a policy when they are moved into a designated NSX security group. This is similar to method 2. However, unlike method 2, Deep Security policies are assigned through the VMware UI instead of through a Deep Security event-based task.
| Deep Security Virtual Appliance deployment | ||||||||||
| NSX for vSphere (NSX-V) 6.4.x | NSX-T 2.5.x | NSX-T 3.x | ||||||||
|---|---|---|---|---|---|---|---|---|---|---|
| Method |
Standard OR NSX for vShield Endpoint (free) |
Advanced | Enterprise | NSX Data Center Standard |
NSX Data Center Professional |
NSX Data Center Advanced |
NSX Data Center Enterprise Plus |
NSX Data Center for Remote Office Branch Office |
All license types | All license types |
|
Method 1 |
✔ | ✔ | ✔ | ✔ | ✔ | ✔ | ✔ | ✔ | ✔ | ✔ |
|
Method 2 |
X | ✔1 | ✔1 | X | X | ✔1 | ✔1 | ✔1 | • | ✔ |
|
Method 3 |
X | ✔1 | ✔1 | X | X | ✔1 | ✔1 | ✔1 | • | ✔ |
1 Requires VMware's Network Introspection Service.
• Requires the following software combination: Deep Security Manager FR 2019-12-12 (build 12.5.494) or newer with Deep Security Agent Linux FR 2020-04-02 (build 12.5.0-814) or newer.
Method 1: Create a 'Computer Created' event-based task
The instructions below are task-based. For more explanatory information on event-based tasks, see Automated policy management in NSX environments.
- In Deep Security Manager, click Administration at the top.
- On the left, click Event-Based Tasks.
- In the main pane, click New.
- From the Event drop-down list, select Computer Created (by System). Click Next.
- Select Activate Computer and set it to 5 minutes.
- Select Assign Policy and select a policy from the drop-down list, for example, Windows Server 2016.You can click the arrows to view child policies. Click Next.
- Specify the conditions that restrict when the event-based task is triggered. Add this condition:
vCenter Name matches <your_vCenter_name>
- Add more conditions to further restrict when the event-based task is triggered. For example, if you have a naming convention for your VMs that includes a 'Windows' prefix on all Windows VMs, you would set:
Computer Name matches Windows*
Click Next.
- In the Name field, enter a name for the task that reflects the policy you assigned, for example, Activate Windows Server 2016.
- Select Task Enabled and then click Finish.
- Create additional event-based tasks, one per Deep Security policy you plan on assigning. The event-based task must have an event type of Computer Created (by System) and must be configured to activate the computer and assign a policy.
You have now set up your event-based tasks to activate and assign policies to newly-created VMs. As soon as a VM is created, all the Computer Created (by System) event-based tasks are reviewed. If the conditions in a task are met, the task is triggered, and the VM is activated and assigned the associated policy.
Method 2: Create an 'NSX Security Group Change' event-based task
The instructions below are task-based. For more explanatory information on event-based tasks, see Automated policy management in NSX environments.
To start, create or modify the Activate event-based task:
- In Deep Security Manager, click Administration at the top.
- On the left, click Event-Based Tasks.
- In the main pane, look for the event-based task called Activate <your_vCenter_name>. It may or may not exist.
- If the Activate event-based task exists, double-click it and review the table below make sure it is configured properly. If it doesn't exist, click New and run through the wizard, making sure to conform to the table below.
- Create additional Activate event-based tasks if you added multiple vCenter servers to the manager.
Settings in the table below may appear in a different order from shown.
| To configure the 'Activate' event-based task, set... | To... |
|---|---|
| Name | A name for the task that reflects the action and vCenter assigned under Conditions, for example, Activate your_vCenter_name>. |
| Event | NSX Security Group Change
The NSX Security Group Change event is triggered when the manager receives a notification from the data plane (the Deep Security Virtual Appliance). |
| Task Enabled | Enabled. |
| Activate Computer | 5 minutes. |
| Assign Policy | A policy, for example, Windows Desktop.You can click the arrows to view child policies. |
| Conditions |
Mandatory condition to restrict when the event-based task is triggered:
Examples of optional conditions to further restrict triggering:
|
Next, create or modify the Deactivate event-based task:
- Still in Deep Security Manager, in the main pane, look for the event-based task called Deactivate <your_vCenter_name>. It may or may not exist.
- If the Deactivate event-based task exists, double-click it and review the table below make sure it is configured properly. If it doesn't exist, click New and run through the wizard, making sure to conform to the table below.
- Create additional Deactivate event-based tasks if you added multiple vCenter servers to the manager.
Settings in the table below may appear in a different order from shown.
| To configure the 'Deactivate' event-based task, set... | To... |
|---|---|
| Name |
A name for the task that reflects the action and vCenter assigned under Conditions, for example, Deactivate your_vCenter_name>. |
| Event | NSX Security Group Change
The NSX Security Group Change event is triggered when the manager receives a notification from the data plane (the Deep Security Virtual Appliance). |
| Task Enabled | Enabled. |
| Deactivate Computer | Enabled. |
| Conditions |
|
You have now set up your event-based tasks to activate your VMs. If the conditions in a task are met, the task is triggered, and the VM is activated (and assigned the associated policy).
Method 3: Synchronize your Deep Security policies to NSX-T
The instructions below are task-based. For more explanatory information on synchronizing policies, see Synchronize Deep Security policies with NSX.
To start, configure Deep Security Manager:
- Log in to Deep Security Manager.
- Make sure that all of the policies in Deep Security Manager have a unique name before they are synchronized with NSX. All the default ones have unique names.
- At the top, click Computers.
- On the left, right-click the vCenter where you want to enable synchronization and select Properties.
- On the NSX Configuration tab, select Synchronize Deep Security Policies with NSX Service Profiles. Click OK.
Next, check that your policies are loading into vSphere:
- In NSX-T Manager, click Security at the top, and then on the left, click Endpoint Protection.
- In the main pane, click SERVICE PROFILES.
- From the Partner Service drop-down list, select Trend Micro Deep Security if it is not already selected.
- Click ADD SERVICE PROFILE and expand the Vendor Templatedrop-down list.
- Make sure the Deep Security policies are loading. They appear as individual vendor templates of the same name.
Finally, reconfigure Endpoint Protection:
- Go back to Step 5: Configure Endpoint Protection and run through the steps again, but this time making the adjustments described in the remaining steps.
- Create multiple groups.
- Create multiple services profiles. For each service profile, set the Vendor Template to one of the Deep Security policies that you just loaded.
- Associate the groups to the service profiles.
You have now configured method 3.
Step 7: Trigger an activation and policy assignment
If you chose Method 1, you can trigger an activation and policy assignment manually. For instructions, see below.
If you chose Method 2 or 3, all VMs should be activated and assigned policy automatically now. They are protected.
To activate and assign a policy through the Actions button:
- Go to Deep Security Manager, click Computers at the top, and click your vCenter on the left. Your guest VMs appear on the right.
- Shift+click a set of VMs, right-click them and then select Actions > Assign Policy. Select a policy and click OK. A Deep Security policy is assigned to your VMs.
- Shift+click the same set of VMs, right-click them and then select Actions > Activate/Reactivate.Your VMs are activated in Deep Security Manager. They are now protected.
- If you have additional, existing VMs you want to protect, repeat the procedure in this section to assign a policy and activate them.
Step 8: Check that VMs are activated and assigned a policy
To check:
- In Deep Security Manager, click Computers at the top.
- On the left, expand Computers > <your_vCenter> > Virtual Machines.
- Check the TASK(S) and STATUS and columns. (Click Columns at the top to add them if they are not visible.) The TASK(S) column should indicate Activating, and your VMs should move from the Unmanaged (Unknown) status, to the Unmanaged (No Agent) status, to the Managed (Online) status. You may see the VMs move into the VMware Tools Not Installed status, but this is temporary.
- Check the POLICY column to make sure the correct Deep Security policy was assigned.
You have now deployed Deep Security Virtual Appliance and protected your VMs with it.
Next steps (how to add new VMs)
Follow the instructions below to learn how to add new VMs to your system and protect them with Deep Security.
To add a new VM if you chose Method 1 (create a 'Computer Created' event-based task):
- Create a new VM in vCenter. This triggers the Computer Created (by System) event-based task, which activates and assigns policy to the new VM.
To add a new VM if you chose Method 2 (create an 'NSX Security Group Change' event-based task):
- Create or move the VM into one of the NSX security groups. This triggers the NSX Security Group Change event-based task, which activates and assigns policy to the new VM.
To add a new VM if you chose Method 3 (synchronize Deep Security policies to NSX):
- Create or move the VM into one of the NSX security groups. This activates and assigns policy to the new VM.