Integrate with SAP NetWeaver
Deep Security Scanner enables you to protect your SAP deployments using Workload Security by helping to secure critical information from attack, including such threats as malware, cross-site scripting, and SQL injection. Workload Security scans content uploaded to the SAP NetWeaver technology platform to determine its true type and reports this to SAP systems via the NetWeaver-VSI interface. Content scanning protects against possible malicious script content that might be embedded or disguised inside documents. SAP administrators can then set policy according to which document types should be allowed.
Deep Security Scanner is not supported on computers with a relay-enabled agent.
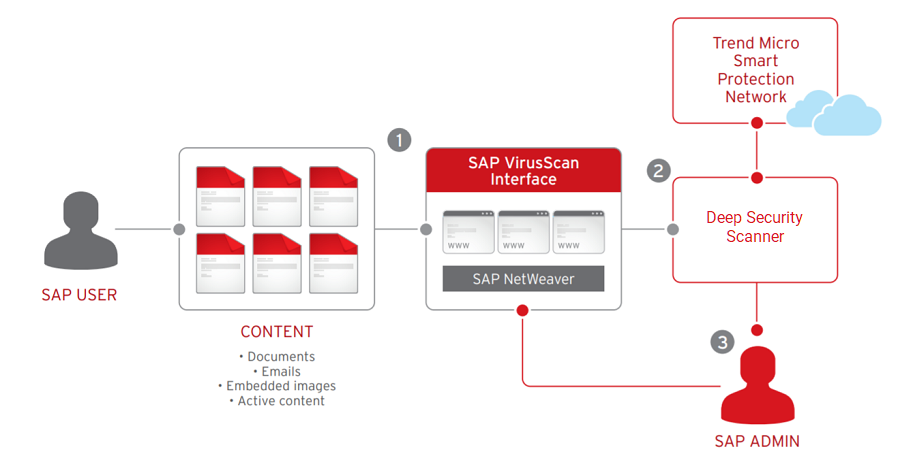
Deep Security Scanner functions as follows:
- SAP customer environments are secured through the SAP Virus Scan Interface (VSI), the security component of the SAP NetWeaver platform. The VSI is used to secure all forms of customer content including documents, embedded images, and active content including JavaScript and scripts in PDF and Microsoft Office documents. Deep Security Scanner works seamlessly with SAP NetWeaver technology and the SAP HANA platform.
- Deep Security Scanner performs scans of the content uploaded to the SAP NetWeaver technology platform to determine its true type and reports this to SAP systems via the NetWeaver VSI interface. Content scanning protects against possible malicious script content that might be embedded or disguised inside documents.
- SAP administrators can then set policy according to which actual document types should be allowed.
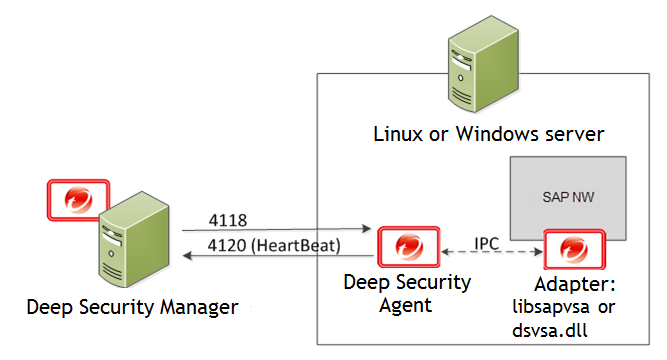
Deep Security and SAP components
Deep Security Manager connects with Deep Security Agent located on the SAP NetWeaver server. The agent connects with libsapvsa or dsvsa.dll, which are the virus adapters provided by Trend Micro for scanning purposes.
The following components are involved in Deep Security Scanner:
- Deep Security Manager: The centralized web-based management console that administrators use to configure security policy and deploy protection to Deep Security Agent.
- Deep Security Agent: A security agent deployed directly on a computer. The nature of that protection depends on the rules and security settings that each Deep Security Agent receives from the Deep Security Manager.
- SAP NetWeaver: SAP-integrated technology computing platform. The SAP NetWeaver Virus Scan Interface (NW-VSI) provides virus scanning capabilities for third-party products that perform the actual scan. The NW-VSI interface must be activated.
- SAP NetWeaver ABAP WinGUI: A Windows management console used for SAP NetWeaver. In this document, it is used for the configuration of the Deep Security Agent and the SAP NetWeaver Virus Scan Interface.
Enable integration between Deep Security Scanner and SAP NetWeaver
- Activate Deep Security Scanner.
- Check Supported features by platform to see which operating systems support Deep Security Scanner.
- Install Deep Security Agent on an SAP application server running one of the supported operating systems. See Install the agent .
- Add the SAP server to Deep Security and activate the agent on the SAP server. See Add the SAP Server to Deep Security Manager and activate the agent.
- Enable the SAP integration in a computer or policy. See Assign a security profile.
- Configure the SAP Virus Scan Interface (VSI) by calling the following transactions (see Configure SAP to use the agent):
- VSCANGROUP
- VSCAN
- VSCANPROFILE
- VSCANTEST
Depending on your operating system and environment, the output that you see may differ slightly.
Activate Deep Security Scanner
- In the Deep Security Manager, go to Administration > Licenses.
- Select Enter New Activation Code.
- In the Deep Security Scanner area that is under Additional Features, enter your Deep Security Scanner activation code, then select Next and follow the prompts.
The Settings > Scanner tab is now available in the Computer or Policy editor![]() You can change these settings for a policy or for a specific computer.
To change the settings for a policy, go to the Polices page and double-click the policy that you want to edit (or select the policy and click Details).
To change the settings for a computer, go to the Computers page and double-click the computer that you want to edit (or select the computer and click Details)., where you can enable SAP for individual computers or policies.
You can change these settings for a policy or for a specific computer.
To change the settings for a policy, go to the Polices page and double-click the policy that you want to edit (or select the policy and click Details).
To change the settings for a computer, go to the Computers page and double-click the computer that you want to edit (or select the computer and click Details)., where you can enable SAP for individual computers or policies.
To use Deep Security Scanner, the Anti-Malware module must also be activated.
Install the agent
Deep Security Agent is installed with the core agent functionality only. After the agent is installed on SUSE Linux Enterprise Server or Red Hat Enterprise Linux, you can enable protection modules on the agent. At that point, the plug-ins required for the protection modules will be downloaded and installed.
- Go to the Trend Micro Download Center (http://downloadcenter.trendmicro.com) and download the Deep Security Agent package for your OS.
- Install the agent on the target system. You can use rpm or zypper, depending on the OS. In this example, rpm is used by typing:
rpm -ihv Agent-Core-SuSE_<version>.x86_64.rpm - You should see the output similar to the one shown in this example, which indicates that the agent installation is complete:

You can also deploy the agent using a deployment script generated from Deep Security Manager.
Add the SAP Server to Deep Security Manager and activate the agent
- To add the SAP server, open the Deep Security Manager console and on the Computers tab, click New. There are several ways to add the server, including synchronization with Microsoft Active Directory, VMware vCenter, Amazon Web Services, or Microsoft Azure. You can also add the computer using an FQDN or IP address. For detailed instructions, see About adding computers.
- The status of your instance is either Unmanaged (Activation Required) or Unmanged (Unknown). Next, you need to activate the agent before the manager can assign rules and policies to protect the computer. The activation process includes the exchange of unique fingerprints between the agent and the manager. This ensure that only one Deep Security Manager can communicate with the agent. There are two ways to activate the agent: agent-initiated or manager-initiated.
- Manager-initiated activation: This method requires that Deep Security Manager can connect to the FQDN or the IP of the agent via the agent's listening port number for heartbeats. This can sometimes be difficult due to NAT port forwarding, firewall, or AWS security groups. To perform manager-initiated activation, go to the Computers tab in the Deep Security Manager console, right-click the instance where the agent is installed and select Actions > Activate. If you use manager-initiated activation, it is strongly recommended to also Protect Deep Security Agent from unauthorized Deep Security Managers.
- Agent-initiated activation: This method requires that Deep Security Agent can connect to the configured Deep Security Manager address via the manager's listening port number for heartbeats.
You can find the Deep Security Manager address (FQDN or IP) in the Deep Security Manager console, under Administration > Manager Nodes.
You also need to enable agent-initiated activation from the Deep Security Manager console by selecting Administration > System Settings > Agents, and then selecting Allow Agent-Initiated Activation.
Next, use a locally-run command-line tool on Deep Security Agent to initiate the activation process. The minimum activation instruction contains the activation command and the manager's URL (including the port number):
dsa_control -a dsm://[managerurl]:[port]/
where:
- -a is the command to activate the agent, and
- dsm://managerurl:4120/ is the parameter that points the agent to Deep Security Manager.
managerurlis the URL of the Deep Security Manager, and4120is the default agent-to-manager communication port.
The manager URL is the only required parameter for the activation command. Additional parameters are also available (see Command-line basics)
In the following example, the agent-initiated activation by typing is used:
/opt/ds_agent/dsa_control -a dsm://cetl-dsm.ceur-testlab.trendmicro.de:4120/
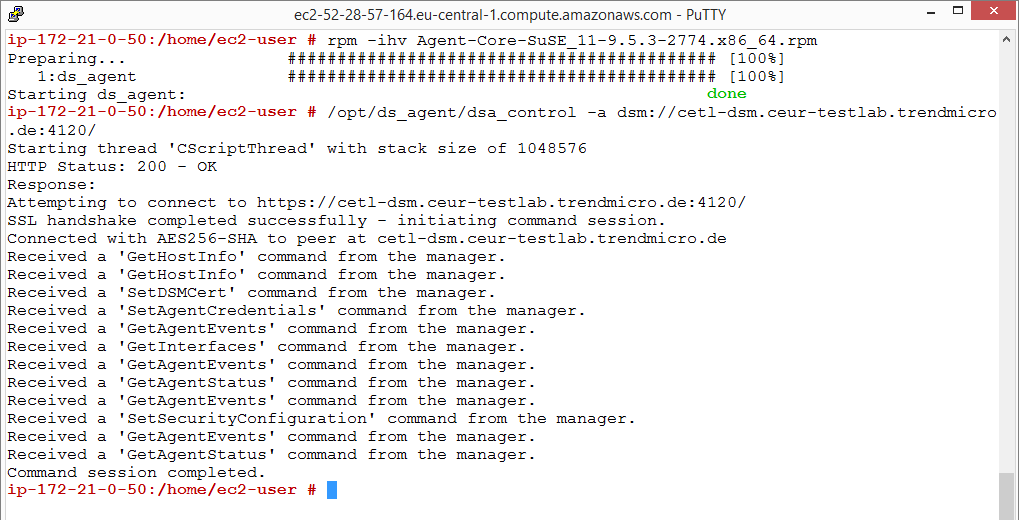
This output indicates that the agent activation is complete.
- To confirm the activation, in the Deep Security Manager console, go to the Computers tab, select the computer name, and then select Details to check that the computer's status is Managed.
Assign a security profile
At this point, the status of the agent is Managed (Online), but there is no protection module installed. This means that the agent and the manager are communicating, but the agent is not using any configuration.
There are several ways to apply protection. In this example, the configuration is done directly on the SAP instance by activating SAP, activating Anti-Malware to provide the agent with the latest pattern and scan engine, and assigning the default Scan Configurations.
- In the Computer editor
 To open the Computer editor, go to the Computers page and double-click the computer that you want to edit (or select the computer and click Details)., go to Anti-Malware > General.
 - In the Anti-Malware section, set Configuration to On (or Inherited On), and then click Save.
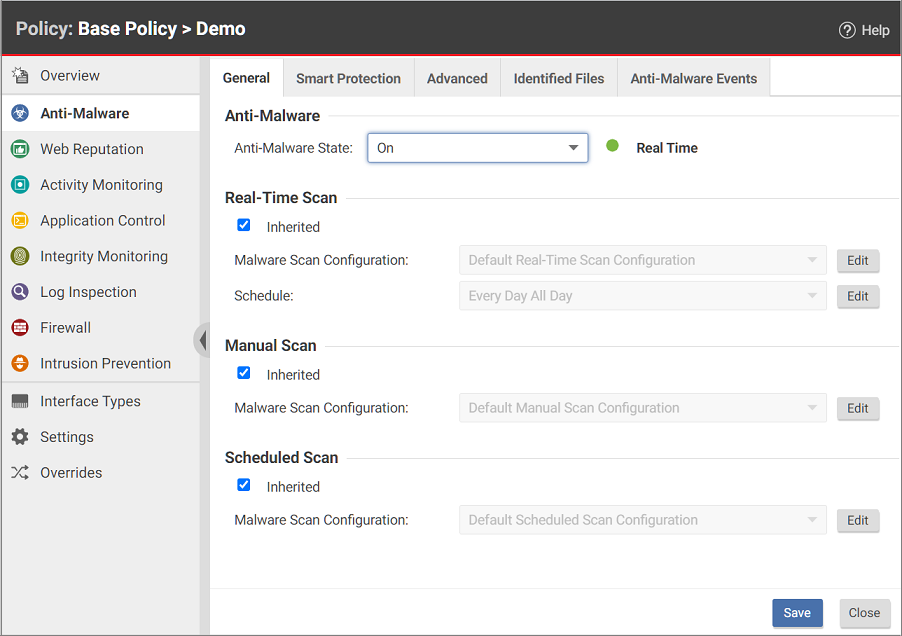
- In the Real-Time Scan, Manual Scan, or Scheduled Scan sections, set the Malware Scan Configuration and Schedule, or allow those settings to be inherited from the parent policy.
- Click Save. The status of the Anti-Malware module changes to Off, installation pending. This means that the agent is retrieving the required module from the Deep Security Manager. For this to work, the client needs to access the Deep Security Relay on the relay's listening port number. A few moments later, the agent should start downloading security updates such as Anti-Malware patterns and scan engines.
- In the Computer editor, go to Settings > Scanner.
- In the SAP section, set Configuration to On (or Inherited On), and then click Save.
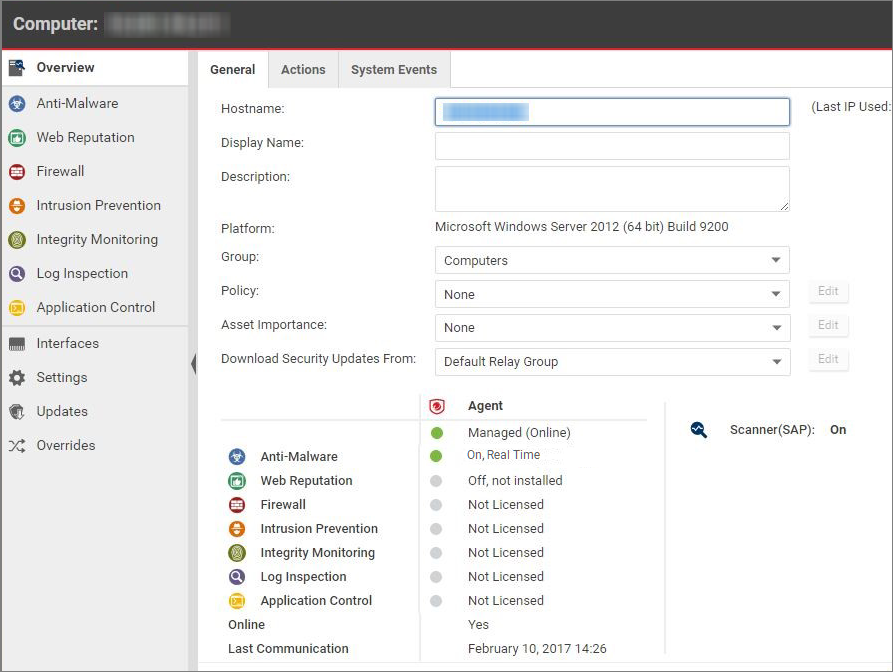
After status of the agent changes to Managed (Online) again and the Anti-Malware and Scanner (SAP) modules are On, you can proceed with the SAP configuration.
Configure SAP to use the agent
The Deep Security Agent is now running and able to scan the file system of its operating system. Next, make the agent aware of the SAP application server. To use this, create a virus scan adapter inside the application server. The virus scan adapter must be part of a group. After the virus scan adapter and virus scan group are created, use virus scan profiles to configure what to scan and how to behave.
Depending on your environment, the following are the required steps:
- Configure the Trend Micro scanner group or Configure the Trend Micro scanner group in a Java environment
- Configure the Trend Micro virus scan provider or Configure the Trend Micro virus scan provider in a Java environment
- Configure the Trend Micro virus scan profile or Configure the Trend Micro virus scan profile in a Java environment
- Test the virus scan interface or Test the virus scan interface in a Java environment
The virus scan group and the virus scan adapter are both global configurations (client 00). The virus scan profile must be configured in each tenant (client 01, 02, and so on).
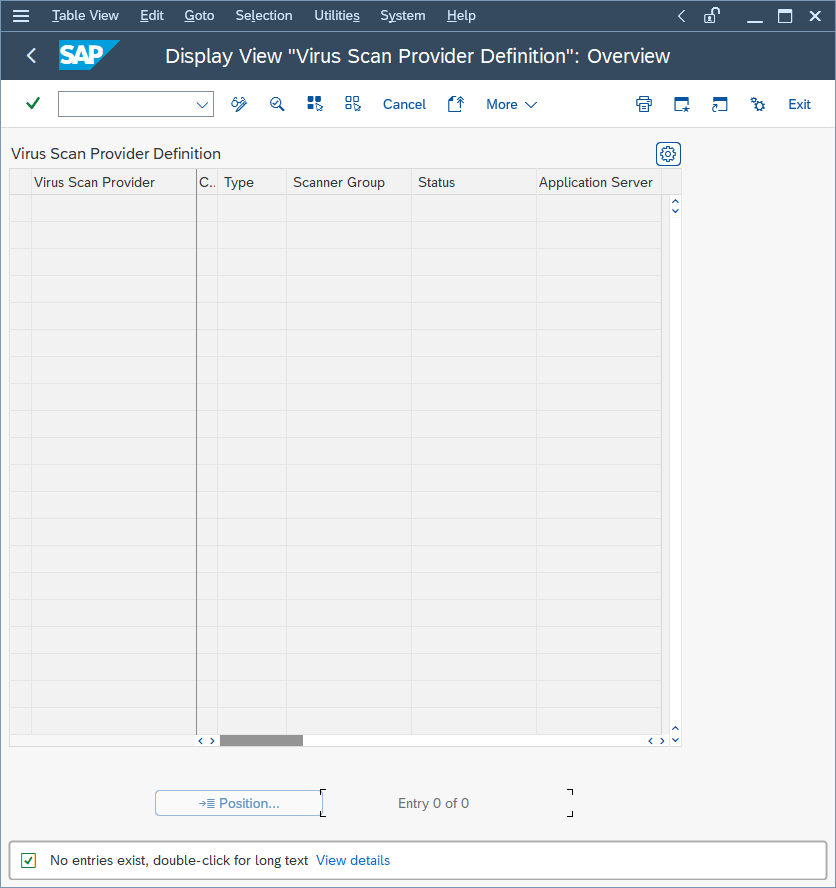
Configure the Trend Micro scanner group
- In the SAP WinGUI, run the VSCANGROUP transaction. In edit mode, click New Entries.
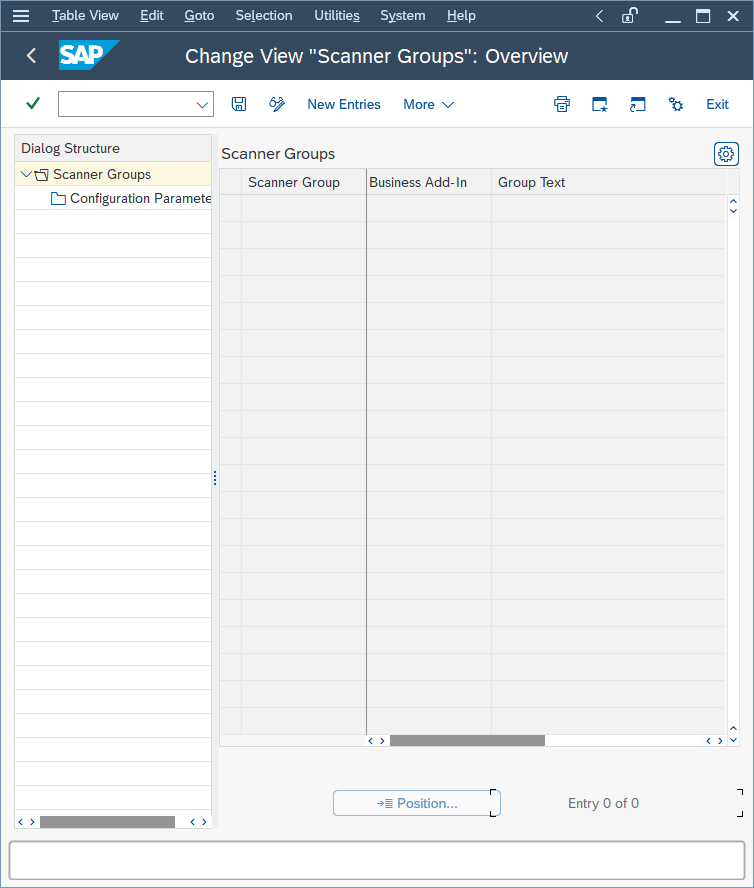
- Create a new scanner group, specifying a group name in the Scanner Group area and a description of the scanner group in the Group Text area.
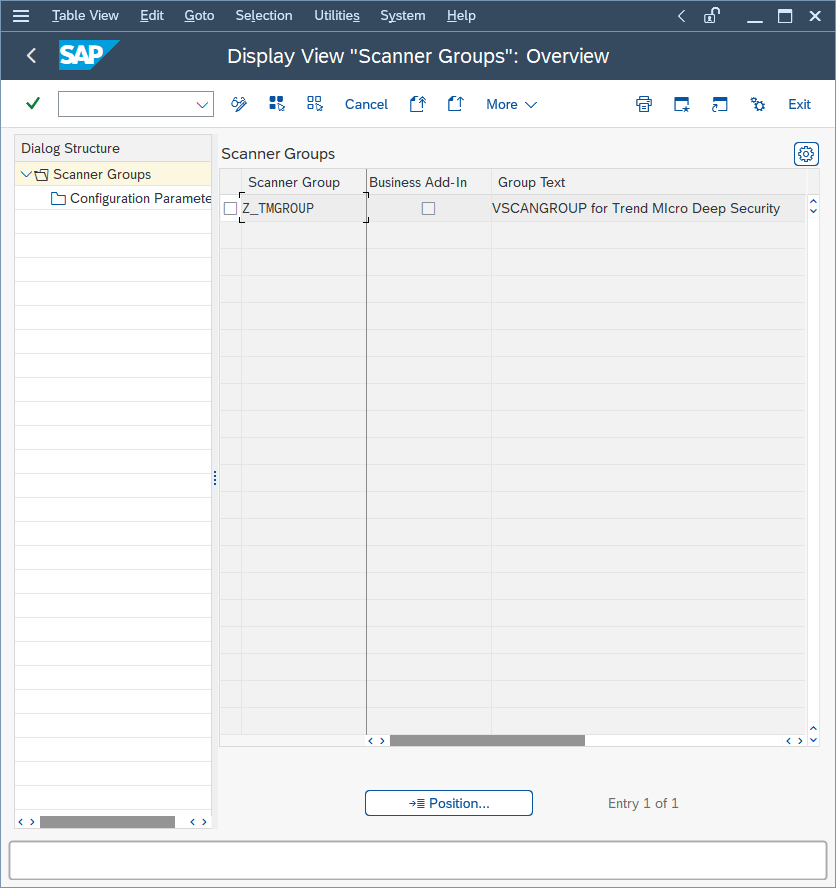
- Click the Save icon to leave the edit mode.
A Prompt for Workbench request dialog appears. In the following example, a new workbench request is created to keep track of all the VSI-related changes: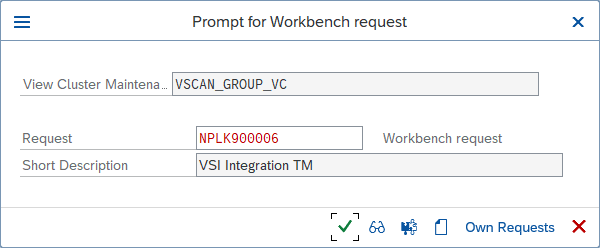
The next step is the actual configuration of the VSI integration. It is called a Virus Scan Adapter.
Configure the Trend Micro virus scan provider
- In the SAP WinGUI, run the VSCAN transaction. In edit mode, click New Entries.
- Enter a new configuration of the VSI-certified solution.
In the example below, the following configuration parameters are set: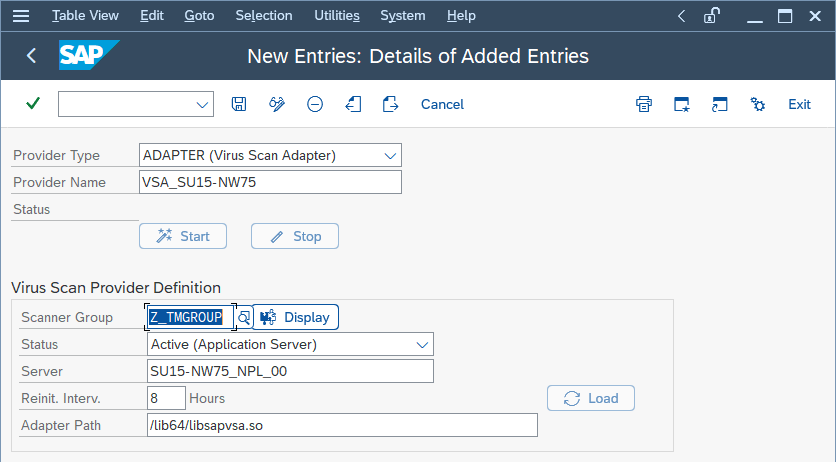
Setting Value Description Provider Type ADAPTER (Virus Scan Adapter) Automatically set (default) Provider Name VSA_<host name> Automatically set, serves as alias Scanner Group Select the group that you configured earlier All previously created scanner groups, which you can display using the input help Status Active (Application Server) Automatically set (default) Server nplhost_NPL_42 Automatically set, hostname Reinit. Interv. 8 Hours Specifies the number of hours after which the Virus Scan Adapter will be reinitialized and load new virus definitions. Adapter Path (Linux) /lib64/libsapvsa.so Default path Adapter Path (Windows) C:\Program Files\Trend Micro\Deep Security Agent\lib\dsvsa.dll Default path - Click the Save icon to leave the edit mode.
A prompt to pack this into a workbench request appears. - Confirm the request, then click Start.
The Status light turns green, which means the adapter is loaded and active: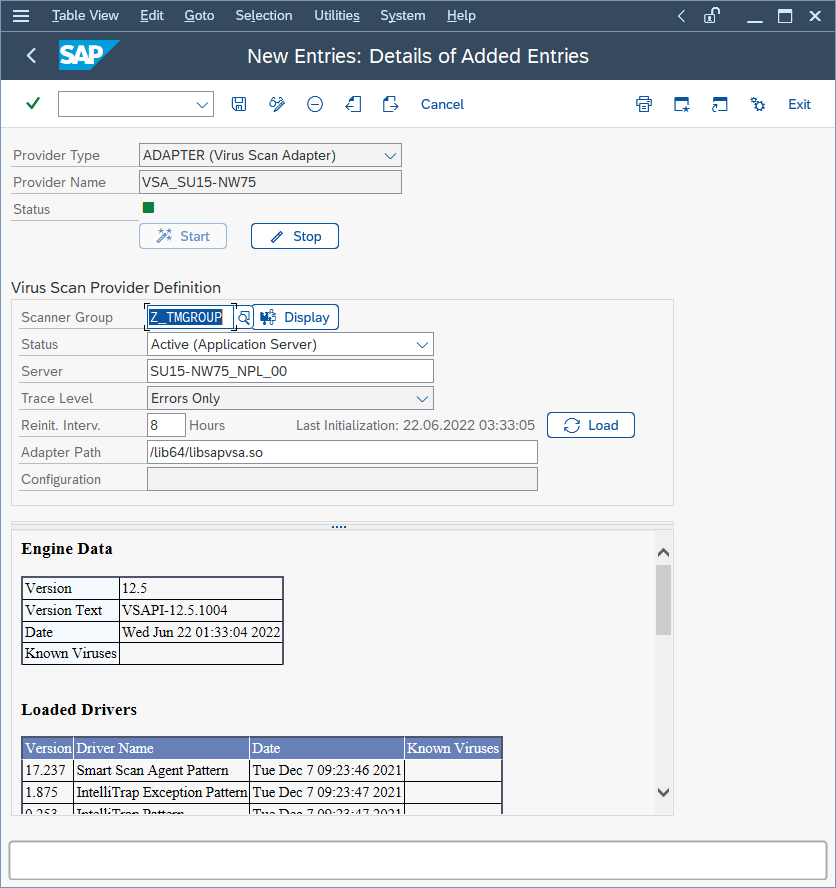
At this point, the VSI configuration is nearly finished. The application server is now ready to process file transactions using a virus scan provided by Trend Micro Deep Security.
Configure the Trend Micro virus scan profile
- In the SAP WinGUI, run the VSCANPROFILE transaction, then select the SAP operation that requires virus scan.
For example, check the "Active" checkbox for /SCET/GUI_UPLOAD or /SCET/GUI_DOWNLOAD and then click the Save icon.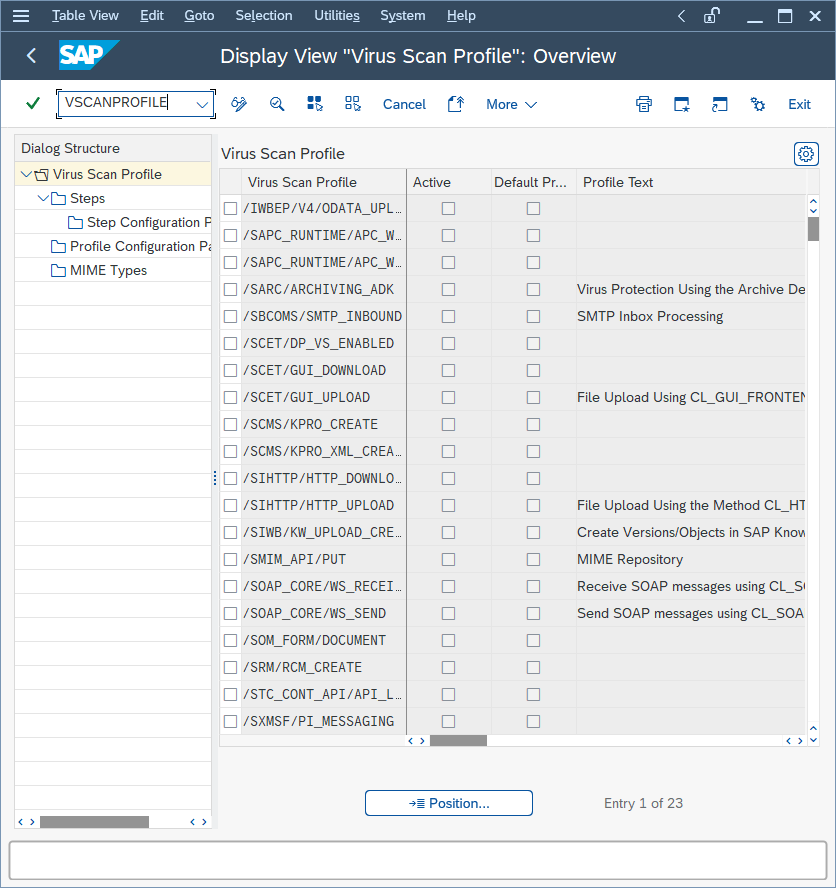
- In edit mode, click New Entries.
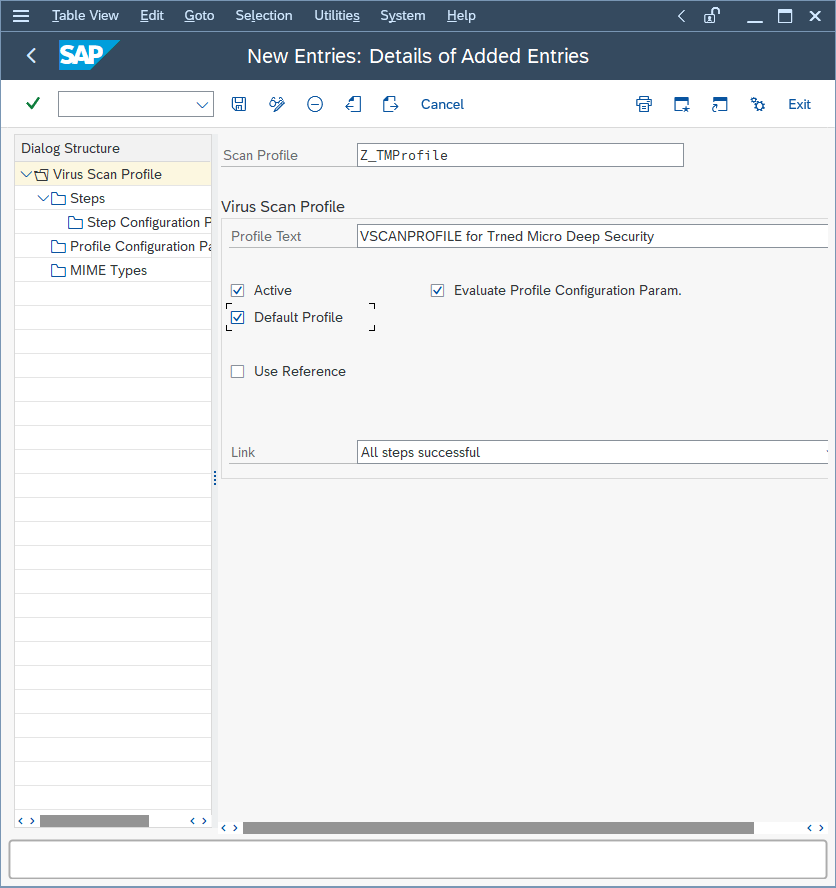
The virus scan profiles define how specific transactions (file uploads, file downloads, and so on) are handled corresponding to the virus scan interface. To use the previously configured virus scan adapter in the application server, you need to create a new virus scan profile: - In the Scan Profile field, enter Z_TMProfile and select Active, Default Profile, and Evaluate Profile Configuration Param.
- While still in edit mode, double-click Steps on the left to configure the steps:
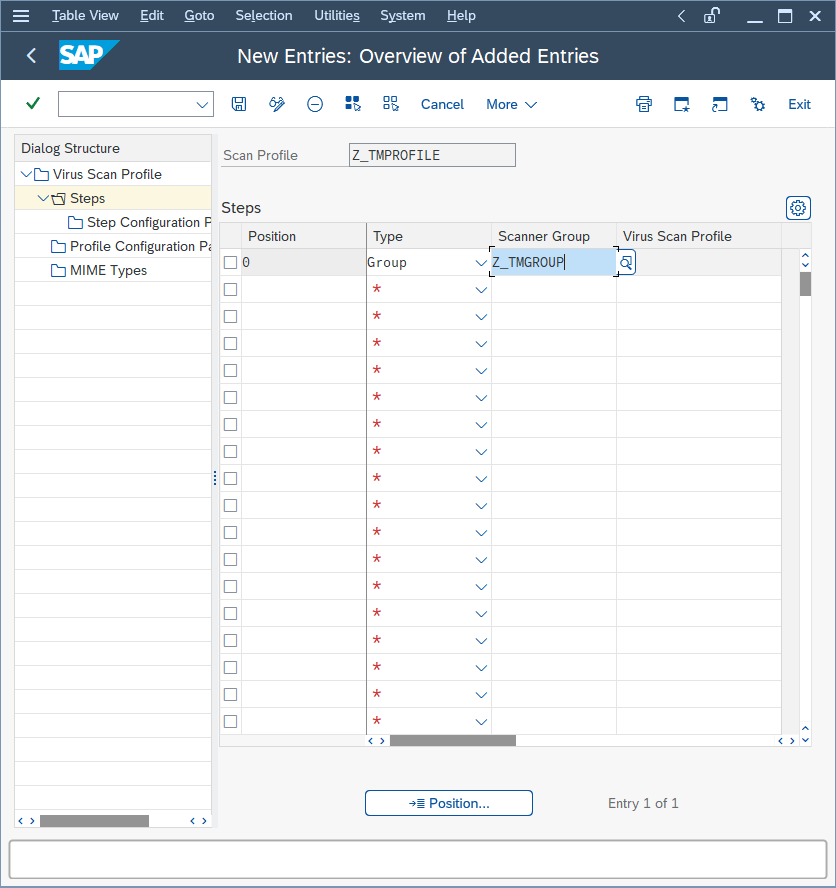
- Click New Entries.
The steps define what to do when the profile is called by a transaction. - Set the Position to 0, Type to Group, and Scanner Group to the name of the group that you configured earlier.
- Click the Save icon to leave the edit mode.
A notification eventually appears about an existing virus scan profile, /SCET/DP_VS_ENABLED. - Ignore the notification about an existing profile because the profile is not active and is not used.
After confirming this notification, you are asked to pack this configuration in a customization request. Creating a new request helps keep track of the changes that have been made: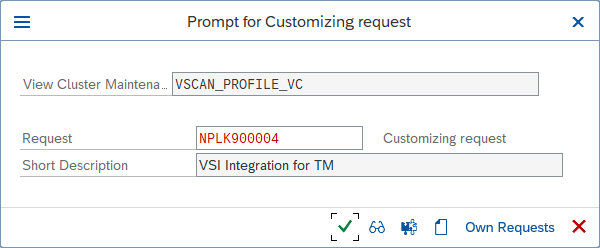
- To create configuration parameters for a step, double-click Profile Configuration Parameters on the left, then click New Entries and set the parameters:
Parameter Type Description CUST_ACTIVE_CONTENT BOOL Check if a file contains script (JavaScript, PHP, or ASP script) and block. CUST_CHECK_MIME_TYPE BOOL Check if the file extension name matches its MIME type. If they do not match, the file is blocked. All MIME types and extension names can be exactly matched. For example: - Microsoft Word files must be
.docor.dot - JPEG files must be
.jpg - Text and binary files can have any extensions
See Supported MIME types.
- Microsoft Word files must be
- Double-click Step Configuration Parameters on the left, then select New Entries and set the parameters:
Parameter Type Description Default (Linux) Default (Windows) SCANBESTEFFORT BOOL The scan should be performed on the best effort basis; that is, all security critical flags that allow a VSA to scan an object should be activated, such as SCANALLFILES and SCANEXTRACT, but also internal flags. Details about exactly which flags these are can be stored in the certification. (not set) (not set) SCANALLFILES BOOL Scans for all files regardless of their file extension. disabled disabled SCANEXTENSIONS CHAR List of the file extensions for which the VSA should scan. Only files with the configured extensions are checked. Other extensions are blocked. Wildcards can also be used here to search for patterns. *stands for this location and following, and?stands for only this character. For example,exe;com;do?;ht* => \`\*\`means to scan all files.null "" SCANLIMIT INT This setting applies to compressed files. It specifies the maximum number of files that are unpacked and scanned. INT_MAX 65535 SCANEXTRACT BOOL Archives or compressed objects are to be unpacked enabled enabled SCANEXTRACT_SIZE SIZE_T Maximum unpack size 0x7FFFFFFF 62914560 (60 MB) SCANEXTRACT_DEPTH INT Maximum depth to which an object is to be unpacked. 20 20 SCANLOGPATH CHAR Custom log path for VSA.
Must be an absolute path to either a regular file or to a location where a regular file can be created. Cannot be an executable file path.
Only limited log messages are written. For example, the detected malware.
Supported in Deep Security Agent 20 LTS update 2024-05-02.(not set) (not set) SCANMIMETYPES CHAR List of the MIME types to be scanned for. Only files with configured MIME types are checked. Other MIME types are blocked. This parameter works only if CUST_CHECK_MIME_TYPE is enabled. (not set) (not set) BLOCKMIMETYPES CHAR List of MIME types that are blocked. This parameter works only if CUST_CHECK_MIME_TYPE is enabled. (not set) (not set) BLOCKEXTENSIONS CHAR List of file extensions that are blocked. (not set) (not set)
This configuration is per-client, so it must be done in each tenant of the SAP application server.
Test the virus scan interface
- In the SAP WinGUI, run the VSCANTEST transaction.
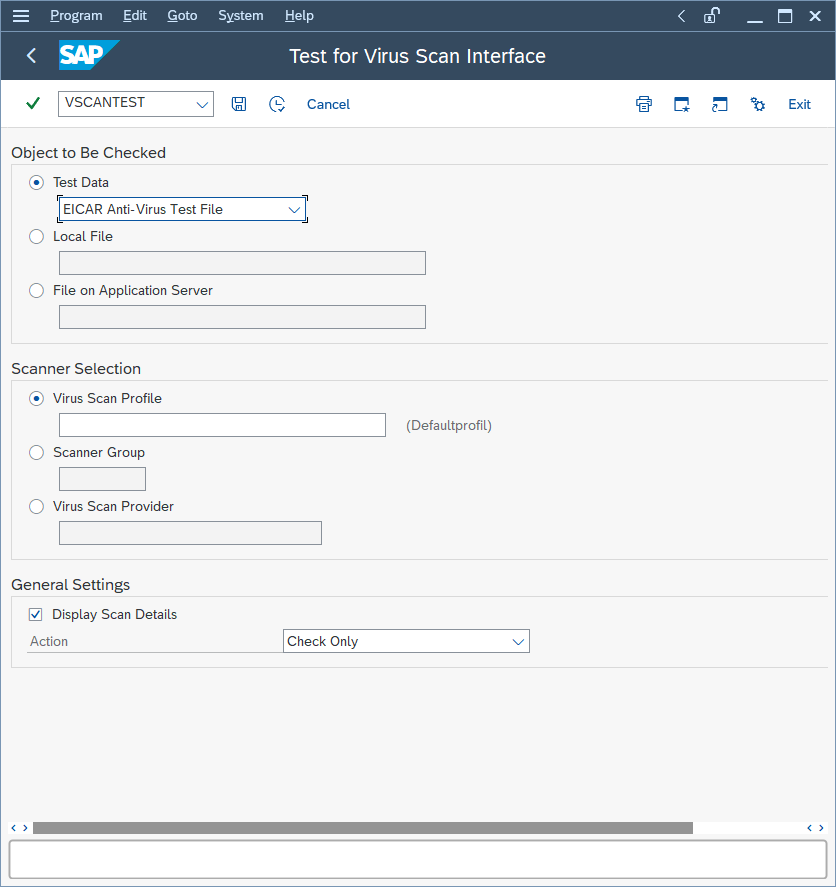
Every VSI-aware SAP application server also has a built-in test to check whether the configuration steps were done correctly. For this, an EICAR test virus (www.eicar.org) is packed in a transaction that can call a specific scanner. - Not providing any values calls the default profile, which was configured in the previous step, so do not set anything.
- Click Execute.
A notification appears, explaining what an EICAR test virus is. - Confirm the notification.
The transaction is intercepted: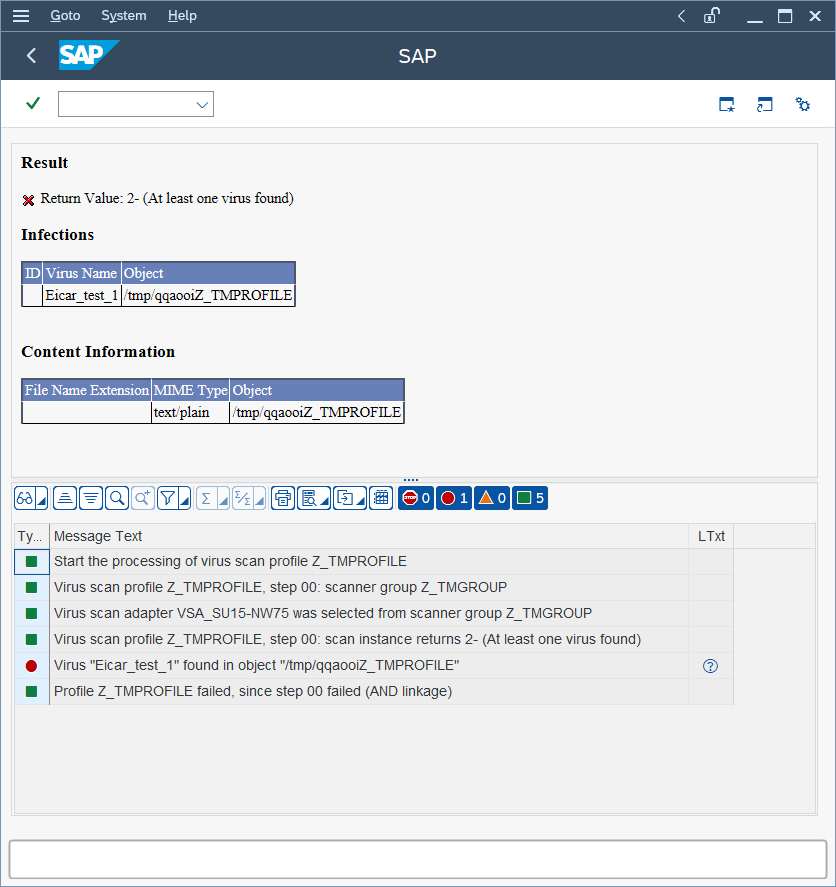
Infections shows information about the detected malware.
Content Information shows the correct MIME-type of the file.
The file name is always a randomly generated 7-letter alphabetic string followed by the virus scan profile name.
After this, there is an output about each step of the transaction:
- The transaction called the default virus scan profile, which is the virus scan profile Z_TMPROFILE.
- The virus scan profile Z_TMPROFILE is configured to call an adapter from the virus scan group Z_TMGROUP.
- The virus scan group Z_TMGROUP has multiple adapters configured and calls one of them (in this case, VSA_NPLHOST).
- The virus scan adapter returns value 2-, which means a virus was found.
- Information about the detected malware is displayed by showing Eicar_test_1 and the file object /tmp/ zUeEbZZ_TMPROFILE.
- The called default virus scan profile Z_TMPROFILE fails because step 00 (the virus scan group) was not successful and therefore the file transaction is stopped from further processing.
For a cross-check, there is also information about this "malware" event in the Deep Security Manager console. To see the event, open the Computer editor![]() To open the Computer editor, go to the Computers page and double-click the computer that you want to edit (or select the computer and click Details). and select Anti-Malware > Events.
To open the Computer editor, go to the Computers page and double-click the computer that you want to edit (or select the computer and click Details). and select Anti-Malware > Events.
Configure the Trend Micro scanner group in a Java environment
A scanner group combines multiple virus scanners of the same type. You require the groups to specify virus scan profiles later.
You can create a scanner group as follows:
- Log in to SAP NetWeaver Administrator.
- Select the Configuration tab, and then select Virus Scan Provider.
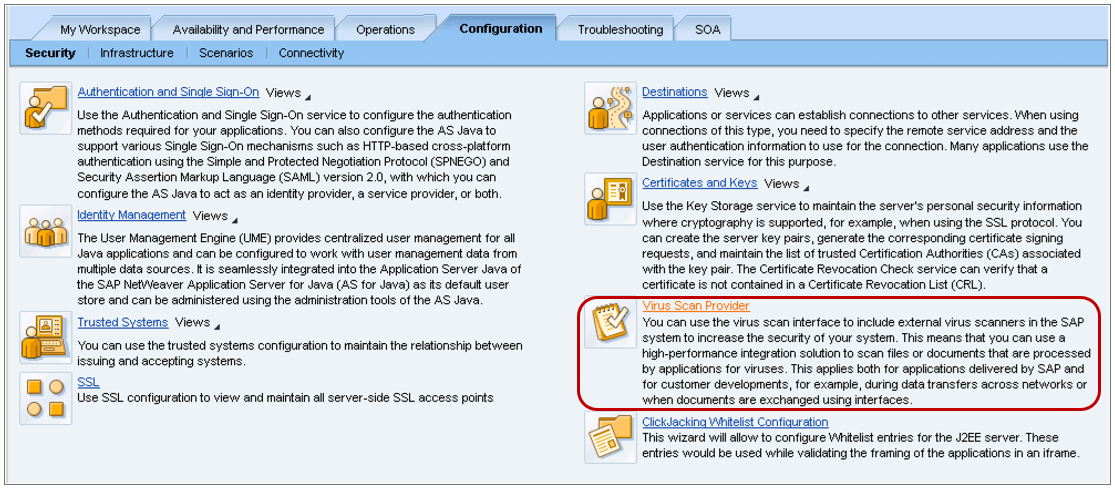
- In change mode, in the Groups tab, click Add.
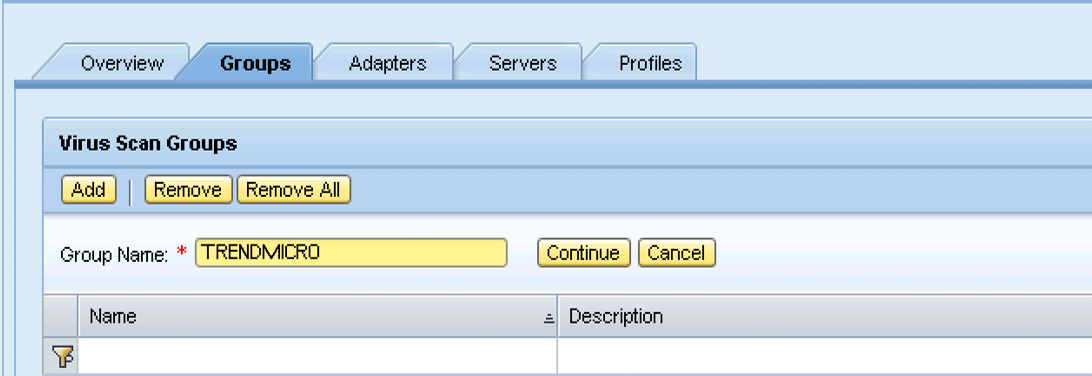
- In the Settings tab, enter the description of the group in the Group Description field that is part of the Virus Scan Group Details.
- Select Default Scan Group to use this group as the default group.
Configure the Trend Micro virus scan provider in a Java environment
You can configure a virus scan provider as follows:
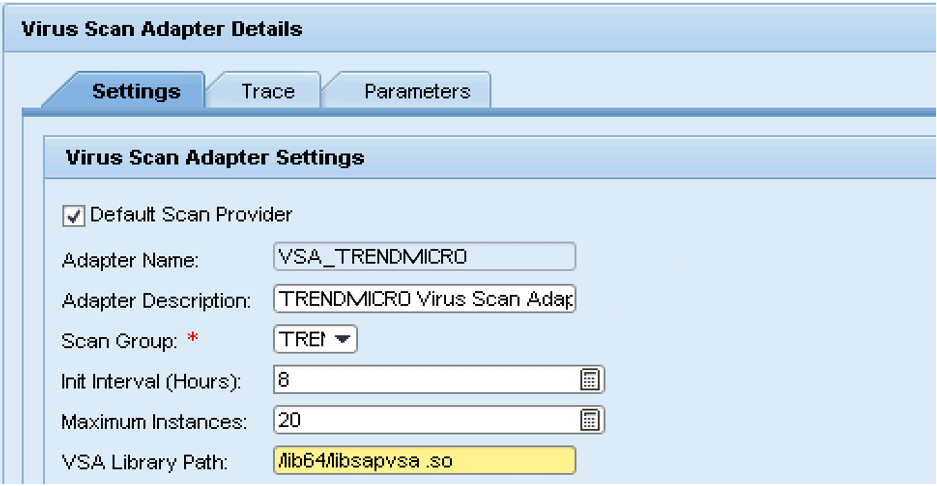
- In change mode, in the Adapters tab, click Add to create the Virus Scan Provider as a virus scan adapter.
- Use the Adapter Name field to add the rest of the name after the predefined prefix, and then click Continue. The name must start with VSA_. This adds a new row in the Virus Scan Adapters group.

- Provide the path to the VSA shared library, which is
/lib64/libsapvsa.soon UNIX andC:\Program Files\Trend Micro\Deep Security Agent\lib\dsvsa.dllon Windows. - Make a selection from the Scan Group list.
- Select Default Scan Provider.
- Save your configurations and activate the Virus Scan Provider.
Configure the Trend Micro virus scan profile in a Java environment
Applications use virus scan profiles to check data for viruses. A virus scan profile contains a list of scanner groups that check a document. You can also use a virus scan profile to assign configuration parameters for the virus scanner. If you scan for viruses with this virus scan profile, the virus scanner receives the parameters.
A virus scan profile specifies steps that are to be processed during the scan. A step is either a virus scanner typically found using the scanner group or a step that specifies a virus scan profile. This step is then performed as part of the enclosing virus scan profile.
A virus scan is performed under the name of a virus scan profile. The system administrator can use the profile to activate or deactivate the virus scan for each component.
By default, a virus scan profile is provided for each SAP application that integrates a virus scan.
You can configure a virus scan profile as follows:
- On the Profiles tab, click Add to create a virus scan profile in change mode.
- In the Profile Name field, enter the rest of the name after the predefined prefix, and then click Continue. This adds a new row in a Virus Scan Profiles group.
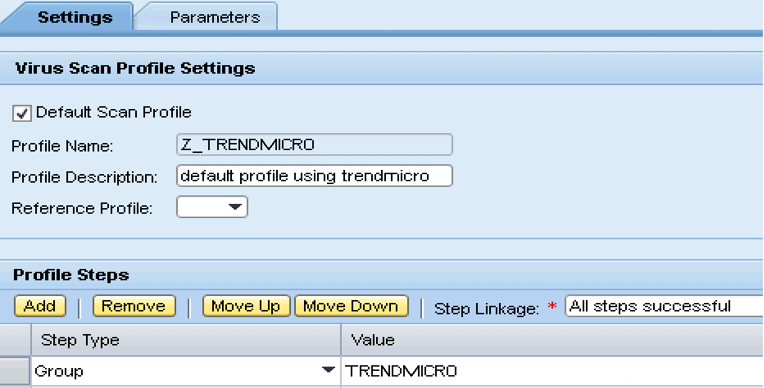
- Under Virus Scan Profile Details, select the Settings tab, and then select the profile to be edited as a reference profile by setting the Default Scan Profile indicator:
- To use the default profile, select Default Profile from the the Reference Profile list.
- To use a reference profile, from the Reference Profile list, select an existing reference profile to which to link the new profile. This is possible due to the fact that since a virus scan profile can use another virus scan profile as a reference profile, multiple applications can be operated through the same virus scan profile.
- To define the new profile, click Add and complete the following fields:
Field Description Profile Name The name of the new profile. Profile Description Description of the new profile. Reference Profile If selected, other fields would be hidden. Step Linkage Linkage of the steps of this profile: - All steps successful: AND linkage, with which every step must be successful for the overall result to be successful.
- At least one step successful: OR linkage, with which only one step needs to be successful for the overall result to be successful.
Profile Steps Steps in this profile. - Specify the profile steps in the Profile Steps group, as follows:
- Click Add.
- Make a selection from the tep Type list as either a group or another profile to use.
- Specify the value for the group or profile.
- Use Move Up, Move Down, and Remove to configure the Profile Steps list.
- To activate the profile, save your entries, then select the profile in the Virus Scan Profiles group, and then click Activate.
Now configure the profile parameters, as follows:
- Select the Parameters tab of the relevant profile in edit mode.
- Click Add to create a new entry.
- Save the entries.
The following table lists the profile configuration parameters:
| Parameter | Type | Description |
|---|---|---|
| CUST_ACTIVE_CONTENT | BOOL | Checks if a file contains script, such as JavaScript, PHP, or ASP script, and then and block it. |
| CUST_CHECK_MIME_TYPE | BOOL | Checks if the file extension name matches its MIME type. If they do not match, the file is blocked. All MIME types and extension names can be exactly matched. For example:
See Supported MIME types. |
The following table lists the step configuration parameters:
| Parameter | Type | Description | Default for Linux | Default for Windows |
|---|---|---|---|---|
| SCANBESTEFFORT | BOOL | Scans on the best effort-basis; that is, all critical security flags that allow a VSA to scan an object should be activated, such as SCANALLFILES and SCANEXTRACT, but also internal flags. Details about the possible flags are stored in the certification. | 1 | 1 |
| SCANALLFILES | BOOL | Scans for all files regardless of their file extension. | 1 | 1 |
| SCANLIMIT | INT | Specifies the maximum number of files that are unpacked and scanned. Applies to compressed files only. | INT_MAX | 65535 |
| SCANEXTRACT | BOOL | Unpacks archives or compressed objects. | enabled | enabled |
| SCANEXTRACT_SIZE | SIZE_T | Maximum unpack size. | 0x7FFFFFFF | 62914560 (60 MB) |
| SCANEXTRACT_DEPTH | INT | Maximum depth to which an object is to be unpacked. | 20 | 20 |
| SCANLOGPATH | CHAR | Custom log path for VSA.
Must be an absolute path to either a regular file or to a location where a regular file can be created. Cannot be an executable file path. Only limited log messages are written. For example, the detected malware. Supported in Deep Security Agent 20 LTS update 2024-05-02. |
(not set) | (not set) |
Test the virus scan interface in a Java environment
- Start the test application under the
/vscantestpath. - Specify the object to check, using either the provided test data or your own local file.
- Select the virus scan profile, scanner group, or the virus scan provider to test.
- Select one of the following options:
- Check only - The specified anti-virus product scans the data for viruses and displays the result.
- Check and clean - In addition to scanning and displaying the result, the specified anti-virus product attempts to clean the data if a virus infection is diagnosed.
- Click Execute the action to start the test.
Supported MIME types
The MIME types supported by Deep Security Scanner vary depending on the version of Deep Security Agent you are using:
- Deep Security Agent 9.6 uses VSAPI 9.85
- Deep Security Agent 10.0 uses ATSE 9.861
- Deep Security Agent 10.1 uses ATSE 9.862
- Deep Security Agent 10.2, 10.3, 11.0, 11.1, and 11.2 use ATSE 10.000
- Deep Security Agent 11.3 and later use ATSE 11.0.000
| MIME Type | Description | Extension | Supported in agent 9.6 |
Supported in agent 10.0 |
Supported in agent 10.1 and later |
| application/octet-stream | * | Yes | Yes | Yes | |
| application/com | COM File | com | Yes | Yes | Yes |
| application/ecmascript | EMCScript File | es | Yes | Yes | Yes |
| application/hta | HTA File | hta | Yes | Yes | Yes |
| application/java-archive | Java Archive (JAR) file | ear, jar, rar, sar, war, zip | Yes | Yes | Yes |
| application/javascript | Javascript File | js, jsxinc, jsx, ztl | Yes | Yes | Yes |
| application/msword | Word for Windows | doc, dot | Yes | Yes | Yes |
| application/vnd.ms-access | MS Access | mdb | No | No | No |
| application/vnd.ms-project | MS Project | mpp | No | No | No |
| application/octet-stream | COM File | com | Yes | Yes | Yes |
| application/octet-stream | EXE File | exe | Yes | Yes | Yes |
| application/pdf | Adobe Portable Document Format file | Yes | Yes | Yes | |
| application/postscript | Postscript | ai, ps | Yes | Yes | Yes |
| application/rar | RAR File | rar | Yes | Yes | Yes |
| application/rtf | Microsoft RTF | rtf | Yes | Yes | Yes |
| application/sar | Sar File | sar | Yes | Yes | Yes |
| application/vnd.ms-excel | Excel for Windows | xls, xlt, xla | Yes | Yes | Yes |
| application/vnd.ms-outlook | Outlook for Windows | msg | No | Yes | Yes |
| application/vnd.ms-powerpoint | Windows PowerPoint | ppt, pot, pps, ppa | Yes | Yes | Yes |
| application/vnd.ms-publisher | MS Publisher | pub | No | No | Yes |
| application/vnd.oasis.opendocument | Open Document | odf | Yes | Yes | Yes |
| application/vnd.openxmlformats-officedocument.presentationml.presentation | MS Office File | pptx, potx, ppsx, ppam, pptm, potm, ppsm | Yes | Yes | Yes |
| application/vnd.openxmlformats-officedocument.spreadsheetml.sheet | MS Office File | xlsx, xltx, xlsm, xltm, xlam, xlsb | Yes | Yes | Yes |
| application/vnd.openxmlformats-officedocument.wordprocessingml.document | MS Office File | docx, dotx, docm, dotm | Yes | Yes | Yes |
| application/vnd.rn-realmedia | Real Media | rm | Yes | Yes | Yes |
| application/wordperfect | WOrdPerfect | wp, wp5, wp6, wpd, w60, w61 | Yes | Yes | Yes |
| application/x-alf | alf | Yes | Yes | Yes | |
| application/x-arc-compressed | ARC File | arc | Yes | Yes | Yes |
| application/x-bzip2 | bZIP File | * | Yes | Yes | Yes |
| application/x-cpio | CPIO File | * | Yes | Yes | Yes |
| application/x-director | Macromedia Director Shockwave Movie | dcr | Yes | Yes | Yes |
| application/x-gzip | Gzip | * | Yes | Yes | Yes |
| application/xhtml+xml | XHTML | dhtm, dhtml, htm, html, htx, sht, shtm, shtml, stml, xht, xhtm, xhtml, xml, txt | Yes | Yes | Yes |
| application/x-java-class | JAVA Applet | class | Yes | Yes | Yes |
| application/x-kep | kep | Yes | Yes | Yes | |
| application/x-otf | otf | Yes | Yes | Yes | |
| application/x-sapshortcut | sap, sapc | Yes | Yes | Yes | |
| application/x-shockwave-flash | Macromedia Flash | swf | Yes | Yes | Yes |
| application/x-silverlight-app | PKZIP | xap | Yes | Yes | Yes |
| application/x-sim | sim | Yes | Yes | Yes | |
| application/x-tar | TAR File | tar | Yes | Yes | Yes |
| application/x-vbs | * | Yes | Yes | Yes | |
| application/zip | ZIP File | zip, zipx | Yes | Yes | Yes |
| audio/basic | Audio | snd, au | Yes | Yes | Yes |
| audio/midi | MIDI | mid, midi, rmi, mdi, kar | Yes | Yes | Yes |
| audio/x-aiff | Audio InterChange File Format from Apple/SGI | aiff, aif, aifc | Yes | Yes | Yes |
| audio/x-mpeg-3 | MP3 | mp3 | Yes | Yes | Yes |
| audio/x-realaudio | Real Audio | ra | Yes | Yes | Yes |
| audio/x-voc | Creative Voice Format(VOC) | voc | Yes | Yes | Yes |
| image/bmp | Windows BMP | bmp | Yes | Yes | Yes |
| image/gif | GIF | gif | Yes | Yes | Yes |
| image/ico | Windows Icon | ico | Yes | Yes | Yes |
| image/jpeg | JPEG | jpg, jpeg, jpe, jif, jfif, jfi | Yes | Yes | Yes |
| image/msp | Microsoft Paint | msp | Yes | Yes | Yes |
| image/png | Portable Network Graphics | png | Yes | Yes | Yes |
| image/ppm | PPM image | ppm | Yes | Yes | Yes |
| image/svg+xml | svg | Yes | Yes | Yes | |
| image/tiff | TIFF | tif, tiff | Yes | Yes | Yes |
| image/vnd.ms-modi | Microsoft Document Imaging | mdi | Yes | Yes | Yes |
| image/x-cpt | Corel PhotoPaint | cpt | Yes | Yes | Yes |
| image/x-pcx | PCX | pcx | Yes | Yes | Yes |
| image/x-pict | Macintosh Bitmap | pct | Yes | Yes | Yes |
| image/x-ras | Sun Raster(RAS) | ras | Yes | Yes | Yes |
| image/x-wmf | Windows Metafile | wmf | Yes | Yes | Yes |
| image/vnd.dwg | DWG File | dwg | No | No | Yes |
| text/csv | CSV | csv, txt | Yes | Yes | Yes |
| text/html | HTML | dhtm, dhtml, htm, html, htx, sht, shtm, shtml, stml, xht, xhtm, xhtml, xml, txt | Yes | Yes | Yes |
| text/plain | * | Yes | Yes | Yes | |
| text/plain | Text File | msg, txt | Yes | Yes | Yes |
| text/xml | XML | dhtm, dhtml, htm, html, htx, sht, shtm, shtml, stml, xht, xhtm, xhtml, xml, txt | Yes | Yes | Yes |
| text/xsl | XSL | xsl | Yes | Yes | Yes |
| unknown/unknown | * | Yes | Yes | Yes | |
| video/mpeg | * | Yes | Yes | Yes | |
| video/quicktime | Quick Time Media | m4a, m4b, m4p, m4r, m4v, mov, movie, mp4, heic, heics, heif, heifs, qt | Yes | Yes | Yes |
| video/x-fli | AutoDesk Animator | fli | Yes | Yes | Yes |
| video/x-flv | Macromedia Flash FLV Video | flv | Yes | Yes | Yes |
| video/x-ms-asf | Advanced Streaming Format | asf, wma, wmv | Yes | Yes | Yes |
| video/x-scm | Lotus ScreenCam Movie | scm | Yes | Yes | Yes |
| font/ttf | TrueType Font | dfont, otc, otf, ttc, tte, ttf | No | No | Yes |
| text/x-msdos-batch | A batch file is a script file in DOS, OS/2, and Microsoft Windows | bat, cmd, btm, txt | No | No | No |