Install Deep Security Manager on multiple nodes
Instead of running Deep Security Manager on one server, you can install Deep Security Manager on multiple servers ("nodes") and connect them to one shared database. This provides better:
- Reliability
- Availability
- Scalability
- Performance
You can log in to any node. Each node can do all types of tasks. No node is more important than any of the others. A node failure does not cause service downtime, and does not result in data loss. Deep Security Manager processes many concurrent activities in a distributed pool that all online nodes execute. All activity that does not happen due to user input is packaged as a job, and runs on any available manager (with some exceptions for "local" jobs that are executed on each node, like cache clearing).
Each node must run the same Deep Security Manager software version. When you upgrade, the first manager you upgrade will temporarily take over all duties and shut down the other nodes. On Administration > Manager Nodes, other nodes' status will be "Offline" with an indication that an upgrade is required. Once upgraded, nodes will automatically return online and begin processing again.
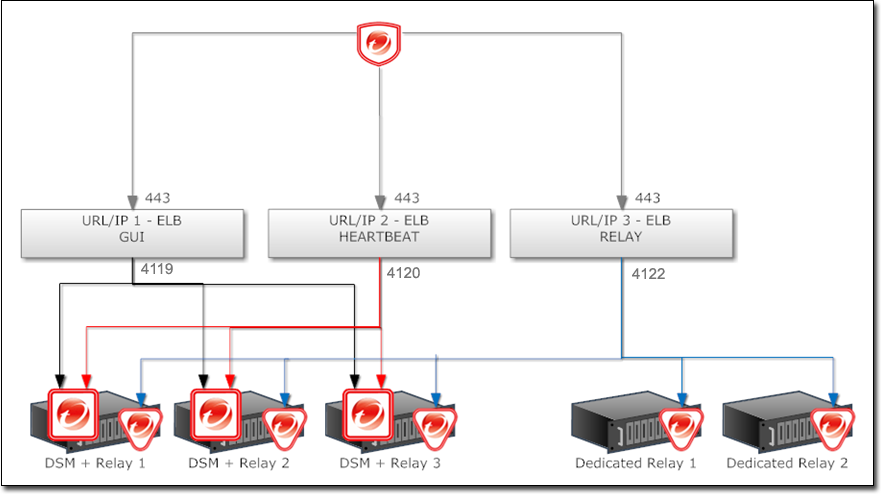
Set up a load balancer
If you are deploying multiple server nodes of Deep Security Manager for a large scale deployment, a load balancer can help distribute connections with agents and appliances. Load balancers with virtual IPs can also provide a single inbound port number such as TCP 443, instead of the multiple port numbers that Deep Security normally requires.
Balance load based upon TCP connections; do not use SSL termination. This ensures that an entire connection occurs with the same manager node. The next connection may be distributed to a different node.
For more Deep Security Manager deployment recommendations, see the Deep Security Best Practice Guide.
Configure the load balancer in Deep Security
By default, a multi-node manager gives the address of all nodes to all agents and virtual appliances. The agents and virtual appliances randomly select a node from the list when they try to connect. If they cannot, then they try another node on the list, continuing this process until either a connection succeeds, or no nodes can be reached. If they can't reach any node, then they wait until the next heartbeat to try again.
Each time a node is added or removed, an updated list is sent to all agents and virtual appliances. Until then, connections to old nodes may fail, and the new node will be unused. This causes slow communications and increased network traffic. To avoid this, instead configure agents and virtual appliances to connect via the load balancer's address.
Add a node
- Set up a load balancer.
- After you have installed Deep Security Manager on one server node,
- Select the AMI that matches the billing model you chose for the previous node, either Pay-as-you-Go or Bring-your-own license (BYOL).
- Install the same version of the manager on all nodes.
- Never
- Connect all nodes to the same database.
- Make sure all nodes use the same master key (if configured).
- Have the master key always available so that all nodes can decrypt and read the encrypted configuration properties and personal data when required. For more information, see masterkey.
- If the installer shows a Master Key page with the following text: Type the local secret used to access the master key. All nodes that belong to the same Deep Security Manager must be configured with the same local secret. On this page, enter the secret that you specified when you set up the first node.
- Set the system clock of each manager node to use the same time zone. The database must also use the same time zone. If the time zone is different, this causes Manager Time Out of Sync errors.
Add a node if manager versions are mismatched
If you're trying to add a manager node but the installation fails, it might be because the AMI that you're trying to launch—and the manager software within it—is at a version that is earlier than the manager nodes you have already installed. This situation typically arises if you have upgraded your existing manager nodes to a version that hasn't been posted to AWS Marketplace yet (and possibly may never be posted). To work around this issue, complete the following tasks to add a manager node successfully.
First, allow the creation of new nodes:
- SSH into an existing manager node.
- Add the following line to the dsm.properties file:
manager.allowNewNodeCreation=true
This setting allows new manager nodes to be created based on this one.
Next, create a new AMI:
- In the AWS console, select the existing manager node's EC2 instance, and then click Actions > Image > Create Image.
- Enter an Image name such as Deep Security Manager AMI. Leave the remaining fields at their defaults.
- Click Create Image.
- In the AWS console's navigation pane, go to Images > AMI, and wait for the image to finish creating.
A new AMI is now created with the manager preinstalled.
Finally, launch a new manager node based on the AMI:
- Still in Images > AMI, right-click the new image and select Launch.
- Select an appropriate size for the instance, and then click Next: Configure Instance Details.
- Expand the Advanced Details section, and in the User data form, add the following line:
sed -i '/managerNodeGUID/d' /opt/dsm/webclient/webapps/ROOT/WEB-INF/dsm.properties
This setting indicates to create a new GUID for this node.
- Move through the wizard by clicking Next. When asked to configure a security group, choose the one that you used for your other node.
- Proceed through the remaining wizard steps to launch the new node.
The new node now appears in the manager.
Remove a node
Before you remove or replace a server, you should remove it from the pool of Deep Security Manager nodes.
-
Halt the service or uninstall Deep Security Manager on the node that you want to remove.
Its status must change to "Offline".
- Log into Deep Security Manager on another node.
- Go to Administration > Manager Nodes.
-
Double-click the node that you want to remove.
The node's Properties window should appear.
- In the Options area, click Decommission.
Upgrade a node
Follow the instructions in Upgrade Deep Security Manager AMI for details on upgrading manager nodes.
Viewing node statuses
To display all Deep Security Manager nodes along with their status, combined activity, and jobs being processed, go to Administration > System Information. From the drop-down menu, select which graph you want to view.
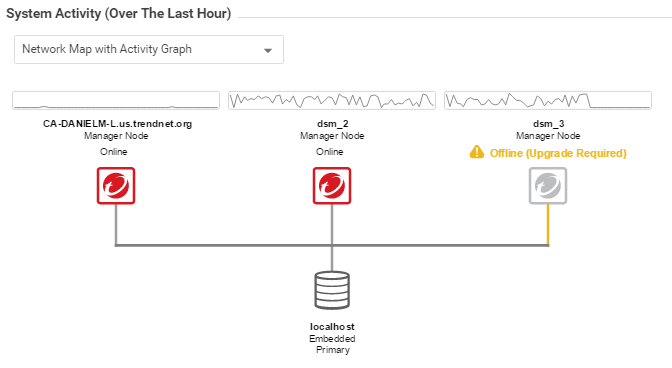
Network Map with Activity Graph
The Network Map with Activity Graph in the System Activity area displays a map of all installed manager nodes and their current status as well their relative activity over the last hour. The nodes can be in the following states:
- Online
- Offline
- Offline (Upgrade Required)
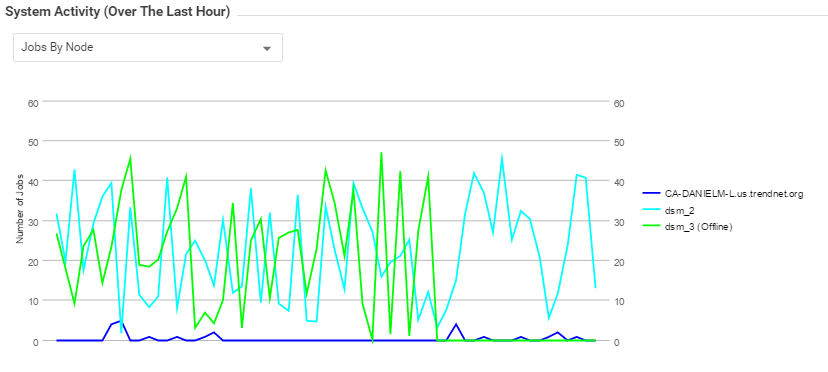
Jobs by Node
This chart displays the number of jobs carried out over the last hour by each node.
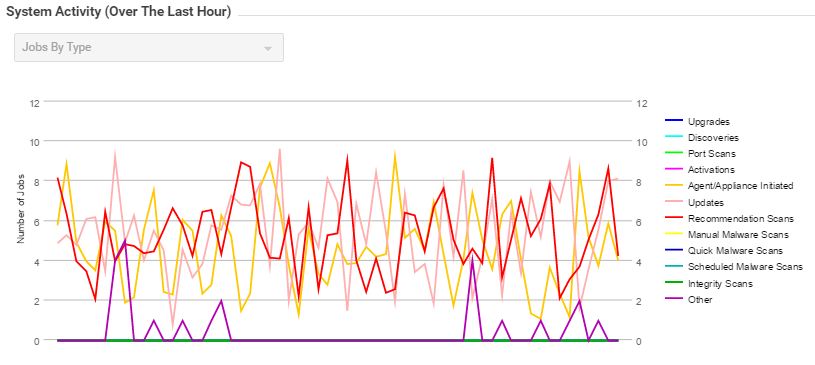
Jobs by Type
This chart displays the jobs carried out over the last hour by type.
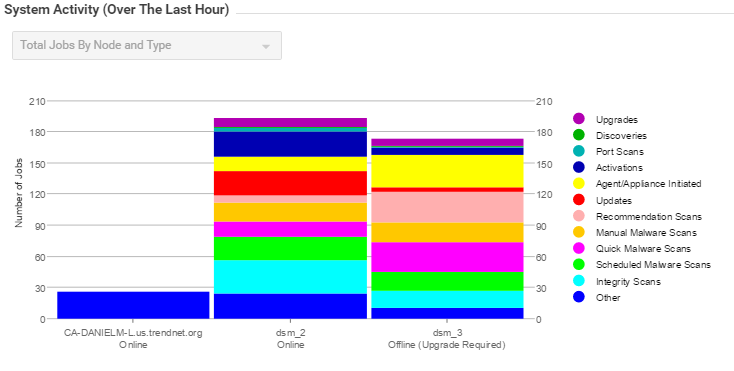
Total jobs by node and type
This chart displays the number of job types for each node over the last hour.