Detect emerging threats using Threat Intelligence
The Threat Intelligence feature was formerly called Connected Threat Defense. If you were previously using Connected Threat Defense, see Migrating from Connected Threat Defense to Threat Intelligence.
In the modern data center, more and more security breaches are a result of targeted attacks using techniques such as phishing and spear-phishing. In these cases, malware writers can bypass traditional malware scanners by creating malware specifically targeted for your environment. Deep Security provides enhanced malware protection for new and emerging threats through its Threat Intelligence feature.
In this article:
- How does Threat Intelligence work?
- Check the Threat Intelligence prerequisites
- Set up a connection to Trend Micro Vision One
- Set up a connection to Deep Discovery Analyzer
- Set up a connection to Trend Micro Apex Central
- Create a malware scan configuration for use with Threat Intelligence
- Enable Threat Intelligence for your computers
- Manually submit a file to Sandbox Analysis
- Allow a file that has raised a false alarm
- Configure the scan action for a suspicious file
- Update the suspicious objects list in Deep Security
- Configure Threat Intelligence in a multi-tenant environment
- Supported file types
- Migrating from Connected Threat Defense to Threat Intelligence
For an overview of the Anti-Malware module, see About Anti-Malware.
How does Threat Intelligence work?
- When all the components are configured properly, the Deep Security Agent uses heuristic detection to analyze files on the protected computer and determines whether they are suspicious.
- Optionally, you can manually or automatically send suspicious files from Deep Security to Trend Micro Vision One or Deep Discovery Analyzer, which executes and observes the suspicious file in a sandbox (a secure, isolated virtual environment).
- Deep Security Manager gets the sandbox analysis results from Trend Micro Vision One or Deep Discovery Analyzer.
The sandbox analysis report doesn’t provide protection; it simply provides information on the Trend Micro Vision One or Deep Discovery analysis. For complete protection, this feature requires a connection to Trend Micro Vision One or Trend Micro Apex Central. The report is retrieved from Trend Micro Vision One or Deep Discovery Analyzer every 15 minutes.
- You can configure Deep Security to submit suspicious files to other services for further analysis. If submitting suspicious files to Trend Micro Vision One, the analysis results are forwarded to Trend Micro Vision One Threat Intelligence. If submitting suspicious files to Deep Discovery Analyzer, it pushes the analysis results to Trend Micro Apex Central, where an action can be specified for the file based on the analysis. Once the action is specified, a list of emerging threats called a suspicious object list is created or updated. Other Trend Micro products, such as Deep Discovery Inspector or Deep Discovery Email Inspector, may also be connected to Trend Micro Vision One or Trend Micro Apex Central and able to update the list.
- Optionally, you can configure Deep Security Manager to receive the list of suspicious objects from Trend Micro Vision One or Trend Micro Apex Central and send the list of suspicious objects to Deep Security Agents.
Check the Threat Intelligence prerequisites
Before connecting Deep Security to Deep Discovery, check that your environment meets these requirements:
- Deep Security Manager is installed and configured with Deep Security Agents protecting computers.
Optional:
- To connect to Trend Micro Vision One (XDR):
- Integrate with Trend Vision One (XDR).
- Purchase the "Deep Security: Sandbox as a Service" license for submitting suspicious files to Trend Micro Vision One.
- To connect to Deep Discovery Analyzer, ensure that Deep Discovery Analyzer 5.5 is installed and the sandbox virtual machines are provisioned.
- To connect to Trend Micro Apex Central, ensure that Apex Central 2019 or later is installed.
- Add Deep Discovery Analyzer to the Trend Micro Apex Central Managed Servers. See the Trend Micro Apex Central documentation for details.
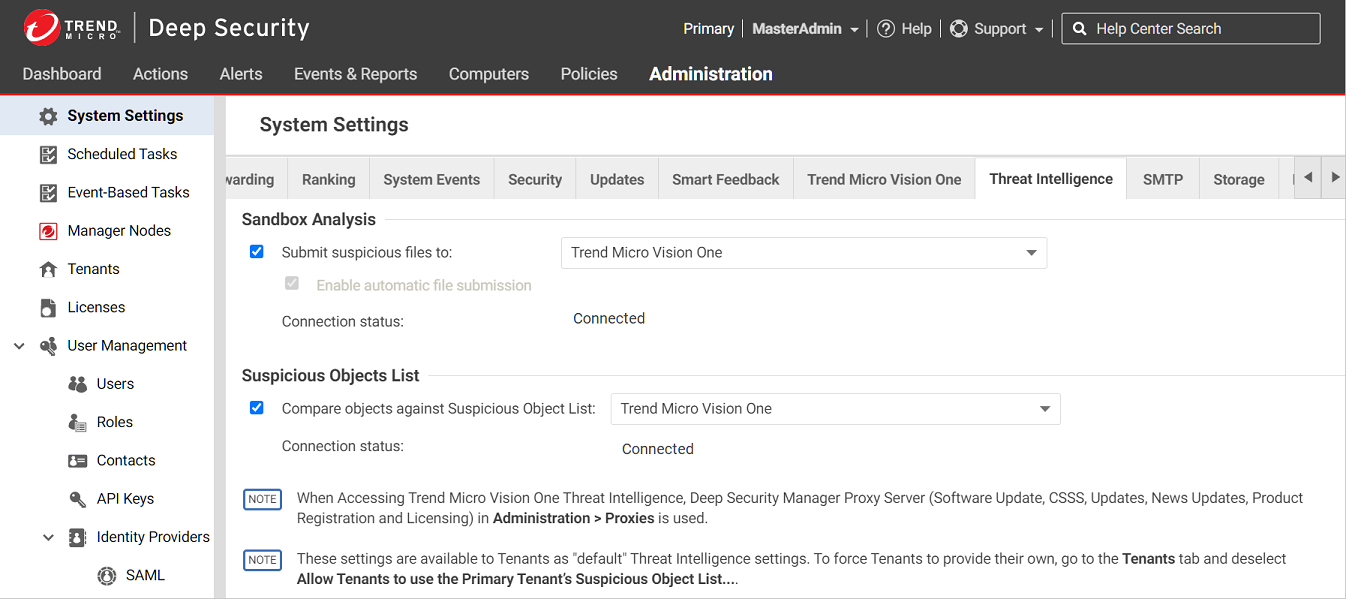
Set up a connection to Trend Micro Vision One
You can configure Deep Security to submit the suspicious files and retrieve the suspected object list from Trend Micro Vision One, share it with protected computers, and compare local objects against the Trend Micro Vision One Threat Intelligence Suspicious Object List.
- In Deep Security Manager, go to Administration > System Settings > Threat Intelligence.
- Select Submit suspicious files to and then Trend Micro Vision One.
- Select Compare objects against Suspicious Object List and then Trend Micro Vision One.
Set up a connection to Deep Discovery Analyzer
If you want Deep Security Manager to send suspicious files to Deep Discovery Analyzer for analysis, you'll need to set up a connection.
- In Deep Security Manager, go to Administration > System Settings > Threat Intelligence.
- Select Submit suspicious files to and then Registered Deep Discovery Analyzer associated with Apex Central.
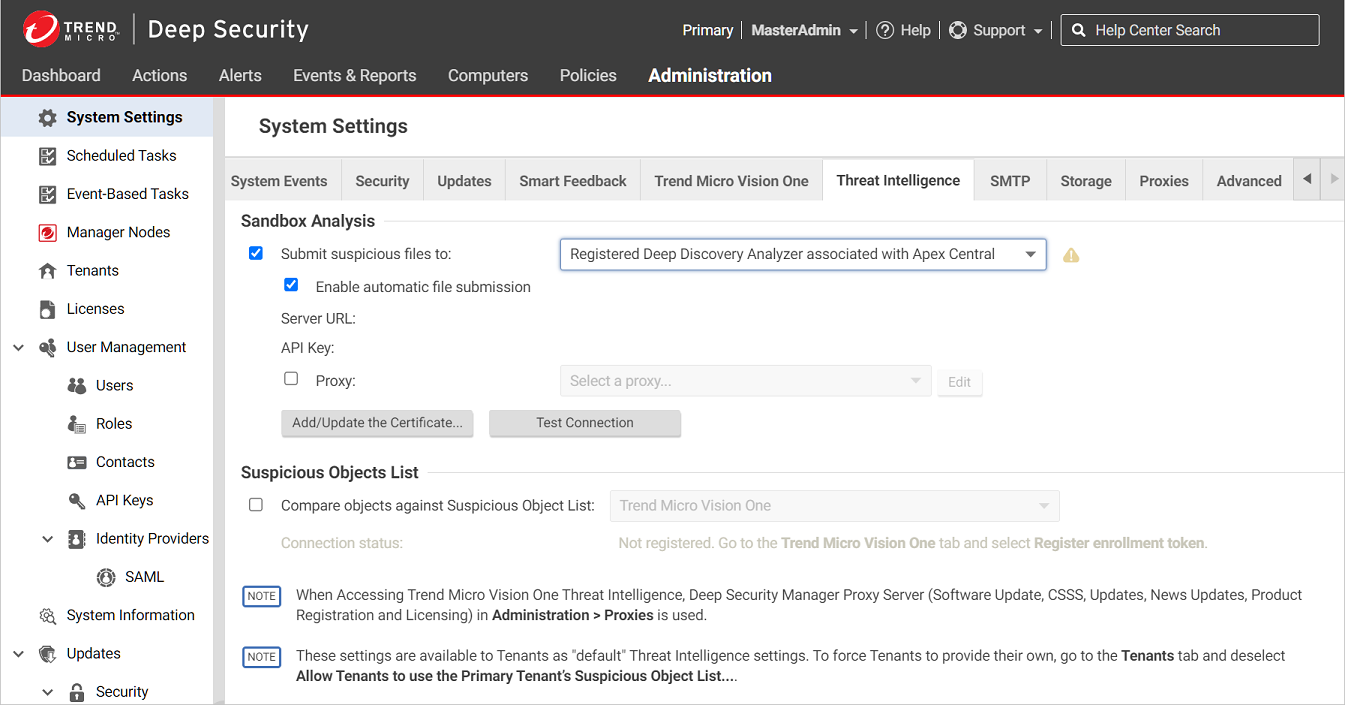
- If you want Deep Security Manager to automatically submit files to Deep Discovery Analyzer, select Enable automatic file submission.
Automatic Submission to Deep Discovery Analyzer occurs every 15 minutes and will submit a maximum of 100 files per submission.
- Select Test Connection. If you get an error saying that Deep Security is unable to connect due to a missing or invalid certificate, select Add/Update Certificate to update to the correct Deep Discovery Analyzer certificate.
- Select Save.
- In Deep Discovery Analyzer, go to Help > About and note the Service URL and API key. You will need these values later, so copy them into a text file temporarily.
- In Deep Security Manager, go to Administration > System Settings > Threat Intelligence.
- Select Submit suspicious files to and then Manually selected Deep Discovery Analyzer server .

- If you want Deep Security Manager to automatically submit files to Deep Discovery Analyzer, select Enable automatic file submission.
Automatic Submission to Deep Discovery Analyzer occurs every 15 minutes and will submit a maximum of 100 files per submission
- Enter the Server URL and API key that you found in step 1.
- Select Test Connection. If you get an error saying that Deep Security is unable to connect due to a missing or invalid certificate, select Add/Update Certificate to update to the correct Deep Discovery Analyzer certificate.
- Select Save.
Set up a connection to Trend Micro Apex Central
When you configure these settings, Deep Security Manager will be able to retrieve the suspected object list from Trend Micro Apex Central, share it with protected computers, and compare local objects against the Apex Central Suspicious Object List.
- In Deep Security Manager, go to Administration > System Settings > Threat Intelligence.
- Select Compare objects against Suspicious Object List and then Registered Apex Central.
If this option is not available, it is because Apex Central is not yet managing Deep Security, and you must follow the instructions "If Trend Micro Apex Central is not yet managing Deep Security" (below) instead.
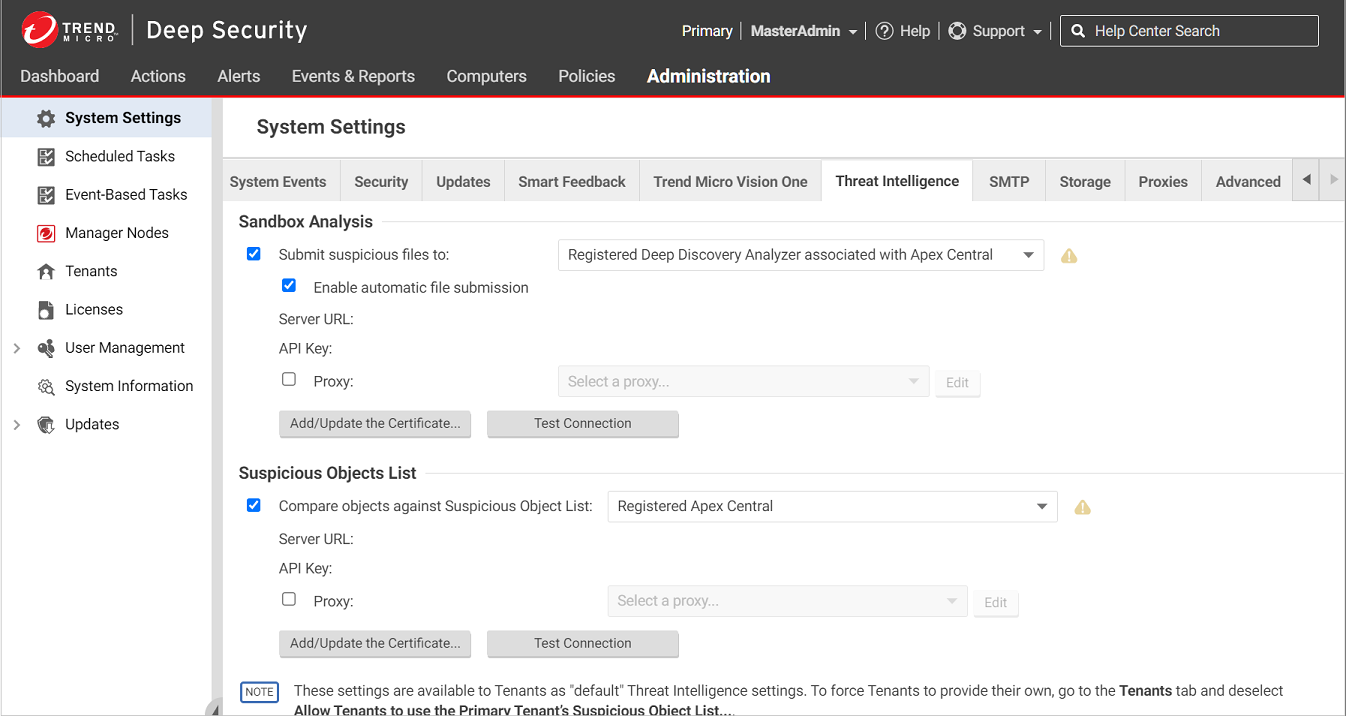
- Select Test Connection. If you get an error saying that Deep Security is unable to connect due to a missing or invalid certificate, select Add/Update Certificate to update to the correct Trend Micro Apex Central certificate.
- Select Save.
- In Trend Micro Apex Central, go to Administration > Managed Servers > Server Registration.
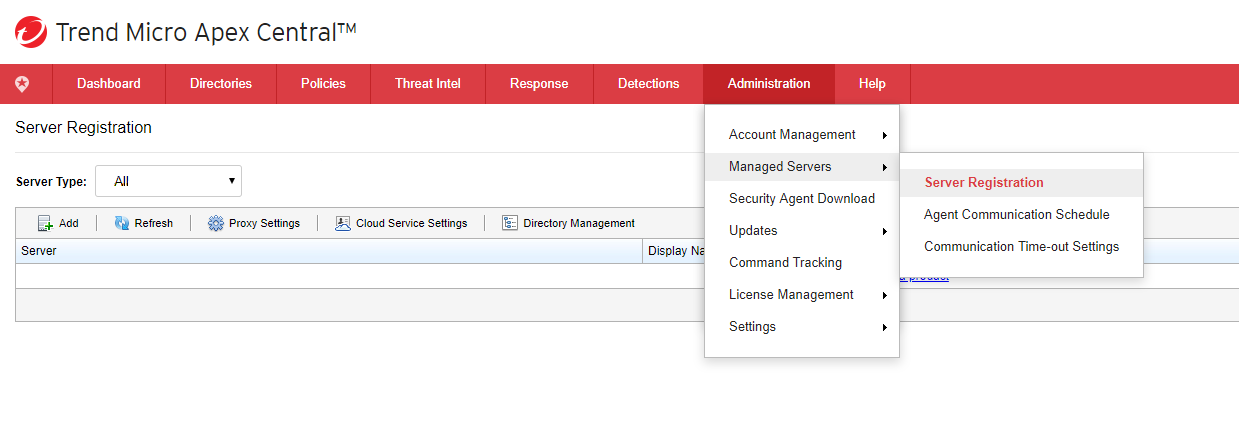
- In the Server Type drop-down menu, select Deep Security.
- Select Add to register Deep Security to the Apex Central server.
Apex Central will automatically transfer the Service URL and API key needed to register Deep Security within 10 minutes of adding it as a managed product.
Create a malware scan configuration for use with Threat Intelligence
The following configuration allows Deep Security to detect suspicious files, back up the suspicious files, and automatically send them to Sandbox Analysis for further analysis.
- In Deep Security Manager, go to Policies > Common Objects > Other > Malware Scan Configurations.
- Create a new scan configuration or edit an existing configuration.
- On the General tab, under Document Exploit Protection, select Scan documents for exploits and select one of these options:
- Scan for exploits against known critical vulnerabilities only: Only detects known critical vulnerabilities. The CVE Exploit vulnerability type is associated with this option (See Customize malware remedial actions.)
- Scan for exploits against known critical vulnerabilities and aggressive detection of unknown suspicious exploits: Detects more issues but may also result in more false positives. If you want to detect suspicious files and submit them to Trend Micro Vision One or Deep Discovery Analyzer, you must select this option. The Aggressive Detection Rule vulnerability type is associated with this option. (See Customize malware remedial actions.)
- Configure the other malware scan settings as described in Configure malware scans and exclusions.
Enable Threat Intelligence for your computers
You can enable Threat Intelligence in policies or for individual computers.
- In the Computer or Policy editor
 You can change these settings for a policy or for a specific computer.
To change the settings for a policy, go to the Polices page and double-click the policy that you want to edit (or select the policy and click Details).
To change the settings for a computer, go to the Computers page and double-click the computer that you want to edit (or select the computer and click Details)., go to Anti-Malware > General.
You can change these settings for a policy or for a specific computer.
To change the settings for a policy, go to the Polices page and double-click the policy that you want to edit (or select the policy and click Details).
To change the settings for a computer, go to the Computers page and double-click the computer that you want to edit (or select the computer and click Details)., go to Anti-Malware > General. - Ensure that the Anti-Malware State is On or Inherited (On).
- The General tab contains sections for Real-Time Scan, Manual Scan, and Scheduled Scan. (For information on the different types of scans, see Enable and configure Anti-Malware.) In the appropriate sections, use the Malware Scan Configuration list to select the scan configuration that you created above.
- Go to the Threat Intelligence tab and adjust these settings as required:
- If you want Deep Security to send suspicious files to Trend Micro Vision One or Deep Discovery Analyzer, set the option under Sandbox Analysis to Yes or Inherited (Yes).
- If you have set up a connection between Deep Security and Trend Micro Apex Central and you want to use the suspicious object list from Apex Central to detect malicious files, set Use Suspicious Object List (under Suspicious Objects List) to Yes or Inherited (Yes).
- Select Save.
Manually submit a file to Sandbox Analysis
You can manually submit files that appear on the Events & Reports > Events > Anti-Malware Events > Identified Files page.
- Select the file that you want to submit and select the Analyze button.
- Follow the steps in the wizard that appears.
- After the file is submitted, you can check the progress of its analysis in the Submission Status column on the Identified Files page.
- When the analysis is finished, the Submission Status column will display "Results Ready". You can select the Results Ready link to see details.
Allow a file that has raised a false alarm
If a file is identified as malware on the Events & Reports > Events > Anti-Malware Events > Identified Files page but you know it's not malware, you can add it to the Document Exploit Protection Rule Exceptions list on the Anti-Malware > Advanced tab of the Computer or Policy editor![]() You can change these settings for a policy or for a specific computer.
To change the settings for a policy, go to the Polices page and double-click the policy that you want to edit (or select the policy and click Details).
To change the settings for a computer, go to the Computers page and double-click the computer that you want to edit (or select the computer and click Details)..
You can change these settings for a policy or for a specific computer.
To change the settings for a policy, go to the Polices page and double-click the policy that you want to edit (or select the policy and click Details).
To change the settings for a computer, go to the Computers page and double-click the computer that you want to edit (or select the computer and click Details)..
To allow the file, right-click it, select Allow, and follow the steps in the wizard that appears.
Configure the scan action for a suspicious file
You can view the suspicious objects list in the Trend Micro Vision One or Trend Micro Apex Central console and configure the action (log, block, or quarantine) that should be taken when a suspicious object is found. (For details on configuring the actions, see the help for Trend Micro Vision One or Apex Central.) If you have configured Deep Security Manager to obtain the suspicious object list from Trend Micro Vision One or Apex Central, Deep Security will perform the specified action when it finds the suspected object.
Deep Security supports file suspicious objects. It also supports URL suspicious objects if the Web Reputation protection module is configured to use the Trend Micro Smart Protection Server. Deep Security does not support IP and domain suspicious objects.
Update the suspicious objects list in Deep Security
After the analysis of a suspicious object has been completed and the action for the file has been set in Trend Micro Vision One or Trend Micro Apex Central, Deep Security can use the Suspicious Object list from Trend Micro Vision One or Apex Central to protect your computers. To manually update the suspicious file list in Deep Security Manager, go to Administration > Updates > Security and use the controls in the Suspicious Object List Updates column to get the latest list and send it to your protected computers. You can also create a scheduled task that regularly checks for an updated list (see Schedule Deep Security to perform tasks).
In Trend Micro Apex Central, the default suspicious object setting is "Log". You may want to consider changing the default setting to "Quarantine" or "Block".
In Trend Micro Vision One Threat Intelligence Suspicious Object Management, you can select the Default Settings in the upper-right corner, and specify the default actions to take on different types of objects at each risk level and the expiration settings for the objects. In Trend Micro Apex Central, the default suspicious object setting is "Log". You may want to consider changing the default setting to "Quarantine" or "Block".
Once the suspicious object list has been updated in Deep Security and the computer policies have been updated with the action specified, the Deep Security Agent then checks the affected computers and uses this action any time this file is encountered again on a protected computer.
Configure Threat Intelligence in a multi-tenant environment
In a multi-tenant environment, the primary tenant (t0) can choose whether to share their Deep Discovery Analyzer and Trend Micro Apex Central settings with their tenants. The setting that controls this behavior is Administration > System Settings > Tenants > Allow Tenants to use Primary Tenant's Suspicious Object List and Sandbox Analysis settings:
- When the setting is enabled and a tenant goes to Administration > System Settings > Threat Intelligence, they see an additional Use default server settings check box. When this check box is selected, the tenant uses the primary tenant's settings. When Use default server settings is not selected, the tenant can configure their own Threat Intelligence settings.
-
If the primary tenant chooses Trend Micro Vision One to submit suspicious files and compare objects against the Suspicious Object List, the tenant will connect to their own Trend Micro Vision One account, NOT the primary tenant’s Trend Micro Vision One account. Please be sure the tenants complete their own Trend Micro Vision One registration.
- When the setting is not enabled, tenants must use their own Trend Micro Vision One, or Trend Micro Apex Central and Deep Discovery Analyzer, if they want to use Threat Intelligence.
Supported file types
Deep Security can send these file types to Deep Discovery Analyzer:
- doc - Microsoft Word document
- docx - Microsoft Office Word 2007 document
- gul - JungUm Global document
- hwp - Hancom Hangul Word Processor (HWP) document
- hwpx - Hancom Hangul Word Processor 2014 (HWPX) document
- jar - Java Applet Java application
- js - JavaScript file
- jse - JavaScript encoded script file
- jtd - JustSystems Ichitaro document
- lnk - Microsoft Windows Shell Binary Link shortcut
- mov - Apple QuickTime media
- pdf - Adobe Portable Document Format (PDF)
- ppt - Microsoft Powerpoint presentation
- pptx - Microsoft Office PowerPoint 2007 Presentation
- ps1 - Microsoft Windows PowerShell script file
- rtf - Microsoft Rich Text Format (RTF) document
- swf - Adobe Shockwave Flash file
- vbe - Visual Basic encoded script file
- vbs - Visual Basic script file
- xls - Microsoft Excel spreadsheet
- xlsx - Microsoft Office Excel 2007 Spreadsheet
- xml - Microsoft Office 2003 XML file
Migrating from Connected Threat Defense to Threat Intelligence
Threat Intelligence was introduced in Deep Security Manager 20.0.503 (20 LTS Update 2021-09-23). This section provides information about upgrading from earlier versions of Deep Security Manager with Connected Threat Defense to a newer version with Threat Intelligence, and setting up the connection to Trend Micro Vision One (XDR).
- Ensure that Deep Security Manager is registered with Trend Micro Vision One (XDR).
- In Deep Security Manager, go to Administration > System Settings > Threat Intelligence.
- Select Submit suspicious files to and then Trend Micro Vision One.
- Select Compare objects against Suspicious Object List and then Trend Micro Vision One.
- Select Save. The Connection status will change to "Connected" within 15 minutes.
- After Deep Security Manager submits a file sample, you can find the analysis summary in Trend Micro Vision One, under Threat Intelligence > Sandbox Analysis. For details, see the Trend Micro Vision One help.
- When a suspicious object is found, you can find the generated suspicious object list in Trend Micro Vision One, under Threat Intelligence > Suspicious Object Management. For details, see the Trend Micro Vision One help.
Multi-tenant migration
If you are migrating from Connected Threat Defense to Threat Intelligence in a multi-tenant environment:
- The primary tenant should not enable the Administration > System Settings > Tenants > Allow Tenants to use Primary Tenant's Suspicious Object List and Sandbox Analysis settings option.
- After upgrade, all other tenants should open Deep Security Manager, go to Administration > System Settings > Trend Micro Vision One, and ensure that Deep Security Manager is registered with Trend Micro Vision One (XDR). The tenants can then configure their own Threat Intelligence settings in Administration > System Settings > Threat Intelligence.