Deep Security 11 has reached end of support. Use the version selector (above) to see more recent versions of the Help Center.
SQL Server domain authentication problems
If you experience problems connecting to the SQL Server database when installing Deep Security Manager, follow the instructions below to troubleshoot the problem.
This topic's scope is limited to Windows domain authentication issues. If you are using SQL Server Authentication instead, see Prepare a database for Deep Security Manager and review the configuration steps listed in that topic to troubleshoot any problems.
'Windows domain authentication' goes by many names: Kerberos authentication, domain authentication, Windows authentication, integrated authentication, and a few others. In this topic, the terms 'Kerberos' and 'Windows domain authentication' are used.
Step 1: Verify the host name and domain
Step 2: Verify the servicePrincipalName (SPN)
Step 4: Verify the krb5.conf file (Linux only)
Step 5: Verify the system clock
Step 1: Verify the host name and domain
You must make sure the Host name field is in FQDN format and resolvable by the DNS server:
- When you run the Deep Security Manager installer and reach the database step, make sure you specify the SQL server's FQDN. Don't input an IP address or NetBIOS host name.
Example of a valid host name: sqlserver.example.com
- Make sure the FQDN is registered and resolvable by the DNS server. To check if the correct host name was configured in the DNS entry, use the nslookup command-line utility. This utility can be invoked from any computer on the domain. Enter the following command:
nslookup <SQL Server FQDN>
where <SQL_Server_FQDN> is replaced with the FQDN of the SQL server. If the utility can resolve the provided FQDN successfully, then the DNS entry is configured properly. If the FQDN cannot be resolved, then configure a DNS A record and reverse record that includes the FQDN.
- Still on the installer's database page, click Advanced and make sure you specify the SQL server's full domain name in the Domain field. The domain must include one or more dots ("."). Don't input a short domain name or NetBIOS name.
Example of a valid domain name: example.com
- Check if the domain name is in FQDN format using the nslookup command-line utility. Enter the following command:
nslookup <Domain_Name>
where <Domain_Name> is replaced with the full domain name of the SQL server. If the utility can resolve the provided domain name, then it is the full domain name.
Database authentication using Microsoft workgroups is not supported by Deep Security Manager 10.2 and later. For Windows domain authentication, you'll need to have installed an Active Directory domain controller, configured a domain, and added the SQL server to this domain. If there is no Active Directory domain infrastructure in your environment, you must use SQL Server Authentication instead. (To use SQL Server Authentication instead of Windows domain authentication, enter the Deep Security Manager database owner's user name and password into the User name and Password fields on the Database page of the manager's installer. Do not input a domain. The omission of a domain name causes SQL Server Authentication to be used. For details, see Microsoft SQL Server.)
Step 2: Verify the servicePrincipalName (SPN)
You must make sure the servicePrincipalName (SPN) is configured correctly in Active Directory.
For Microsoft SQL Server, the SPN is in this format:
MSSQLSvc/<SQL_Server_Endpoint_FQDN>
MSSQLSvc/<SQL_Server_Endpoint_FQDN>:<PORT>
To verify that the SPN is correct, run through these tasks. At the end are some step-by-step instructions for specific use cases, references to other documentation, and debugging tips.
Step 2a: Identify the account (SID) running the SQL Server service
Step 2b: Find the account in Active Directory
Step 2c: Identify which FQDN to use in the SPN
Step 2d: Identify whether you're using a default instance or named instance
Case 1: Set the SPN under a local virtual account
Case 2: Set the SPN under a domain account
Case 3: Set the SPN under a Managed Service account
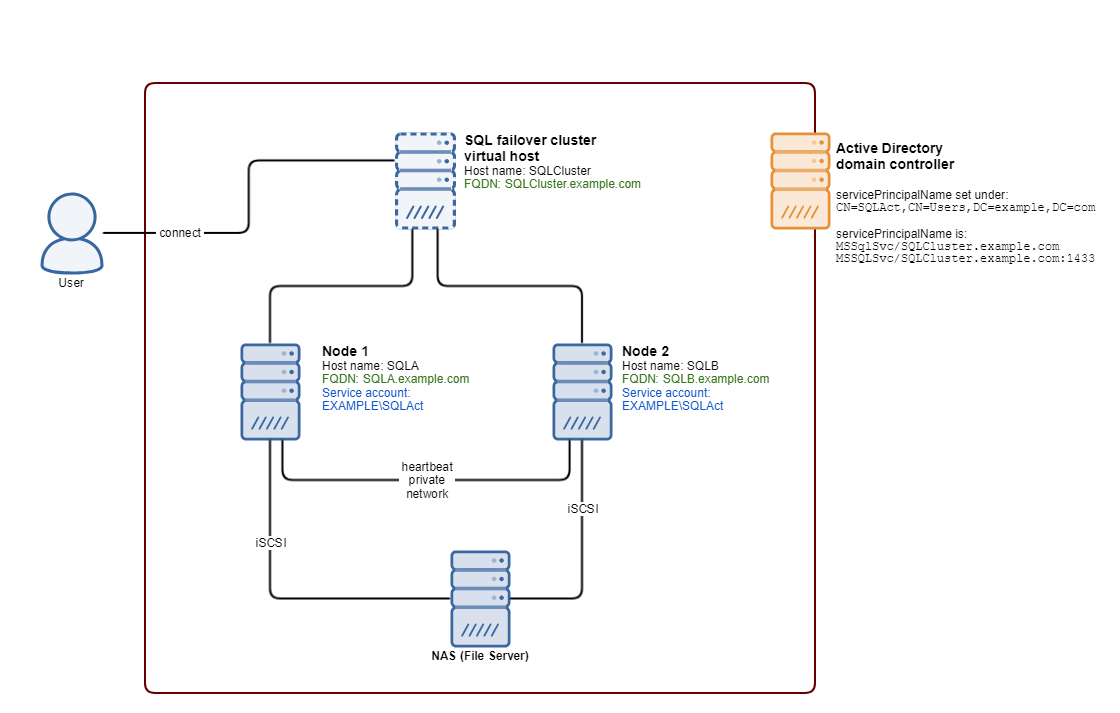
Case 4: Set the SPN for a failover cluster
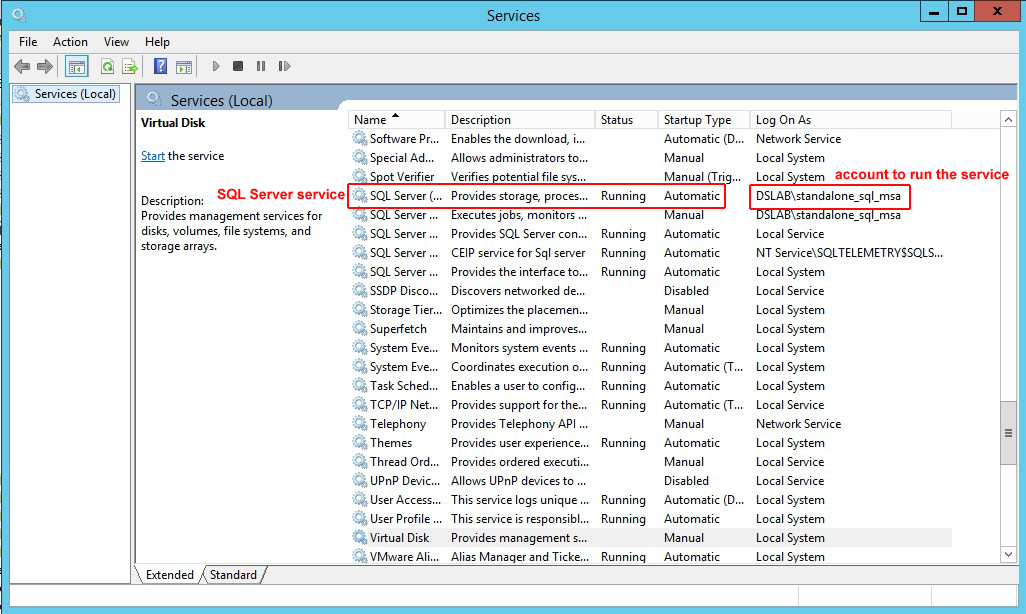
Step 2a: Identify the account (SID) running the SQL Server service
The SPN is configured inside the account running the SQL Server service.
To identify which account is running the SQL Server service, use the services.msc utility. You see the SQL Server service appear, along with the associated account.
Step 2b: Find the account in Active Directory
Once you know the name of the account running the SQL Server service, you must locate it in Active Directory. The account can be in a few possible locations depending on whether it is a local virtual account, a domain account, or a Managed Service account. The table below outlines these possible locations. You can use the ADSI Editor (adsiedit.msc) on the Active Directory computer to look for the different folders in Active Directory and find the account.
| Account type | Name of account | Location of account in Active Directory | Description |
|---|---|---|---|
| Local virtual account | NT SERVICE\MSSQLSERVER (default instance) NT SERVICE\MSSQL$InstanceName (named instance) |
CN=Computer CN=<Computer_Name> | Services that run under virtual accounts access network resources by using the credentials of the computer account. The default standalone SQL Server service uses this account to start up. |
| Domain account | A domain user name, for example, SQLServerServiceUser | CN=Users CN=<User_Name> | Services started using this account access the network resources using a domain user's credentials. SQL Server failover clusters require a domain account to run the service. The standalone SQL Server service can also be configured to use a domain account to start up. |
| Managed Service account | A Managed Service account name, for example SQLServerMSA | CN=Managed Service Account CN=<Account_Name> | Introduced in Windows Server 2008 R2, the Managed Service Account resembles the domain account, but can be used to perform interactive logons. Both the standalone SQL Server service and the SQL Server cluster services can be configured to use a Managed Service account to start up. |
Step 2c: Identify which FQDN to use in the SPN
For naming consistency, it is recommended that you set the SPN to the FQDN of the endpoint. The endpoint is the target to which the SQL Server client (Deep Security Manager) connects, and may be an individual SQL Server or a cluster. Consult the table below for details on which FQDN to use.
| If the SQL Server installation type is... | Set the SPN to... |
|---|---|
| Standalone SQL Server | The FQDN of the host where the SQL Server is installed |
| Failover SQL Server cluster | The FQDN of the SQL Server cluster (individual SQL Server nodes are not the endpoint and should not be used in the FQDN) |
Step 2d: Identify whether you're using a default instance or named instance
You must know whether the SQL Server was installed as a default instance or a named instance because the port number and instance name (if one was specified) need to go into the SPN.
- The default instance typically uses port 1433.
- A named instance uses a different port. To determine this port, consult this webpage.
Example: If the FQDN endpoint of the SQL Server service is sqlserver.example.com and it is the default instance, then the SPN will be in the format:
MSSQLSvc/sqlserver.example.com
MSSQLSvc/sqlserver.example.com:1433
Another example: If the FQDN endpoint of SQL Server service is sqlserver.example.com and it is a named instance using port 51635 with an instance name of DEEPSECURITY, then the SPN will be in the format:
MSSQLSvc/sqlserver.example.com:DEEPSECURITY
MSSQLSvc/sqlserver.example.com:51635
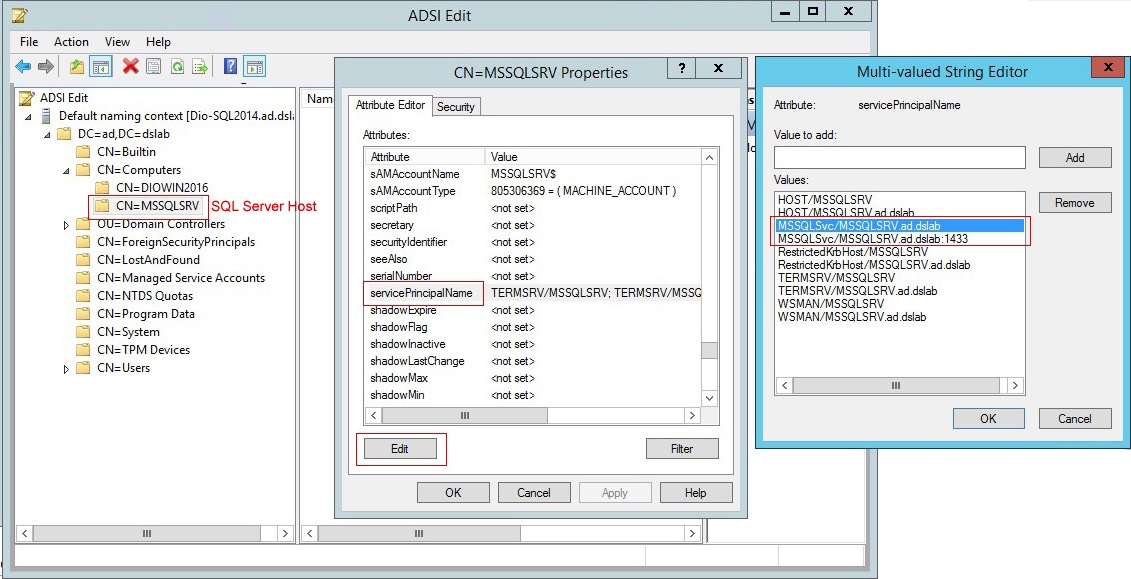
Case 1: Set the SPN under a local virtual account
To set the SPN for a standalone SQL Server that runs under a local virtual account:
- On the Active Directory computer, open ADSIEdit.msc. The ADSI Editor opens.
- Locate the SQL Server host in CN=Computers.
- Right-click the SQL Server host, and select Properties.
- On the Attribute Editor tab, scroll to servicePrincipalNames and click the Edit button.
- If the attribute values don't exist, add each one individually using the Add button. Click OK.
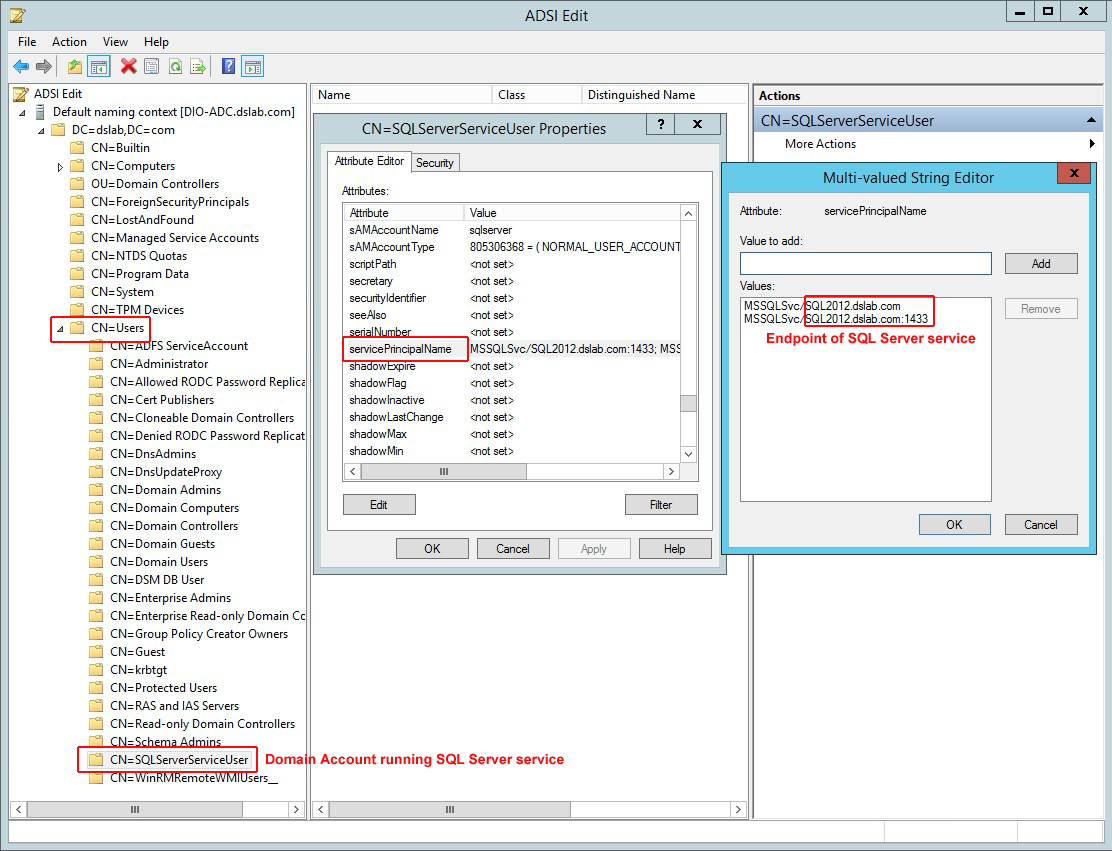
Case 2: Set the SPN under a domain account
The SPN configuration is similar to the local virtual account configuration except that the SPN is set in domain account (CN=Users) running the SQL Server service.
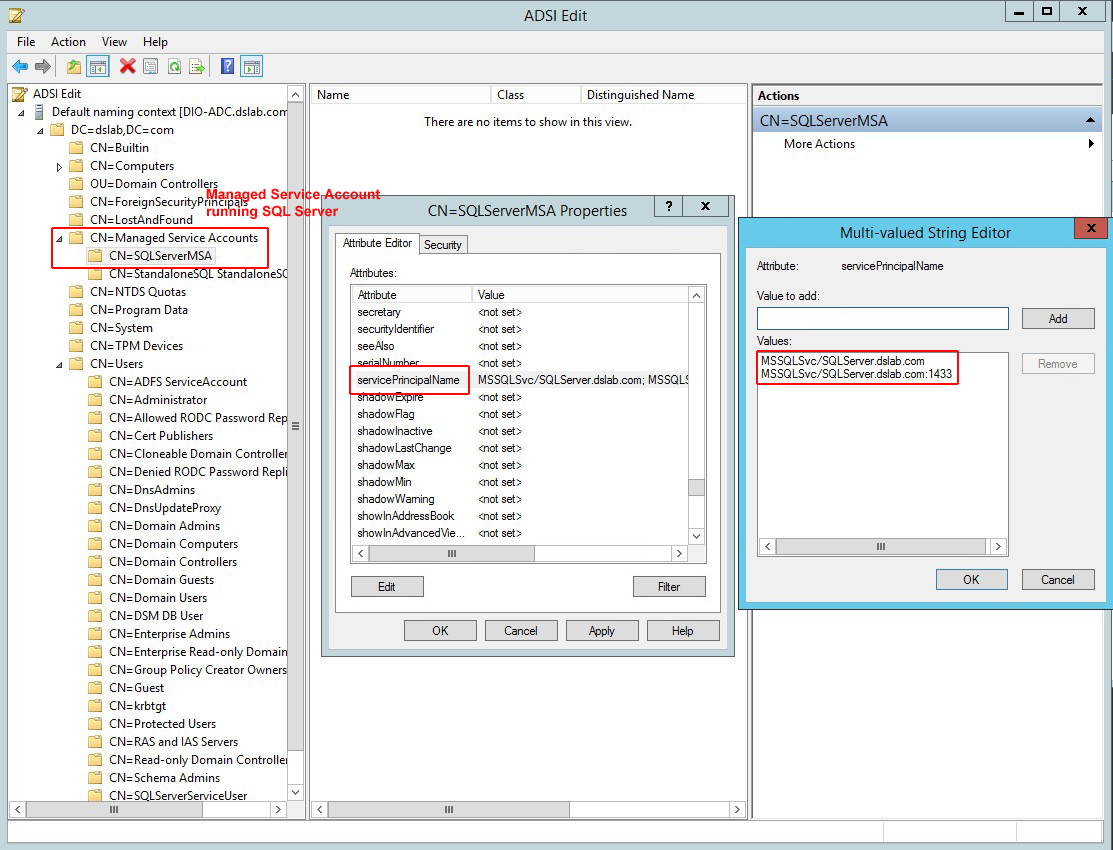
Case 3: Set the SPN under a Managed Service account
The SPN is set in the Managed Service account (CN=Managed Service Account) running the SQL Server service.
Case 4: Set the SPN for a failover cluster
An SQL Server failover cluster can run under a domain account or a Managed Service account. Refer to Case 2: Set the SPN under a domain account or Case 3: Set the SPN under a Managed Service account for instructions. Make sure to set the SPN to the FQDN of the SQL cluster endpoint, not an individual SQL node.
SPN references
Below are links to Microsoft's official documents about SPN configurations:
Register a Service Principal Name for Kerberos Connections
How to: Enable Kerberos Authentication on a SQL Server Failover Cluster
SPN debugging tips
To verify that the correct SPN configuration was set, use the command line tool setspn to query for registered SPN entries. The command syntax is:
setspn -T <Full_Domain_Name> -F -Q MSSQLSvc/<SQL_Server_Endpoint_FQDN>*
where:
- <Full_Domain_Name> is replaced with the domain name of your environment.
- <SQL_Server_Endpoint_FQDN> is replaced with the FQDN of SQL Server.
For example: Assume that a standalone SQL Server resides at SQL2012.dslab.com, and runs under a local virtual account in the domain dslab.com. You can use command below to query all registered SPNs that have a prefix of MSSQLSvc/SQL2012.dslab.com and see if it is correctly configured.

From the command result, you can then verify that the SPN has been set and registered in correct LDAP path, and in the account that is running the SQL Server service (in this case, it is the computer account).
Step 3: Verify the password
You must make sure the password does not contain special characters if you're using Deep Security Manager 11.0. Example: }. The inclusion of special characters causes the database connection to fail. To work around this issue:
- Change the SQL server password.
Or
- Use the Deep Security Manager 11.0 Update 1 installation program instead, which contains a fix.
Step 4: Verify the krb5.conf file (Linux only)
If you're installing the manager on Linux, you must make sure the /etc/krb5.conf exists and contains the correct domain and realm information:
- Open or create the /etc/krb5.conf file in a text editor to configure Kerberos.
- Provide the following information:
[libdefaults]
...
default_realm = <DOMAIN>
...
[realms]
<DOMAIN> = {
kdc = <ACTIVE_DIRECTORY_CONTROLLER_FQDN>
admin_server = <ACTIVE_DIRECTORY_CONTROLLER_FQDN>
}
[domain_realm]
.<DOMAIN FQDN> = <DOMAIN>
<DOMAIN FQDN> = <DOMAIN>
where <DOMAIN>, <ACTIVE_DIRECTORY_CONTROLLER_FQDN> and <DOMAIN_FQDN> are replaced with your own values.
Example file:
[libdefaults]
default_realm = EXAMPLE.COM
default_tkt_enctypes = des3-hmac-sha1 des-cbc-crc
default_tgs_enctypes = des3-hmac-sha1 des-cbc-crc
dns_lookup_kdc = true
dns_lookup_realm = false
[realms]
EXAMPLE.COM = {
kdc = kerberos.example.com
kdc = kerberos-1.example.com
admin_server = kerberos.example.com
}
[domain_realm]
.example.com = EXAMPLE.COM
example.com = EXAMPLE.COM
[logging]
kdc = SYSLOG:INFO
admin_server = FILE=/var/kadm5.log
- Save and close the file.
Step 5: Verify the system clock
You must make sure the system clocks on the domain controller, SQL Server, and Deep Security Manager computer are synchronized. With Kerberos, the maximum allowable clock skew is five minutes by default.
Step 6: Verify the firewall
You must make sure the firewall is not blocking the SQL connection. A default SQL Server instance allows connections through port 1433, while a named SQL Server instance uses a port that is selected at random. To find out which port to connect to, the SQL client (Deep Security Manager in this case) queries the available named instances and finds the mapping port by issuing a lookup request to the SQL Server browser service. The SQL Server browser service runs on port 1434 (UDP). Verify that your firewall configuration allows port 1433 (if you're using a default instance), or 1434 (if you're using a named instance).