Set up a multi-tenant environment
Multi-tenancy is only available for Deep Security from AWS Marketplace with the Bring your own License (BYOL) payment option.
The multi-tenancy feature in Deep Security lets you create separate management environments within a single Deep Security Manager. It allows tenants to each have their own settings and policies and to monitor their own events. This can be useful if you want to create separate staging and production environments or if you need to create separate environments for different business units in your organization. You can also use multi-tenancy to provision Deep Security to customers in a service model.
Once you enable multi-tenancy, you (as the "primary tenant") retain all of the capabilities of a regular installation of Deep Security Manager. However, the tenants you subsequently create can have their access to Deep Security functionality restricted to varying degrees, based on how you configure the system for them.
In this topic:
- Multi-tenancy requirements
- Enable multi-tenancy
- Create a tenant
- Scalability guidelines
- Multi-tenancy tips
- Managing tenants
- Set up a multi-tenant environment
- Usage monitoring
- Configure database user accounts
- APIs
- Upgrade
- Supporting tenants
- Load balancers
Multi-tenancy requirements
You cannot set up multi-tenancy with:
- Deep Security from AWS Marketplace with the 'Per Protected Instance Hour' billing option (only the BYOL option is supported)
- Deep Security Manager VM for Azure Marketplace
- Azure SQL Database
- Azure SQL or on-premise Always On availability groups
Multi-tenancy requires an activation code. Multi-tenancy also has additional database requirements. For details, see
To maximize scalability, we recommend that you use a multi-node Deep Security Manager (see Run Deep Security Manager on multiple nodes). All manager nodes process GUI, heartbeat, or job requests for any tenant. For background processing, each tenant is assigned a manager node that takes care of job queuing, maintenance, and other background tasks. Tasks are rebalanced across remaining nodes when manager nodes are added or taken offline.
When you enable multi-tenancy, your current installation of Deep Security Manager becomes the primary tenant (t0) and has special privileges, including the ability to create other tenants. Other tenants are restricted from using certain features and don't have permissions to see the UI for those features in Deep Security Manager. For example, non-primary tenants cannot create other tenants. For details, see Set up a multi-tenant environment
Enable multi-tenancy
- In the Deep Security Manager, go to Administration > System Settings > Advanced. In the Multi-Tenant Options area, click Enable Multi-Tenancy.
- The Multi-Tenant Configuration wizard appears. Enter your multi-tenancy activation code and click Next.
-
Choose the license mode that you want to use:
- Inherit Licensing from Primary Tenant: This option gives all tenants the same licenses that you (the primary tenant) have. This option is recommended if you are using multi-tenancy in a staging environment, or if you intend to set up tenancies for separate departments within your organization.
- Per Tenant Licensing: With this configuration, you can use the Deep Security API to provide a license when you create a tenant, or the tenant can enter a license when they sign in to the Deep Security Manager for the first time.
-
Click Next.
When the wizard closes, you’ll be able to see Administration > System Settings > Tenants, where you can configure multi-tenancy options. For information about the options on that page, click Help in the upper-right corner of Deep Security Manager.
Create a tenant
You can automate tenant creation and configuration using the Deep Security API. For examples, see the Create and Manage Tenants guide in the Deep Security Automation Center.
Once multi-tenant mode is enabled, tenants can be managed from Administration > Tenants.
For information about the database user account permissions that are required for adding tenants, see Configure database user accounts.
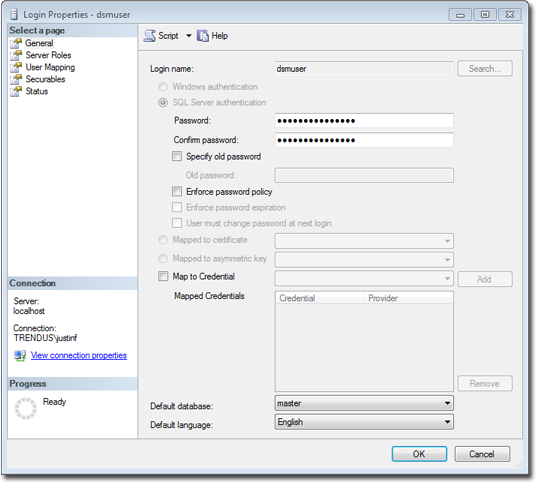
- In the Deep Security Manager, go to Administration > Tenants and click New.
- The New Tenant wizard appears. Enter a Tenant Account Name. The account name can be anything except "Primary", which is reserved for the primary tenant.
- Enter the email address that is used to contact the tenant.
- Select the Locale. The locale determines the language of the Deep Security Manager user interface for the tenant.
- Select a Time Zone. Times for events are shown relative to this time zone, not the time zone on the system where the event happened.
-
If your Deep Security installation uses more than one database, select whether to let Deep Security automatically select a database server on which to store the new tenant account ("Automatic -- No Preference") or to use a particular server.
Database servers that are not accepting new tenants do not appear in the list.
- Enter a user name for the first user of the new tenant account.
-
Select one of the three password options:
- No Email: The tenant’s first user's user name and password are defined here and no emails are sent.
- Email Confirmation Link: You set the tenant’s first user's password. However, the account is not active until the user clicks a link in the confirmation email. The email confirmation ensures that the email provided belongs to the user before they can access the account.
- Email Generated Password: This allows you to generate a tenant without specifying the password.
All three options are available via the API. The email confirmation option is suitable for developing public registration. A CAPTCHA is recommended to ensure that the tenant creator is a human not an automated bot.
- Click Next to finish with the wizard and create the tenant.
Tenant creation can take up to four minutes due to the creation of the schema and the population of the initial data. This ensures each new tenant has the most up-to-date configuration and removes the burden of managing database templates, especially between multiple database servers.
Each tenant database has an overhead of around 100 MB of disk space (due to the initial rules, policies and events that populate the system).
Examples of messages sent to tenants
Email Confirmation Link: Account Confirmation Request
Welcome to Deep Security! To begin using your account, click the following confirmation URL. You can then access the console using your chosen password.
Account Name: ExampleCorp
User name: admin
Click the following URL to activate your account:
https://managerIP:portnumber/SignIn.screen?confirmation=1A16EC7A-D84F-D451-05F6-706095B6F646&tenantAccount=ExampleCorp&username=admin
Email Generated Password
First email : Account and Username Notification
Welcome to Deep Security! A new account has been created for you. Your password will be generated and provided in a separate email.
Account Name: ExampleCorp
Username: admin
You can access Deep Security using the following URL:
https://managerIP:portnumber/SignIn.screen?tenantAccount=ExampleCorp&username=admin
Second email: Password Notification
This is the automatically generated password for your Deep Security account. Your Account Name, Username, and a link to access Deep Security will follow in a separate email.
Password: z3IgRUQ0jaFi
Scalability guidelines
Deployments of 50-100 tenants or more should follow these guidelines to avoid scalability issues:
- Create a maximum of 2000 tenants for a set of Deep Security Manager nodes
- Create a maximum of 300 tenants on a single database server
- Use a separate database server for the primary tenant, with no other tenants
- Limit the number of agents per tenant to 3000
- Limit the number of total agents to 20000
- Use a maximum of 2 Deep Security Manager nodes
- Do not use any co-located relays
Multi-tenancy relies on using multiple databases (if you are using Microsoft SQL) or multiple users (if you are using Oracle). To scale further, you can connect Deep Security Manager to multiple database servers and automatically distribute the new tenants across the available set of database servers. See Configure database user accounts.
Multi-tenancy tips
Reconnaissance IP list
In a multi-tenant environment, tenants may need to add the Deep Security Manager IP address to the "Ignore Reconnaissance IP" list found in Policies > Common Objects > Lists > IP Lists. This is to avoid getting a "Reconnaissance Detected: Network or Port Scan" warning.
Use multiple database servers
Multi-tenancy relies on using multiple databases (if you are using Microsoft SQL) or multiple users (if you are using Oracle). To scale further, you can connect Deep Security Manager to multiple database servers and automatically distribute the new tenants across the available set of database servers. See Configure database user accounts.
Tenant pending deletion state
Tenants can be deleted, but the process is not immediate. Before it deletes records, Deep Security requires that all its tenant-related jobs are finished. The least frequent job runs every week, so tenants may remain in the "pending deletion" state for up to approximately 7 days.
Multi-tenant options under System Settings
Consider these options on Administration > System Settings > Tenants:
Allow Tenants to use the Relays in my "Default Relay Group" (for unassigned Relays): Gives tenants automatic access to relay-enabled agents set up in the primary tenant. This saves tenants the effort of setting up dedicated relay-enabled agents for security updates.
Allow Tenants to use the "Run Script" Scheduled task: Scripts present a potentially dangerous level of access to the system; however, the risk can be mitigated because scripts have to be installed on the Deep Security Manager using file-system access.
Managing tenants
Administration > Tenants displays the list of all tenants. A tenant can be in any of these States:
- Created: Created, but activation email has not been sent to the tenant user.
- Confirmation Required: Created, but the activation link in the confirmation email sent to the tenant user has not been clicked. (You can manually override this state.)
- Active: Fully online and managed.
- Suspended: No longer accepting sign-ins.
- Pending Deletion: Tenants can be deleted, but it is not immediate. The tenant may be in the "pending deletion" state for up to 7 days, until pending jobs finish.
- Database Upgrade Failed: For tenants that failed the upgrade path. The Database Upgrade button can be used to resolve this situation.
Tenant Properties
Double-click on a tenant to view the tenant's Properties window.
General
You can change the locale, time zone and state. Changes do not affect existing tenant users (only new ones, and parts of the UI that are not user-specific).
The Database Name indicates the name of the database used by this tenancy. You can access the tenant database's properties via the hyperlink.
Modules
The Modules tab provides options for protection module visibility. The selected visibility can be used to tune which modules are visible for which tenants. By default all unlicensed modules are hidden. You can change this by deselecting Always Hide Unlicensed Modules. Alternatively, selected modules can be shown on a per-tenant basis.
By default, if you use "per tenant" licensing, each tenant only sees their licensed modules.
If you select Inherit License from Primary Tenant, then all tenants can see all features that you (the primary tenant) are licensed for.
If you are evaluating Deep Security in a test environment and want to see what a full multi-tenancy installation looks like, you can enable "Multi-Tenancy Demo Mode". When in Demo Mode, the manager populates its database with simulated tenants, computers, events, alerts, and other data. Initially, 7 days' worth of data is generated but new data is generated on an ongoing basis to keep the manager's dashboard, reports and events pages populated with data.
Features
As an Administrator, you can enable or disable certain features for specific tenants. These available features may change over time.
If you enable Extended Descriptions for Event Forwarding, Deep Security includes the full description of events that are forwarded to Amazon SNS or a SIEM. Otherwise, descriptions are omitted. SAML Identity Provider Integration, Amazon WorkSpaces Integration, Application (Application Control), and API Rate Limiter (in the Automation Center) are enabled by default.
Statistics
The Statistics tab shows information for the current tenant including database size, jobs processed, logins, security events and system events. The spark line show the last 24 hours at a glance.
Agent Activation
The Agent Activation tab displays a command that you can run to activate the agent on the computer. The command is relative to the agent install directory of this tenant's computers. Activation is required so that Deep Security Manager can securely connect with it, and the tenant can assign policies and perform other configuration procedures from the Deep Security Manager.
What does the tenant see?
When multi-tenancy is enabled, the sign-in page has an additional Account Name text field.
Tenants are required to enter their account name in addition to their user name and password. The account name allows tenants to have overlapping user names. For example, if multiple tenants synchronize with the same Active Directory server.
Some features in the Deep Security Manager UI are not available to tenant users. These areas are hidden for tenants:
- Manager Nodes Widget
- Multi-Tenant Widgets
- Administration > System Information
- Administration > Licenses (If Inherit option selected)
- Administration > Manager Nodes
- Administration > Tenants
-
Administration > System Settings:
- Tenant Tab
- Security Tab > Sign In Message
- Updates Tab > Setting for Allowing Tenants to use Relays from the Primary Tenant
- Advanced Tab > Load Balancers
- Advanced Tab > Pluggable Section
- Some of the help content not applicable to tenants
- Some reports not applicable to tenants
- Other features based on the multi-tenant options
-
Some alert types are also be hidden from tenants:
- Heartbeat Server Failed
- Low Disk Space
- Manager Offline
- Manager Time Out Of Sync
- Newer Version of Deep Security Manager available
- Number of Computers Exceeds Database Limit
- And when inherited licensing is enabled any of the license-related alerts
It is also important to note that tenants cannot see any of the multi-tenant features of the primary tenant or any data from any other tenant. In addition, certain APIs are restricted since they are only usable with primary tenant rights (such as creating other tenants).
For more information on what is and is not available to tenant users, see Multi-tenant settings.
All tenants have the ability to use role-based access control (RBAC) with multiple user accounts to further sub-divide access. Additionally, they can use Active Directory integration for users to delegate the authentication to the domain. The Tenant Account Name is still required for any tenant authentications.
Agent-Initiated Activation
Agent-initiated activation is enabled by default for all tenants.
Tenants can see the arguments required for agent-initiated activation by going to Administration > Updates > Software > Local, selecting the agent software, and then clicking Generate Deployment Scripts. For example, the script for Agent-Initiated Activation on a Windows machine might look like this:
dsa_control -a dsm://<host or IP>:4120/ "tenantID:XXXXXXXX-XXXX-XXXX-XXXX-XXXXXXXXXXXX" "token:XXXXXXXX-XXXX-XXXX-XXXX-XXXXXXXXXXXX"
Tenant diagnostics
Tenants are not able to access manager diagnostic packages due to the sensitivity of the data contained within the packages. Tenants can still generate agent diagnostics by opening the computer editor, going to Actions > Overview, and then selecting Agent Diagnostics.
Usage monitoring
Deep Security Manager records data about tenant usage. To view it, go to the dashboard's Tenant Protection Activity widget, the Tenant Properties window's Statistics tab, and reports. This information can also be accessed through the legacy REST API's status monitoring, which can be enabled or disabled by going to Administration > System Settings > Advanced > Status Monitoring API.
Use the legacy REST API's status monitoring to customize the type of tenant information that you would like to see, depending on your environment. For enterprises, this can be useful to determine the usage by each business unit. You can also use the information to monitor the usage of the overall Deep Security system and look for indicators of abnormal activity. For example, if a single tenant experiences a spike in security event activity, it might be under attack.
Multi-tenant Dashboard
When multi-tenancy is enabled, primary tenant users have access to the following additional Dashboard widgets for monitoring tenant activity:
- Tenant Database Usage
- Tenant Job Activity
- Tenant Protection Activity
- Tenant Security Event Activity
- Tenant Sign-In Activity
- Tenant System Event Activity
- Tenants
The same information is available on Administration > Tenants (some in optional columns) and on the Statistics tab of a tenant's Properties window.
This information provides the ability to monitor the usage of the overall system and look for indicators of abnormal activity. For example, if a single tenant experiences a spike in security event activity, they might be under attack.
Multi-tenant reports
To generate reports that contain the information you require, go to Event & Reports > Generate Reports and choose the report you'd like to generate from the drop-down menu. The following are reports for multi-tenant environments, and the information they include:
Security Module Usage Cumulative Report
- Tenant
- Hostname
- ID
- Anti-Malware hours
- Network hours
- System hours
- Enterprise hours
Security Module Usage Report
- Tenant
- ID
- Hostname
- Display name
- Computer group
- Instance type
- Start date
- Start time
- Stop time
- Duration (seconds)
- Anti-malware
- Web Reputation
- Firewall
- Intrusion prevention
- Integrity monitoring
- Log Inspection
- Application Control
Tenant Report
- Tenant name
- Database size
- Peak host count
- Protection hours
- Percentage of protected hours
Configure database user accounts
The majority of each tenant's data is stored in a separate database. This database can co-exist on the same database server as other tenants, or it can be isolated onto its own database server. In all cases, some data only exists in the primary database (the one installed with Deep Security Manager). When multiple database servers are available, tenants are created on the database with the least amount of load.
The segmentation of each tenant's data into a database provides additional benefits:
- Data destruction: Deleting a tenant removes all traces of that tenant's data (supported in the product).
- Backup: Each tenant's data can be subject to different backup policies. This can be useful for something like tenancy being used for staging and production where the staging environment requires less stringent backups (backups are the responsibility of the administrator setting up Deep Security Manager).
- Balancing: The potential for future re-balancing to maintain an even load on all database servers.
Configuring database user accounts
Microsoft SQL Server, Oracle, and PostgreSQL use different terms for database concepts described below.
| Concept | SQL Server term | Oracle term | PostgreSQL term |
|---|---|---|---|
| Process where multiple tenants execute | Database Server | Database | Database Server |
| One tenant's set of data | Database | Tablespace/User | Database |
The following section uses the Microsoft SQL Server terms for both SQL Server and Oracle.
See also Configure database user accounts.
SQL Server
Multi-tenancy requires that Deep Security can create databases when you create new tenants, so its SQL Server database user requires the "dbcreator" role.
For the user role of the primary tenant, assign DB owner to the main database.
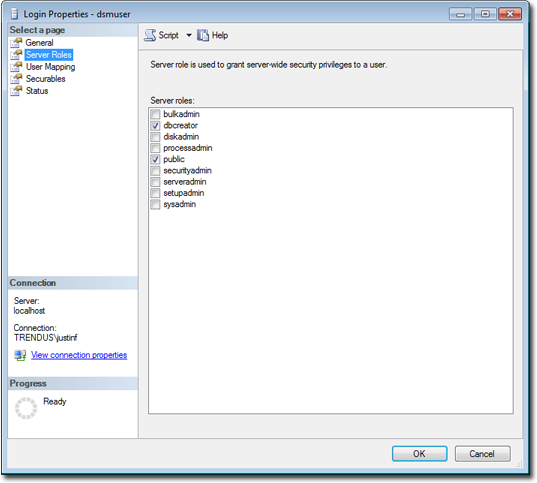
You can restrict the rights to include only the ability to modify the schema and access the data.
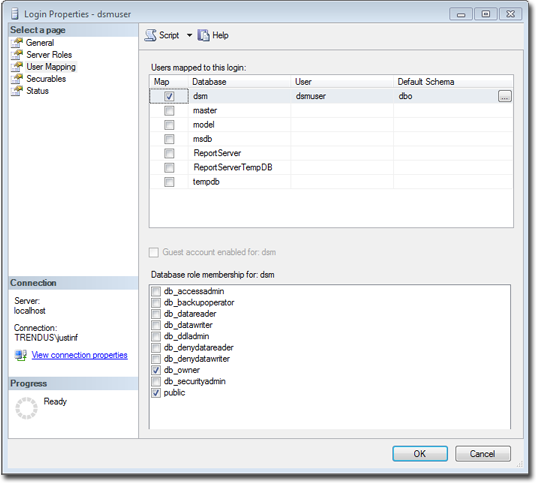
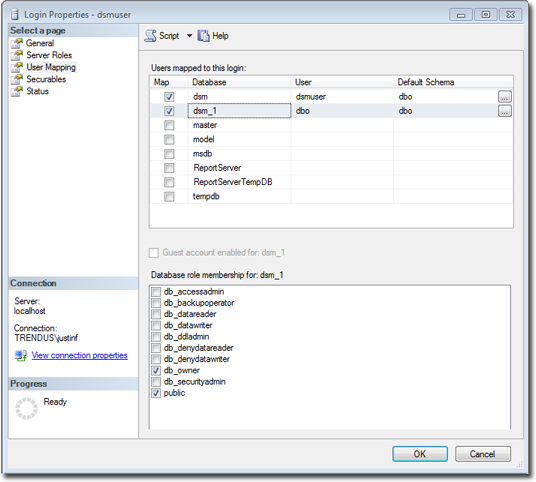
With the "dbcreator" role, databases that the account creates are automatically owned by the same user. For example, here are the user's properties after the first tenant has been created:
To create the first account on a secondary database server, only the "dbcreator" server role is required. No user mapping is required.
Oracle
Multi-tenancy in Oracle is similar to Microsoft SQL Server, but with a few important differences. Where SQL Server has a single user account per database server, Oracle uses one user account per tenant. The user that Deep Security was installed with maps to the primary tenant. That user can be granted permission to allocate additional users and tablespaces.
If multi-tenancy is enabled, you must assign these Oracle permissions:
Tenants are created as users with long random passwords and given these permissions:
For secondary Oracle servers, you must create the first user account (a bootstrap user account). This user has a mostly tablespace. The configuration is identical to the primary user account.
PostgreSQL
The user must have permissions to create new databases and roles:
ALTER ROLE [username] CREATEDB CREATEROLE;
On a secondary database server, the hostname, username, and password are required. The username must have privileges to create additional users (roles) and databases.
Configuring multiple database servers
By default, all tenants are created on the same database server that Deep Security Manager was installed with. In order to provide additional scalability, Deep Security Manager supports adding additional database servers (sometimes referred to as a secondary database). When you add a tenant, you have the option to let Deep Security automatically select a database server on which to store the new tenant account or you can specify a particular server.
To configure more databases, go to Administration > System Settings > Tenants. In the Database Servers section, click View Database Servers, and then click New .
For Microsoft SQL Server, the secondary database server requires a hostname, user name, and password (named instance and domain). The Deep Security Manager's database user must have these permissions:
- Create databases
- Delete databases
- Define schema
This account is used not only to create the database but to authenticate to the databases that are created.
For Oracle, multi-tenant deployments use a different model. The new database definition defines a user that is bound to a tablespace. That user is used to "bootstrap" the creation of additional users on Oracle.
Removing or changing secondary databases
You can delete database servers (other than the primary database) if there are no tenants on the server.
If the hostname, user name, password or any details change for a secondary server, you can change these values in the Deep Security Manager console. To change values for the primary database, you must shut down all nodes of the Deep Security Manager and edit the dsm.properties file with the new details.
APIs
Deep Security Manager includes a number of APIs for:
- Enabling Multi-Tenancy
- Managing Tenants
- Accessing Monitoring Data
- Accessing Chargeback (Protection Activity) Data
- Managing Secondary Database Servers
In addition, the legacy SOAP API includes an authenticate method that accepts the Tenant Account Name as a third parameter.
For more information on the APIs, see Use the Deep Security API to automate tasks.
Upgrade
When you run the Deep Security Manager installer, it should detect any existing installation. You can choose to either make a new installation, or upgrade the existing one. If you upgrade, the installer first tries to shut down other nodes, and then starts to upgrade.
The installer upgrades the primary tenant first, followed by the other tenants in parallel (five at a time). Once the installer finishes, run the same installer on the other manager nodes.
If a problem occurs during the tenant's database upgrade, then on Administration > Tenants, the tenant's State is Database Upgrade Failed (offline). The tenant's interface can be used to force the upgrade process. If forcing the upgrade does not work, please contact support.
Supporting tenants
Especially if you are an MSSP that is the first tier support provider to your tenants, sometimes a primary tenant might need to log in to another tenant's user interface.
To do this, go to Administration > Tenants. Right-click the tenant's name, and then select Authenticate As. (The option may not be available if the tenant has disabled access.) This creates a temporary user account with the "Full Access" role inside that tenant, and immediately logs you into that account. Temporary account names are "support_" followed by their username inside the primary tenant.
For example, if your primary tenant username is "jdoe", and you create a temporary account inside tenant "T1", then you would be immediately logged into "T1" as "support_jdoe".
Temporary support accounts are deleted when either they log out or their session times out. Tenants can see system events about the temporary support account's creation, log in, log out, and deletion.
Users in the primary tenant can access more diagnostic tools and information:
- Administration > System Information has more information about tenant memory usage and the state of threads.
-
server#.log log files (such as server0.log) on each manager node's disks have the name of the tenant, and the user if applicable, associated with each event.
In some cases, you may need to perform an action or change a tenant's setting that is not available in the GUI. This usually comes at the request of Trend Micro support. In the command line, add the argument:
-tenantname <tenant-name>
to apply setting changes or actions to that tenant. If the argument is omitted, the command applies to the primary tenant.
Load balancers
By default, a multi-node manager gives the address of all nodes to all agents and virtual appliances. The agents and virtual appliances randomly select a node from the list when they try to connect. If they cannot, then they try another node on the list, continuing this process until either a connection succeeds, or no nodes can be reached. If they can't reach any node, then they wait until the next heartbeat to try again.
Each time a node is added or removed, an updated list is sent to all agents and virtual appliances. Until then, connections to old nodes may fail, and the new node will be unused. This causes slow communications and increased network traffic. To avoid this, instead configure agents and virtual appliances to connect via the load balancer's address.
Load balancers can be configured to either use different port numbers for each different type of traffic, or (if the load balancer supports port re-direction) expose all of the required protocols over port 443 using three load balancers.
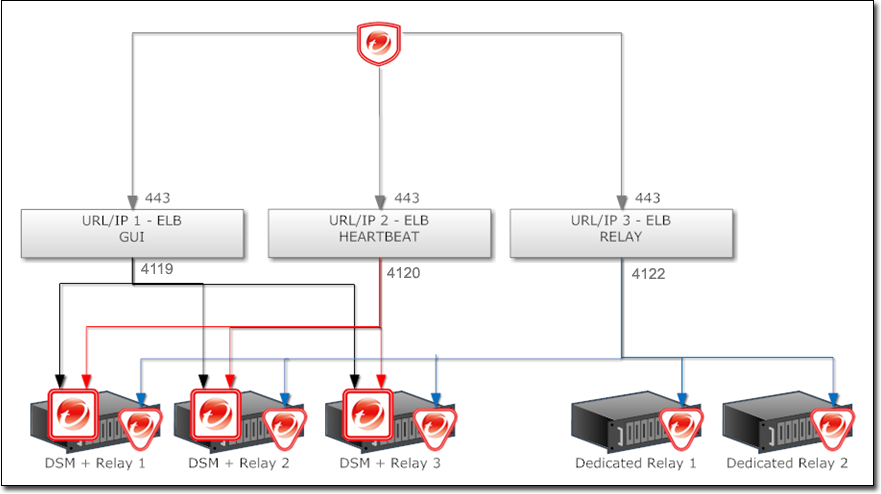
Balance load based upon TCP connections; do not use SSL termination. This ensures that an entire connection occurs with the same manager node. The next connection may be distributed to a different node.
For more Deep Security Manager deployment recommendations, see the Deep Security Best Practice Guide.