Deep Security 11.3 has reached end of support. Use the version selector (above) to see more recent versions of the Help Center.
Install or upgrade Deep Security
This document guides you through the steps required to install or upgrade to Deep Security 11.3.
If you are you are upgrading from a previous version of Deep Security, get a version of this article customized for your environment by running the Deep Security Manager installer. Before it installs anything, the installer checks your environment and also provides a link to the customized upgrade instructions.
Prepare your environment
This document is your checklist. Choose your Deep Security platform, then follow these steps for a basic, functional deployment. Once finished, you'll be ready to make security policies.
-
Download software: Get your license activation codes.
- Download any required vCenter, ESXi, VMware Tools, and NSX Manager software from VMware.
- Download the latest patch and Deep Security Manager installer (https://help.deepsecurity.trendmicro.com/software.html).
- Agent and relay installers are not required; they can be downloaded via the manager. See About upgrades for information on installing or updating agents, relays, and the Deep Security Virtual Appliance.All Deep Security Relays must be upgraded before upgrading the Deep Security Agent. Failure to do so may cause the relay upgrade to fail.
-
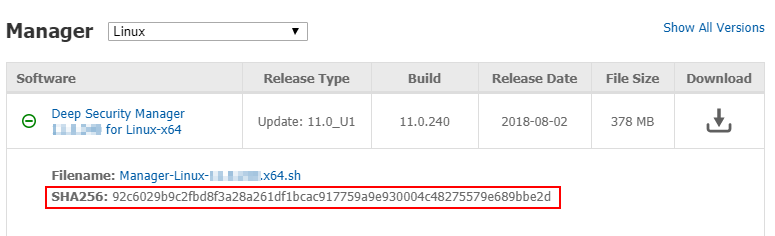
Verify that the Deep Security installers are authentic (check hashes):
To verify software authenticity, check the SHA256 hash (also called a fingerprint). Trend Micro publishes its hashes on the Deep Security Software page. You must click the plus sign next to the software to see the hash (see the figure below).
-
Check compatibility: Start the installer. Before it installs anything, it checks your environment to make sure it complies with system requirements. The installer also makes sure that all your deployment components are compatible with the new version of Deep Security Manager. The readiness check generates a "to do" list of compatibility issues (if any) for your specific environment.
For example, you may need to free disk space, allocate more vRAM, or upgrade old Deep Security Agents to supported versions. If you're not ready yet, you can cancel the install, and return when ready.
The readiness check also customizes this guide for your environment's needs when you click View My Upgrade Guide. Before you install, all tasks under Prepare your environment must be complete.
Supported Deep Security features vary by platform. See Supported features by platform. -
Back up your data: Before you install, make a system restore point or VM snapshot of the server and each protected computer. (Multi-node Deep Security Manager deployments should have a backup for each server node.) Also, if upgrading, stop the service and back up your existing Deep Security Manager database.
Verify your backups. If you don't have backups, and the installer is interrupted for any reason, you won't be able to revert your deployment. This could require you to re-install your entire deployment.If you have an existing multi-tenant deployment, back up all databases.
- With Microsoft SQL and PostgreSQL, there's one main database and an additional database for each tenant.
- With Oracle, all tenant information is in one Deep Security Manager database, but an additional user is created for each tenant. Each user has its own tables.
Hardware requirements
Recommended hardware varies by enabled features, size of your deployment, and future growth. See sizing guidelines.
On the Deep Security Manager server where you are running the installer, the installer's readiness check will verify hardware before it installs. If hardware does not meet minimum system requirements, the installer will either warn you about reduced performance, or block the install.
Only the local server's hardware and some other deployment information that is stored in the database is tested. You must manually verify other servers' hardware, run the readiness check on any other manager nodes, or both.
On Linux, reserved system memory is separate from process memory. Therefore, although the installer's estimate might be similar, it will detect less RAM than the computer actually has. To verify the computer's actual total RAM, log in with a superuser account and enter:
grep MemTotal /proc/meminfo
After you install Deep Security 11.3 , you may be able to optimize performance. See Configure Deep Security Manager memory usage, Low disk space alerts, and Performance profiles.
Network requirements
Before you run the installer, verify that the Deep Security Manager server can use its required network services. This includes NTP for reliable time stamps and DNS for name resolution. For a list of protocols, associated features, expected source or destination, and required open network port numbers, see Port numbers, URLs, and IP addresses.
The system clock of the manager operating system must be synchronized with the clock of the database. Both computers should use the same NTP service.
Once Deep Security Manager is installed, when you deploy new agents, appliances, and relays, the manager automatically applies firewall rules to open their required ports.
For some features, Deep Security must be able to resolve host names into IP addresses. If your DNS server does not already have entries so that the manager can resolve each computer or VM's host name to its IP address, then either use their IP address instead, or perform one of the following actions:
- Add an A record, an AAAA record, or both, on your DNS server so that the manager, agents, appliances, and relays can perform DNS lookup queries.
- Add an entry in the agent or appliance computer's hosts file.
java.io.IOException: DNSName components must begin with a letterNetwork topology
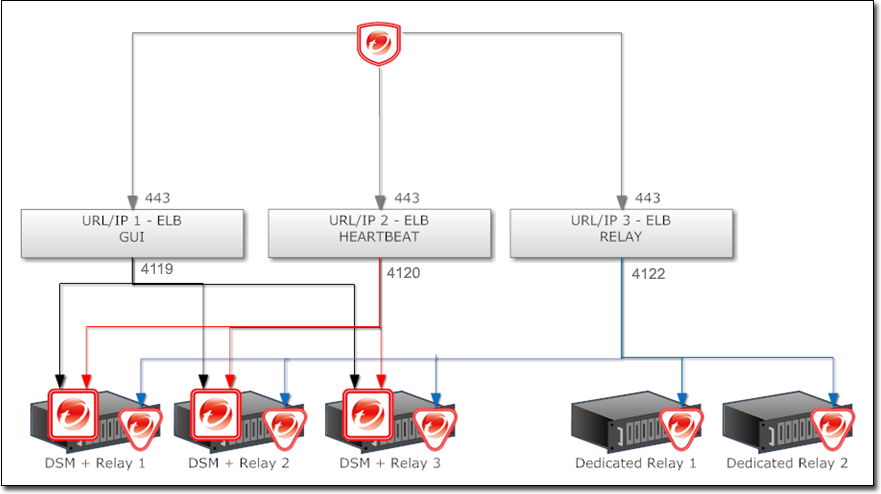
If you are deploying multiple server nodes of Deep Security Manager for a large scale deployment, a load balancer can help distribute connections with Deep Security Agents and Virtual Appliances. Load balancers with virtual IPs can also provide a single inbound port number such as TCP 443, instead of the multiple port numbers that Deep Security normally requires.
Database requirements
The Deep Security Manager must be co-located on the same network as its database, with the connection speed of 1 GB LAN or higher. Connections over WAN are discouraged. Deep Security Manager relies on the database to function. Any increase in latency can have a serious negative impact on Deep Security Manager’s performance and availability.
Requirements vary by database type. See System requirements and Prepare a database for Deep Security Manager.
If you are installing Deep Security for the first time, before you run the installer, create and grant permissions to the database where Deep Security Manager will store its data.
If you use Microsoft SQL Server, Deep Security Manager must connect as either a Microsoft Active Directory domain or SQL user. Windows workgroup authentication is no longer supported.
Microsoft SQL Server Express is supported only in certain limited deployments. For details, see Microsoft SQL Server Express considerations.
Migrate to a supported database
If the database is not compatible, you must migrate to a supported database before you can install Deep Security Manager 11.3.
If you are upgrading Deep Security, to continue to store new data until you are ready to install Deep Security Manager 11.3, migrate to a database that is compatible with both current and future software. Check the System requirements for this version and for the version you are migrating from (Deep Security 10.0 system requirements or you can find system requirements for earlier versions in their install guides: http://docs.trendmicro.com/en-us/enterprise/deep-security.aspx).
For example, if you were currently using an Oracle 10g database with Deep Security Manager 9.5, you would migrate the database to Oracle 11g or 12c first (since it is supported by both Deep Security Manager 9.5 and 11.0), and then upgrade to Deep Security Manager 11.0.
-
Stop the Deep Security Manager service.
Deep Security Agents will continue with their current protection policies while the manager is stopped.
- Back up the database(s).
-
Back up the database connection settings file:
[Deep Security install directory]/webclient/webapps/ROOT/WEB-INF/dsm.properties
- Migrate to a database type that's supported by both your current Deep Security Manager version and Deep Security 11.3.
- If the migration did not preserve existing databases, load the database backup(s) into the new database engine.
- If required, edit dsm.properties to use the migrated database.
- Restart the Deep Security Manager service.
Change the remote SQL query timeout
If you use Microsoft SQL Server databases, go to SQL management studio > SQL Server properties > Connections > Remote query timeout and select 0 (No Timeout). This setting prevents database connection timeouts that can occur when you upgrade if each database schema migration operation takes a long time to complete.
Choose agent-based vs. agentless protection
If you are installing Deep Security for the first time, and you want to protect VMs, you may be able to provide some protection without installing a Deep Security Agent, using a Deep Security Appliance instead, or by using both together ("combined mode"). See Choose agentless vs. combined mode protection and Deploy agentless protection in a vCloud environment.
Install a supported OS
If your server's operating system (OS) is not supported by Deep Security Manager 11.3, you must install a supported OS before you can install the manager.
If you are upgrading a multi-node deployment, depending on whether you have a load balancer, you might be able to migrate servers to another OS without downtime.
For example, if you already had Deep Security Manager 9.5 on Windows 2003, to migrate the OS you would:
- Add another manager node that is running a newer OS supported by both Deep Security Manager 9.5 and 11.3, such as Windows Server 2012 (64-bit).
For a list of supported operating systems, see the install documentation for your current version of Deep Security Manager (See Deep Security 10.0 system requirements or you can find system requirements for earlier versions in their install guides: http://docs.trendmicro.com/en-us/enterprise/deep-security.aspx).
To add the new node, on the Windows 2012 server, run the Deep Security Manager 9.5 installer. When the installer wizard reaches the Database screen, enter the same database connection settings that you used for your other Deep Security Manager node(s). The next page will allow you to specify that you want to add a new manager node. Alternatively, you can perform a silent install to add a new node. For instructions, see Silent install of Deep Security Manager.
- Verify that everything is working correctly.
- In Deep Security Manager, go to Administration > Manager Nodes, right-click the old Windows 2003 node and select Decommission to remove it.
- Upgrade the OS of the decommissioned node, then return it to the pool.
- Repeat these steps with any other nodes that have an unsupported OS.
Upgrade unsupported Deep Security Managers
If your manager is old and the installer does not support upgrading it, the installer will prevent you from continuing. You must upgrade the manager to a supported version first. After that, you can install Deep Security Manager 11.3.
The installer supports upgrade from:
- Deep Security Manager 10.0, 10.1, 10.2, or 10.3
- Deep Security Manager 9.6 Service Pack 1 Patch 1
- Deep Security Manager 9.6 Patch 1
For instructions on how to upgrade from an unsupported version to a supported version, see the installation guide for the unsupported version:
http://docs.trendmicro.com/en-us/enterprise/deep-security.aspx
Upgrade unsupported relays
If your relays don't meet minimum system requirements, you must upgrade them to be compatible with the new version of the manager before you upgrade the manager itself. Since it would break part of your deployment, the installer will warn you if you have incompatible versions, although it won't stop you if a specific relay isn't compatible. This allows you to continue if a specific relay isn't being used now, or is offline.
For instructions on how to upgrade to a supported version, see those versions' install guides:
http://docs.trendmicro.com/en-us/enterprise/deep-security.aspx
After you have upgraded the manager, to use new features, you will upgrade the relays again to Deep Security Relay 11.3.
VMware requirements
If you want to use agentless or combined mode protection, follow the steps below to install compatible VMware components before you install the new Deep Security.
If you are upgrading, and your existing appliances are not compatible with the new Deep Security, also follow those steps to install compatible versions.
- vSphere or ESXi — ESXi 6.0 or later is required.
-
vCNS — vCloud Networking & Security (vCNS) is not supported. If you have legacy vCNS infrastructure for agentless anti-malware and integrity monitoring with Deep Security Virtual Appliances, VMware has discontinued support, so Deep Security Manager 11.3 cannot support it. You must update vCNS to VMware's equivalent new solution: NSX.
Use either:
- NSX Advanced or Enterprise license — Full agentless protection. Requires Deep Security Virtual Appliance 10.0 or later and ESXi 6.0 or later.
- NSX vShield Endpoint or Standard license — Only agentless anti-malware and integrity monitoring. (No network protection: firewall, intrusion prevention, web reputation.) Also requires manual sync of Deep Security Manager with NSX Manager or vCenter to determine NSX security group membership. Requires Deep Security Virtual Appliance 10.0 or later and ESXi 6.0 or later.
Alternatively, for full protection including network protection features, combine the virtual appliance with a Deep Security Agent on each guest VM (also known as "combined mode").
During vCNS upgrade, you must also replace the network filter driver with the NetX API on each ESXi server. The VMware Tools driver for EPSec on each guest VM must also be upgraded, and is now called Guest Introspection.
-
NSX — NSX 6.3 or later is required.
- Deep Security Virtual Appliances — Deep Security Virtual Appliances 10.0 or later are required. See the minimum system requirements and see Upgrade the Deep Security Virtual Appliance.
Upgrade virtual appliances
Since it would break part of your deployment, the installer will warn you if you have incompatible versions of virtual appliances, although the installer will not stop installation if a specific appliance is not compatible. (This allows you to proceed if the virtual appliance isn't used, or is offline.) However, the installer will not allow you to continue if you have incompatible versions of ESXi or vShield Manager / NSX Manager.
VMware dependencies exist. You must select versions that are compatible with each other. To easily choose compatible versions, see Trend Micro Support's VMware compatibility matrix (updated with each release):
https://success.trendmicro.com/solution/1060499
- Back up the vCenter database. Methods vary by version and storage.
- Upgrade vCenter.
-
If you are upgrading, on Deep Security Manager, go to Computers. Deactivate agentless computers or agents in combined mode.
Deactivate the Deep Security Virtual Appliances.
In NSX Manager, also delete the virtual appliances on each ESXi server.
Alternatively, to ensure continuous protection during the upgrade of NSX, ESXi, or virtual appliances, configure computers to use agents for protection instead. Otherwise, computer's won't be protected until you install and activate the appliances and agents again. -
If they exist, on protected guest VMs, uninstall the VMware Tools EPSec driver. On ESXi servers, uninstall the VMsafe-net API (network filter driver).
In Deep Security Manager, disconnect vShield Manager or NSX 6.2.3 or earlier (not vCenter).
Then upgrade vShield Manager or older NSX versions to NSX 6.3.x.
If you don't have legacy vShield Manager or its components (such as the filter driver) and you have NSX 6.3.x or later, skip this step.
You must replace vShield Manager with NSX. Otherwise any configured agentless protection won't work after you upgrade to Deep Security 11.3. This could compromise the security of your protected computers. -
Depending on your architecture, you might also be required to upgrade:
- Run the installer for Deep Security Manager.
-
If you disconnected NSX Manager in step 4, in Deep Security Manager, go to Computers > vCenter. Reconnect NSX Manager. Click Test Connection to verify the connection.
This will add "Trend Micro Deep Security service" to NSX Manager.
-
To protect your VMs with Deep Security Virtual Appliance for file-based protection such as anti-malware, install Guest Introspection.
VMware vShield Endpoint Driver in VMware Tools 5.x is renamed Guest Introspection in NSX 6.2.4 and later.
-
On every protected guest VM, to provide file-based protection such as anti-malware, perform a custom install of VMware Tools. Ensure that the NSX File Introspection option is selected. (See Installing VMware Tools in the vSphere documentation.)
You must install VMware Tools. If you don't, Deep Security Manager won't be able to get the VM's correct hostname and IP address. If the manager forwards incorrect data to Trend Micro Control Manager, Control Manager won't be able to display that endpoint. -
On NSX Manager, deploy new Deep Security Virtual Appliances onto each ESXi. If you are upgrading the appliance, refer to Upgrade the agent embedded on the appliance SVM and apply OS patches.
Do not upgrade the virtual appliance's VMware Tools; it is packaged with a compatible version, and upgrading them can break connectivity.A "VMware Network Fabric" service dependency alert might appear, even if communications succeed. To dismiss the alert, click Failed, then click Resolve.
- Verify that ESXi and NSX are integrated and communicating.
-
If using the vShield Endpoint or Standard license, also manually sync Deep Security Manager with vCenter or vShield Endpoint to retrieve the NSX security group membership and start protection.
-
If VMs might change security groups, set up automated NSX security policy management or Synchronize Deep Security policies with NSX
-
Enable agentless protection of vCloud VMs.
Configure VMware vCloud resources for integration with Deep Security.
-
Deploy and activate new Deep Security Virtual Appliances.
(Refer to Upgrade the Deep Security Virtual Appliance for information on upgrading the Deep Security Virtual Appliance.)
If you are using the VMware Distributed Resource Scheduler (DRS) for high availability (HA), use affinity rules to "pin" each virtual appliance to its specific ESXi host.
-
Install and activate new Deep Security Agents.
If NSX has the NSX vShield Endpoint or Standard license, network-based protection features (firewall, intrusion prevention, web reputation) are not supported by the new NSX license. To maintain protection and provide those features, configure agents in combined mode. To verify that security features are working again, you can test each feature's configuration:
https://success.trendmicro.com/solution/1098449
Firewall features can now be provided by the NSX Distributed Firewall. You can disable the firewall in Deep Security 11.3. Alternatively, you can exclude VMs from the NSX Distributed Firewall, and use the Deep Security firewall instead (see Exclude Virtual Machines from Firewall Protection).
If you are upgrading, after you have installed Deep Security Manager 11.3, if you want to use the new features, you will upgrade your virtual appliances, agents, and relays again, to Deep Security 11.3.
Conversion of coordinated approach to combined mode
- Coordinated approach — In Deep Security 9.5, if the agent on a VM was offline, protection features would be provided by the Deep Security Virtual Appliance instead as an alternative. However, it could not be configured separately for each feature.
- Combined mode — In Deep Security 9.6, each protection feature was configurable to use either the agent or appliance. However, if the preferred protection source was offline, the computer didn't use the other alternative.
In the new Deep Security, its "protection source" settings provide both behaviors:
- whether each feature is provided by the agent or appliance
- whether to use the agent or appliance alternative if the preferred protection is not available
So if you need behavior like the old coordinated approach, you might want to upgrade directly from Deep Security 9.5 to 11.3 — not from 9.5 to 9.6 and then 11.3.
Pin appliances with VMware HA
If you will use agentless protection, and use VMware Distributed Resource Scheduler (DRS) for high availability (HA), configure it before you install Deep Security. Then deploy Deep Security Virtual Appliance on all ESXi hypervisors (including backup hypervisors), and use affinity settings "pin" them to each ESXi server. This will ensure that agentless protection is still being applied after HA failover.
Upgrade unsupported agents
If your agents don't meet minimum system requirements, you must upgrade them to be compatible with the new version of the manager before you upgrade the manager itself. Since it would break part of your deployment, the installer will warn you if you have incompatible versions, although it won't stop you if a specific agent isn't compatible. This allows you to continue if a specific agent isn't being used now, or is offline.
For instructions on how to upgrade to a supported version, see those versions' install guides:
http://docs.trendmicro.com/en-us/enterprise/deep-security.aspx
After you have upgraded the manager, to use new features, you will upgrade the agents again to Deep Security Agent 11.3.
Run the installer
Once your environment is ready, install the latest patches (if any), then run the installer as root, superuser, or (on Windows) Administrator. You can use either:
- Graphical, interactive installer (follow the steps in the wizard)
- Silent installer (see Silent install of Deep Security Manager
If you use Microsoft SQL Server, then Deep Security Manager connection settings vary by authentication type:
- SQL Server: Enter the User name and Password.
- Active Directory: Enter the User name (no domain) and Password, then click Advanced and enter the Domain separately. Also known as Kerberos or Windows domain authentication.
If you are installing Deep Security Manager on Linux with iptables enabled, also configure the iptables to allow agents' heartbeat port numbers and management traffic. See Port numbers, URLs, and IP addresses.
If you are upgrading to the new Deep Security Manager, if you want to use the new features, upgrade your virtual appliances, agents, and relays again to match the new version.
Multi-node manager
For high availability and scalability in larger deployments, use a load balancer, and install same version of Deep Security Manager on multiple servers ("nodes") with the same master key (if configured). Connect them to the same database storage.
All nodes that use the same database must have the same software version. This ensures data compatibility, and that how they handle protected computers is consistent. All nodes must also use the same master key (if configured) and have it always available so that they all can decrypt and read the encrypted configuration properties and personal data when required.
If you are upgrading a multi-node Deep Security Manager:
- Stop all nodes.
-
Run the installer on one node first.
When upgrade is complete for the first node, its service will start. Until other nodes are also upgraded, it will be the only node whose software is compatible with the database, so initially it will be the only available manager. Because it must perform all jobs, you might notice that performance is reduced during this time. On Administration > System Information, Network Map with Activity Graph will indicate that other nodes are offline, and that they require an upgrade.
-
Upgrade other nodes.
As you upgrade them too, other nodes will return online, and begin to share the load again.
-
If you configured a custom master key, run the masterkey commands to encrypt existing data on only one of the nodes.
Other steps in the install or upgrade process are the same, regardless of whether you have one server or multiple.
Install Deep Security Manager on Linux
You can use the command line to perform a silent install, or, if you have X Windows installed, you can use the graphical installer.
- Run the install package. Follow the instructions in the setup wizard.
-
The installer will detect existing Deep Security Manager installations on that server. Select either:
- Fresh install (can use existing or new database): Install Deep Security software. Initialize the database.
- Upgrade: Install new Deep Security software, but keep existing computer details, policies, intrusion prevention rules, firewall rules, etc. Migrate data to new formats if required.
If you select Fresh install (can use existing or new database), the installer will delete all data from any previous installation. - If iptables is enabled, configure rules to allow incoming connections from agents' heartbeat and management traffic port numbers. See also Port numbers, URLs, and IP addresses.
Install Deep Security Manager on Windows
You can use the command line to perform a silent install, or you can use the graphical installer.
- Run the install package. Follow the instructions in the setup wizard.
-
The installer will detect existing Deep Security Manager installations on that server. Select either:
- Fresh install (can use existing or new database): Install Deep Security software. Initialize the database.
- Upgrade: Install new Deep Security software, but keep existing computer details, policies, intrusion prevention rules, firewall rules, etc. Migrate data to new formats if required.
If you select Fresh install (can use existing or new database), the installer will delete all data from any previous installation.
Install a relay on the Deep Security Manager's server
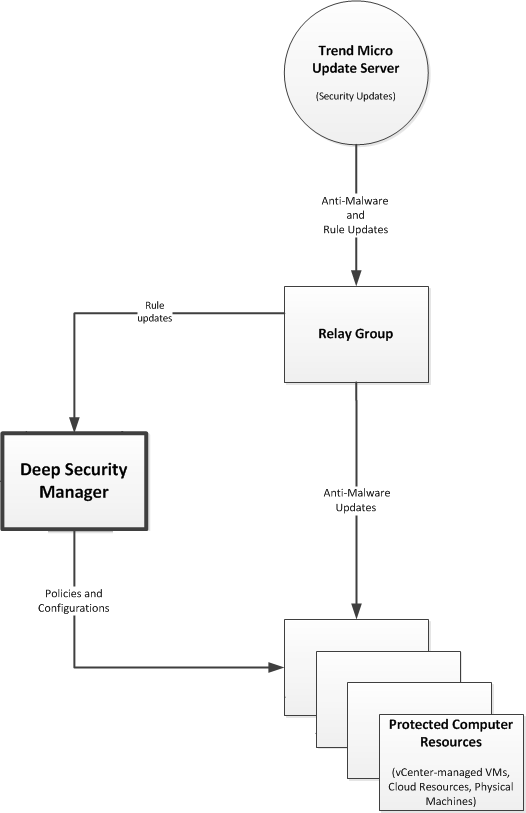
Deep Security requires at least one relay. Relays distribute security updates to protected computers. For more information on relays, see Distribute security and software updates with relays.
When you run the Deep Security Manager installer, it will search its local directory for a full ZIP package of the agent installer. (Relays are agents whose relay feature is enabled.) If it's not found, then the manager's installer will try to download one from the Trend Micro Download Center on the Internet.
-
If an agent installer is found in either location, the manager's installer will offer to install the newest relay.
Trend Micro recommends that you install a local relay to:
- Provide a relay that is local to the manager
- Ensure that at least one relay is always available, even when you decommission old computers with relays
When the manager's installer adds an agent to its server, it only enables the relay feature. It does not apply any default security settings. To protect the server, in Deep Security Manager, apply a security policy to its agent. - If no agent installer is found, you can download and install an agent or relay later.
Schema updates
Unlike with Deep Security Manager 9.6 and earlier, if you are updating, your database administrator (DBA) doesn't need to update the manually database schema first. The installer will make any required database schema changes. If that is interrupted for any reason, simply restore your database backup, then try again. Many possible causes are temporary, such as unusually high load or network maintenance. If the problem persists, contact your support provider. Errors, if any, are logged in:
<install-directory>/DBUpgrade/SchemaUpdate
where the default <install-directory> is /opt/dsm (Linux) or C:\Program Files\Trend Micro\Deep Security Manager (Windows). Two types of files are created:
- T-00000-Plan.txt - All data definition language (DDL) SQL statements that the installer will use to update the schema.
- T-00000-Progress.txt - Schema update progress logs. When finished, the installer changes the file name to either T-00000-Done.txt (successful update) or T-00000-Failed.txt (update failure).
If the schema update fails for t0 (the root tenant), the installer will not continue. You must restore the database backup and then try again.
However, if multi-tenancy is enabled, and if the upgrade fails for any other tenant(s), the installer will continue. For each tenant, the installer will create one of each type of log file, where "00000" is the tenant number, such as "00001" for tenant t1. You can either restore the database backup and try again, or retry the schema update for that specific tenant (see Force a multi-tenant upgrade).
Force a multi-tenant database upgrade
If you have a multi-tenant environment, and are upgrading Deep Security Manager:
- The installer updates the database schema.
-
The installer migrates data into the new structures for the primary tenant (t0).
If t0 migration fails, the installer can't recover. It will not continue. You must restore the database from backup, and then try again.
-
The installer migrates data for other tenants (five in each batch).
If any non-primary tenant's migration fails, the installer will continue, but those tenant's state on Administration > Tenants will be Database Upgrade Required (offline). You can either restore from backup and run the installer again, or you can retry migration for that specific tenant.
To retry a tenant's migration, use the tenant's interface. If forcing a retry does not work, please contact your support provider.
Roll back an unsuccessful upgrade
If you are upgrading, and problems occur when you install Deep Security Manager 11.3, you can quickly revert to a functional state if you:
- Backed up the database before the upgrade
- Didn't upgrade the agents, relays, or virtual appliances yet (or have VM snapshots or system backups that you made before the upgrade)
- Stop the Deep Security Manager service.
- Restore the database.
- Restore all Deep Security Manager server nodes.
- If you changed the hostname, FQDN, or IP address of the Deep Security Manager during the upgrade, restore them.
- Restore the agents, relays, and virtual appliances.
- Start the Deep Security Manager service.
- Verify connectivity to the Deep Security Manager, including the connection between the manager and agents.
After the installer
The "Trend Micro Deep Security Manager" service starts automatically when you finish its installer. To log into Deep Security Manager's GUI, open a web browser and go to:
https://[host_name]:[port]/
where [host_name] is the IP address or domain name of the server where you installed Deep Security Manager, and [port] is the Manager Port you specified during installation.
Complete the deployment by installing the:
- Relay(s)
- Virtual appliance(s), if any
- Agent(s), if any
Self-signed certificate
If you are installing Deep Security for the first time, the installer creates a self-signed server certificate that Deep Security Manager will use to identify itself during secure connections with agents, appliances, relays, and your web browser. It is valid for 10 years. However, because it is not signed by a trusted certificate authority (CA), and therefore the manager's identity can't be automatically authenticated, your web browser will display warnings. To eliminate the error message and improve security, replace Deep Security's server certificate with one signed by a trusted CA. For information on using a certificate from a CA, see Replace the Deep Security Manager SSL certificate.
Upgrades keep the manager's server certificate. You won't need to re-install it each time, unless you perform a fresh install.
Strengthen encryption
If you are upgrading, the manager's server certificate is kept. You won't need to re-install it each time, unless you perform a fresh install. Weak cryptography usually violates compliance, however. Exploits and fast brute force exist for old authentication, encryption methods, and protocols. This includes SHA-1. So you may need to replace your Deep Security certificates anyway. See Upgrade the Deep Security cryptographic algorithm and Replace the Deep Security Manager SSL certificate.
Event data migration
If you are upgrading, the installer will make any required database schema changes. It then migrates data for protected computers into the new schema.
Part of the database is event data. Event data can be large, depending on how much data you chose to keep during the installer. Event data isn't required for policy and computer management features, however, so the installer won't wait until all event data is migrated.
Instead, when you exit it, the installer will restart the Deep Security Manager service. Then Deep Security Manager will continue to migrate older event data into the new schema. Progress is indicated in the status bar at the bottom of the window, in new events, and (if an error occurs) alerts. Total migration time required varies by the amount of data, disk speed, RAM, and processing power.
New event data will still be recorded, and is available as usual during that time.
Upgrade relays on Linux (dpkg)
For Linux distributions that use the dpkg package manager (Debian and Ubuntu), the command is the same.
- Go to Administration > Updates > Software > Download Center.
- Go to Computers.
- Find the computer that you want to upgrade.
-
Right-click the computer and select Actions > Upgrade Agent software.
The new agent software will be sent to the computer and the relay will be upgraded.
Alternatively, manually copy the agent installer file to the computer and run it.
- Copy the agent installer file to the computer.
-
Enter the command:
sudo dpkg -i <installer file>
Upgrade relays on Linux (rpm)
For Linux distributions that use the rpm package manager (Red Hat, CentOS, Amazon Linux, Cloud Linux, and SUSE), the command is the same.
- Go to Administration > Updates > Software > Download Center.
- Go to Computers.
- Find the computer that you want to upgrade.
-
Right-click the computer and select Actions > Upgrade Agent software.
The new agent software will be sent to the computer and the relay will be upgraded.
Alternatively, manually copy the agent installer file to the computer and run it.
- Copy the agent installer file to the computer.
-
Enter the command:
sudo rpm -U <installer rpm>(The "-U" argument instructs the installer to perform an upgrade.)
Upgrade relays on Windows
- On Deep Security Manager, go to Settings > General > Agent Self Protection.
- Disable agent self-protection so that the agent will allow the upgrade.
- Go to Computers.
- Find the computer that you want to upgrade.
-
Right-click the computer and select Actions > Upgrade Agent software.
The new agent software will be sent to the computer and the relay will be upgraded.
Alternatively, manually copy the agent installer file to the computer and run it. Follow the wizard's instructions.
Upgrade agents on Windows
- On Deep Security Manager, go to Settings > General > Agent Self Protection.
- Disable agent self-protection so that the agent will allow the upgrade.
- Go to Computers.
- Find the computer that you want to upgrade.
-
Right-click the computer and select Actions > Upgrade Agent software.
The new agent software will be sent to the computer and the agent will be upgraded.
Alternatively, manually copy the agent installer file to the computer and run it. Follow the wizard's instructions.
-
If anti-malware is enabled, and you upgraded the agent on Windows Server 2012 or later (or, for personal computers, Windows 8 or later), reboot the computer.
The upgrade will not be complete (and protection may not be functional) until you reboot.
Upgrade agents on Linux
- Go to Administration > Updates > Software > Download Center.
- Go to Computers.
- Find the computer that you want to upgrade.
-
Right-click the computer and select Actions > Upgrade Agent software.
The new agent software will be sent to the computer and the relay will be upgraded.
Alternatively, manually copy the agent installer file to the computer and run it.
- Copy the agent installer file to the computer.
-
If the computer uses the rpm package manager (Red Hat, CentOS, Amazon Linux, Cloud Linux, SUSE), enter the command:
sudo rpm -U <installer file>(The "-U" argument instructs the installer to perform an upgrade.)
If the computer uses the dpkg package manager (Debian or Ubuntu), enter the command:
sudo dpkg -i <installer file>
Upgrade agents on Solaris to version 10.0
The Deep Security Agent for AIX and Solaris have not been tested for use with Deep Security Manager 11.3, which is a feature release. The AIX and Solaris platforms continue to be fully supported using Deep Security Manager 11.0 and will continue to be supported in the next major release (Deep Security 12.0). If you have AIX and/or Solaris platforms in your deployment, please continue to use Deep Security Manager 11.0.
Download security updates for Deep Security Agent 8.0 and 9.0
Deep Security 11.3 is a feature release and has not been tested for use with Deep Security Agent 8.0 or 9.0, including:
- Deep Security Agent 8.0 on Windows 2000
- Deep Security Agent 9.0 on AIX 6.1, 7.1, or 7.2
- Deep Security Agent 9.0 Solaris 10 Updates 4-10
Those platforms continue to be fully supported using Deep Security Manager 11.0 and will continue to be supported in the next major release (Deep Security 12.0). If you have AIX and/or Solaris platforms in your deployment, please continue to use Deep Security Manager 11.0. If you are currently using Deep Security Agent 8.0 on Windows 2000, you can upgrade the agent to version 9.6, which is compatible with Deep Security Manager 11.3.
Choose and agent or appliance for each protection feature
If a computer could be protected by either an appliance or agent, you can select which will provide each protection feature.
To configure the protection source, import a VMware vCenter into Deep Security Manager, then in the Computer or Policy editor![]() You can change these settings for a policy or for a specific computer.
To change the settings for a policy, go to the Polices page and double-click the policy that you want to edit (or select the policy and click Details).
To change the settings for a computer, go to the Computers page and double-click the computer that you want to edit (or select the computer and click Details)., go to Settings > General.
You can change these settings for a policy or for a specific computer.
To change the settings for a policy, go to the Polices page and double-click the policy that you want to edit (or select the policy and click Details).
To change the settings for a computer, go to the Computers page and double-click the computer that you want to edit (or select the computer and click Details)., go to Settings > General.
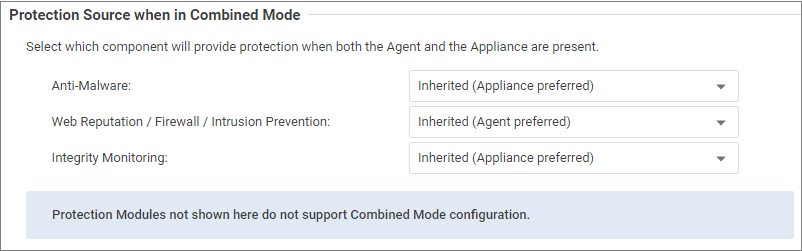
For each protection module or group of protection modules, select either:
-
Appliance Only: Only the Deep Security Virtual Appliance will provide protection, even if there is an agent on the VM and the appliance is deactivated or removed.
Don't use the appliance if you require the scanner (SAP). It requires Deep Security Agent anti-malware.When anti-malware is enabled on the agent, the agent downloads the Anti-malware Solution Platform (AMSP) and starts it as a service. If you do not want this, then from Anti-Malware, select Appliance Only. That way, even if the appliance is deactivated, the agent won't start the AMSP service. - Appliance Preferred: If there is an activated appliance on the ESXi server, it will provide the protection. But if the appliance is deactivated or removed, then the agent will provide protection instead.
- Agent Only:Only the agent will provide protection, even if there is an activated appliance available.
- Agent Preferred: If there is an activated agent on the VM, it will provide the protection. But if there is no activated agent, then the appliance will provide protection instead.
Install a new Deep Security Agent or Relay
To use new features, you must install Deep Security Agent or Relay 11.3.If you don't require the newest features, or if you need compatibility with legacy systems, however, you can install any supported version. For supported Deep Security Agent versions on each platform, see Deep Security Agent platforms.
Most steps are the same, whether you want to install a Deep Security Agent or Relay. (A relay is a Deep Security Agent where you have enabled the relay feature.) Relays update your agents more quickly, reduce manager load, and save internet connection or WAN bandwidth. You must have at least one relay. Relays download software and security updates from Trend Micro and the manager, and redistribute them to your protected computers.
-
Go to Administration > Updates > Software > Download Center.
Even if you use a third party deployment system, you must import all installed Deep Security Agent software into the Deep Security Manager's database. When a Deep Security Agent is first activated, it only installs protection modules that are currently enabled in the security policy. If you enable a new protection module later, Deep Security Agent will try to download its plug-in from Deep Security Manager. If that software is missing, the agent may not be able to install the protection module.
-
Install the agent software on computers. There are multiple methods:
- Manual deployment: Run the install package on the computer, then activate it and assign a policy. For instructions, see Manually install the Deep Security Agent.
- Deployment scripts: Upload and then run the installer using Linux or Unix shell scripts or Microsoft PowerShell. For instructions, see Use deployment scripts to add and protect computers.
- Ansible: For Ansible recipes, see the Deep Security Ansible playbook on GitHub.
- Chef: For Chef recipes for deployment and management, see the Deep Security Chef cookbook on GitHub.
- Puppet: For Puppet manifests, see the Deep Security Puppet manifests repository on GitHub.
- SCCM: Microsoft System Center Configuration Manager (SCCM) can install an agent, activate it, and apply a policy. To use SCCM, go to Administration > System Settings > Agents and enable agent-initiated activation.
- Template or Elastic Beanstalk: Include the agent in your VM template. See Bake the agent into your AMI or WorkSpace bundle and AWS Elastic Beanstalk scripts
- Activate the agent.
- Assign a policy to a computer.
-
If you want to enable the agent to act as a Deep Security Relay, see Distribute security and software updates with relays. (Alternatively, if you already have a web server, you can provide agent software updates via the web server instead of a relay-enabled agent. To do this, you must mirror the software repository of the relay-enabled agent on your web server. For more information on configuring your own software distribution web servers, see Use a web server to distribute software updates. )
Relays must be able to download components that they will redistribute. To test the relay, go to the Administration > Updates > Security. Under both Pattern Updates and Rule Updates, click Check For Updates and Download.
To configure how often your relays check for updates, go to Administration > Scheduled Tasks.
Deployments require at least one relay. Agents cannot download important software and security updates if they cannot connect to a relay.
You can add a relay on the same server while installing Deep Security Manager. If you did not do this, then enable the relay feature on at least one 64-bit agent. To verify how many relays you have, go to Administration > Updates > Relay Management and examine how many relays are below each group. For details, see Distribute security and software updates with relays. - If you require security update packages for older agents, go to Administration > System Settings > Update and select Allow supported 8.0 and 9.0 Agents to be updated.
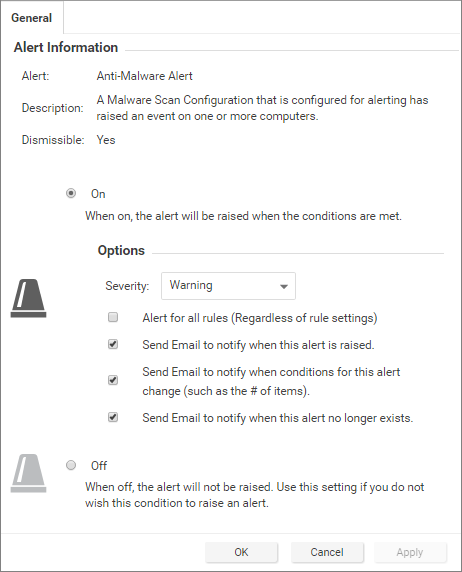
Set up alerts
Deep Security Manager can notify you when important system events occur.
Alternatively, if you have an external SIEM, you can forward events to it. Go to Policies > Common Objects > Other > Syslog Configurations and Administration > System Settings > Event Forwarding (see Forward Deep Security events to an external syslog or SIEM server).
- Go to Administration > System Settings > SMTP. Configure how Deep Security Manager will connect to your email server.
When you test, you should see a Test connection to SMTP server succeeded message. If the test fails, verify your SMTP settings, and that your server and the network allows communication on the required port numbers. - Go to Administration > User Management > Users. Double-click your user account, and select Receive Alert Emails.
-
Go to Alerts and Administration > System Settings > Alerts (see Configure alerts). Double-click each alert, then select which conditions will send an email.
Run a recommendation scan
If you're not sure how to begin configuring your security policies, Deep Security Manager can scan your protected computers, looking for vulnerable software and settings, and provide recommended security settings. Go to Computers and select Actions > Scan for Recommendations (see Manage and run recommendation scans).