Deep Security 11 has reached end of support. Use the version selector (above) to see more recent versions of the Help Center.
Encrypt communication between Deep Security Manager and the database
Communication between the Deep Security Manager and the database is not encrypted by default. This is for performance reasons and because the channel between the manager and the database may already be secure (either they are running on the same computer or they are connected by crossover cable, a private network segment, or tunneling via IPSec).
However, if the communication channel between the Deep Security Manager and the database is not secure, you should encrypt the communications between them. Do this by editing the
dsm.properties
file located in
\[Deep Security Manager install directory]\webclient\webapps\ROOT\WEB-INF\
The instructions vary depending on the database you are using:
This section also provides information on Running an agent on the database server and how to Disable encryption between the manager and database.
Encrypt communication between the manager and database
Microsoft SQL Server database (Linux)
Prerequisite: Make sure you have a certificate from a trusted Certificate Authority (CA) ready and assigned to the Microsoft SQL Server before proceeding with these steps. For details, see Enable Encrypted Connections to the Database Engine on the Microsoft MSDN site.
- Stop the Deep Security Manager service:
# service dsm_s stop - Edit
/opt/dsm/webclient/webapps/ROOT/WEB-INF/dsm.propertiesto add the following lines:database.SqlServer.encrypt=true
database.SqlServer.trustServerCertificate=trueIf you upgraded from Deep Security 10.1 or a previous version, and your connection to the database uses named pipes as the transport, add the following line instead:
database.SqlServer.ssl=require - If you upgraded from Deep Security 10.1 or a previous version, and your connection to the database uses named pipes as the transport, under
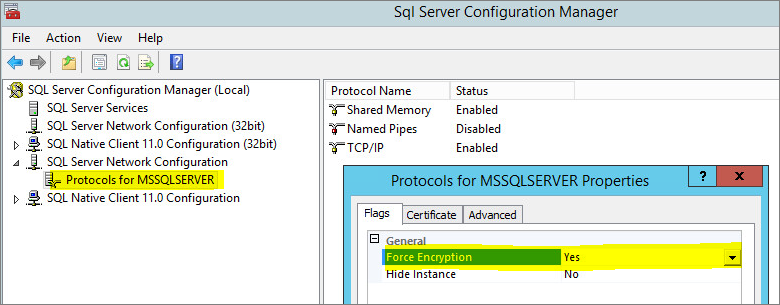
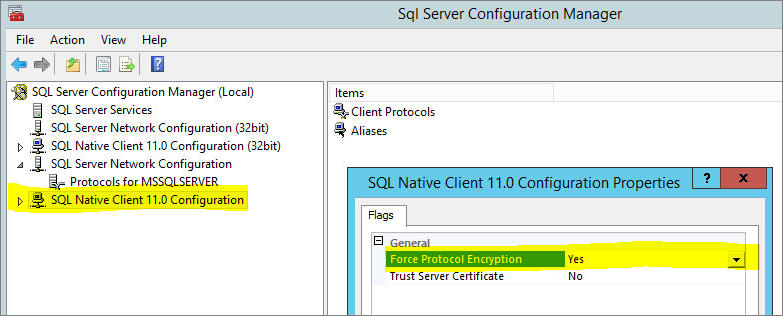
/opt/dsm, create a file nameddsm_s.vmoptionsthat contains the following line:-Djsse.enableCBCProtection=false - In the SQL Server Configuration Manager, enable "Force Encryption" in the protocol properties for the instance:
- Start the Deep Security Manager service:
# service dsm_s start
Microsoft SQL Server (Windows)
Prerequisite: Make sure you have a certificate from a trusted Certificate Authority (CA) ready and assigned to the Microsoft SQL Server before proceeding with these steps. For details, see Enable Encrypted Connections to the Database Engine on the Microsoft MSDN site.
- Stop the Deep Security Manager service.
- Edit
\Program Files\Trend Micro\Deep Security Manager\webclient\webapps\ROOT\WEB-INF\dsm.propertiesto add the following line:database.SqlServer.encrypt=true
database.SqlServer.trustServerCertificate=trueIf you upgraded from Deep Security 10.1 or a previous version, and your connection to the database uses named pipes as the transport, add the following line instead:
database.SqlServer.ssl=require - If you upgraded from Deep Security 10.1 or a previous version, and your connection to the database uses named pipes as the transport, under
\Program Files\Trend Micro\Deep Security Manager, create a file namedDeep Security Manager.vmoptionsthat contains the following line:-Djsse.enableCBCProtection=false - In the SQL Server Configuration Manager, enable "Force Encryption" in the protocol properties for the instance:
- Start the Deep Security Manager service.
Oracle Database
- Add the following lines to
dsm.properties(example):
database.Oracle.oracle.net.encryption_types_client=(AES256)
database.Oracle.oracle.net.encryption_client=REQUIRED
database.Oracle.oracle.net.crypto_checksum_types_client=(SHA1)
database.Oracle.oracle.net.crypto_checksum_client=REQUIRED - Save and close the file. Restart the Deep Security Manager service.
(All parameters prefixed with database.Oracle. will be passed to the Oracle driver.)
Possible values for the
encryption_types_client
are:
- AES256
- AES192
- AES128
- 3DES168
- 3DES112
- DES56C
- DES40C
- RC4_256
- RC4_128
- RC4_40
- RC4_56
Possible values for
crypto_checksum_types_client
are:
- MD5
- SHA1
For additional options consult: https://docs.oracle.com/cd/B28359_01/java.111/b31224/clntsec.htm
PostgreSQL
- Turn on SSL in PostgreSQL. For information, on how to do this for an on-premise PostgreSQL database, see Secure TCP/IP Connections with SSL. For an Amazon RDS for PostgreSQL, see Using SSL with a PostgreSQL DB Instance.
- Stop the Trend Micro Deep Security Manager service.
- In the
dsm.propertiesfile, add the following line:database.PostgreSQL.connectionParameters=ssl=true - Restart the Trend Micro Deep Security Manager service.
- To check that the manager is connecting using TLS, use the following query and check the SSL column:
select a.client_addr, a.application_name, a.usename, s.* from pg_stat_ssl s join pg_stat_activity a using (pid) where a.datname='<Deep Security database name>';
Running an agent on the database server
Encryption should be enabled if you are using an agent to protect the database. When you perform a security update, the Deep Security Manager stores new intrusion prevention rules in the database. The rule names themselves will almost certainly generate false positives as they get parsed by the agent if the data is not encrypted.
Disable encryption between the manager and database
In rare cases, you may need to disable encryption between Deep Security Manager and the database. For example, if you're using an older version of SQL Sever, you may need to disable encryption to avoid connection errors. For details, see Error: The installer could not establish a secure connection to the database server.
Follow the instructions for your database type to disable encryption.
Microsoft SQL Server database (Linux)
- Stop the Deep Security Manager service:
# service dsm_s stop - Edit the
/opt/dsm/webclient/webapps/ROOT/WEB-INF/dsm.propertiesto remove the following lines:database.SqlServer.encrypt=true
database.SqlServer.trustServerCertificate=trueIf you upgraded from Deep Security 10.1 or a previous version, and your connection to the database uses named pipes as the transport, remove the following line instead:
database.SqlServer.ssl=require - In the SQL Server Configuration Manager, disable "Force Encryption" in the protocol properties for the instance:
- Start the Deep Security Manager service:
# service dsm_s start
Microsoft SQL Server (Windows)
- Stop the Deep Security Manager service.
- Edit
\Program Files\Trend Micro\Deep Security Manager\webclient\webapps\ROOT\WEB-INF\dsm.propertiesto remove the following lines:database.SqlServer.encrypt=true
database.SqlServer.trustServerCertificate=trueIf you upgraded from Deep Security 10.1 or a previous version, and your connection to the database uses named pipes as the transport, remove the following line instead:
database.SqlServer.ssl=require - In the SQL Server Configuration Manager, disable "Force Encryption" in the protocol properties for the instance:
- Start the Deep Security Manager service.
Oracle Database
- Remove the following lines from
dsm.properties(example):database.Oracle.oracle.net.encryption_types_client=(AES256)database.Oracle.oracle.net.encryption_client=REQUIREDdatabase.Oracle.oracle.net.crypto_checksum_types_client=(SHA1)database.Oracle.oracle.net.crypto_checksum_client=REQUIRED - Save and close the file. Stop and restart the Deep Security Manager service.
PostgreSQL
- Stop the Trend Micro Deep Security Manager service.
- In the
dsm.propertiesfile, remove the following line:database.PostgreSQL.connectionParameters=ssl=true - Restart the Trend Micro Deep Security Manager service.