Deploy the appliance (NSX-V)
You can watch Deep Security 12 - Agentless Deployment on YouTube to review the setup of agentless protection for a VMware environment with an NSX-V Manager. The video shows you how to import the Deep Security Virtual Appliance, synchronize vCenter and NSX Manager with your Deep Security Manager, deploy Guest Introspection and the appliance, and test the Anti-Malware protection with an EICAR file.
After completing the tasks in Before deploying the appliance, you are ready to deploy the appliance on NSX Data Center for vSphere (NSX-V). Follow the steps below.
To deploy on NSX-T Data Center, see instead Deploy the appliance (NSX-T).
- Step 1: Import appliance packages into Deep Security Manager
- Step 2: Add vCenter to Deep Security Manager
- Step 3: Prepare ESXi servers
- Step 4: Install Guest Introspection
- Step 5: Install the Deep Security Virtual Appliance on NSX-V
- Step 6: Prepare for activation on NSX-V
- Step 7: Create NSX security groups and policies
- Step 8: Trigger an activation and policy assignment
- Step 9: Check that VMs are activated and assigned a policy
- Next steps (how to add new VMs)
You can also Upgrade the Deep Security Virtual Appliance to protect against new OS vulnerabilities.
Step 1: Import appliance packages into Deep Security Manager
Follow the instructions below to download the Deep Security Virtual Appliance and import it into Deep Security Manager.
- On your Deep Security Manager computer, go to the software page at https://help.deepsecurity.trendmicro.com/software.html.
- Download the latest Deep Security Virtual Appliance package to your computer.
- On Deep Security Manager, go to Administration > Updates > Software > Local.
- Click Import and upload the package to Deep Security Manager.
When you import the appliance package, Deep Security Manager automatically downloads Deep Security Agent software that is compatible with the operating system of the appliance's virtual machine. This agent software appears under Administration > Updates > Software > Local. When you deploy the appliance, the embedded agent software will be auto-upgraded to the latest compatible version in Local Software by default. You can change the auto-upgrade version by clicking Administration > System Settings > Updates tab > Virtual Appliance Deployment.
It is acceptable to have multiple versions of the Deep Security Virtual Appliance package appear under Local Software. The newest version is always selected when you deploy a new Deep Security Virtual Appliance.
- Optionally, for guest VMs that run Microsoft Windows, you can also download the Deep Security Notifier. The notifier is a component that displays messages for Deep Security system events in the system tray. For details, see Install the Deep Security Notifier.
Step 2: Add vCenter to Deep Security Manager
Add vCenter to Deep Security Manager following the instructions in Add a VMware vCenter.
After you have finished:
- your guest VMs are displayed in Deep Security Manager.
- the Trend Micro Deep Security service is registered with NSX-V.
Step 3: Prepare ESXi servers
If you are using NSX Advanced Edition or NSX Enterprise Edition, you must prepare your ESXi servers by installing the drivers necessary for network traffic inspection. This operation is performed on the cluster.
If you are using another NSX edition, skip this section.
- In your vSphere Web Client, go to Home > Networking & Security > Installation > Host Preparation:
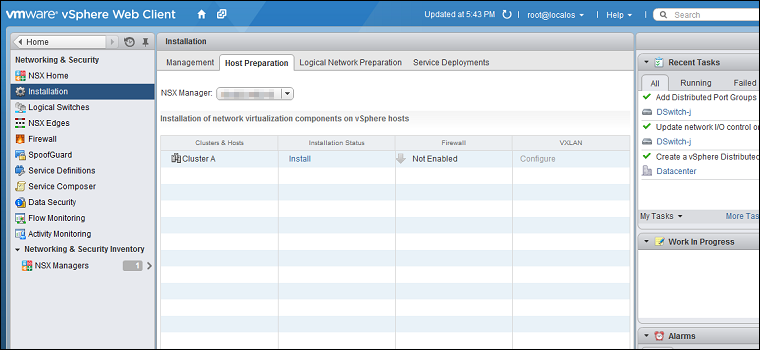
- Locate the NSX cluster you are going to protect with Deep Security in the Clusters & Hosts list and click Install in the Installation Status column. The installation will complete and the driver version will be displayed in the Installation Status column:
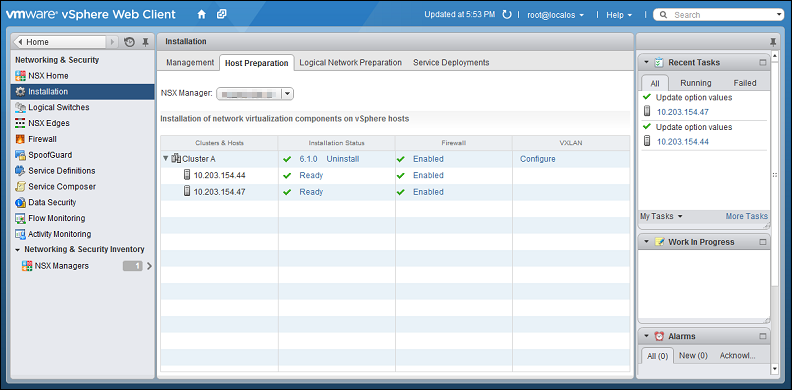
ESXi host preparation is now complete. For more complete instructions on host preparation, see VMware documentation.
Step 4: Install Guest Introspection
If you want file-based protection such as Anti-Malware or Intrusion Prevention for your VMs, you must install the Guest Introspection service on your ESXi servers. The Guest Introspection service consists of a couple of drivers: the File Introspection (vsepflt) driver and Network Introspection (vnetflt) driver.
If you do not install Guest Introspection, the Anti-Malware and Intrusion Prevention features will not work.
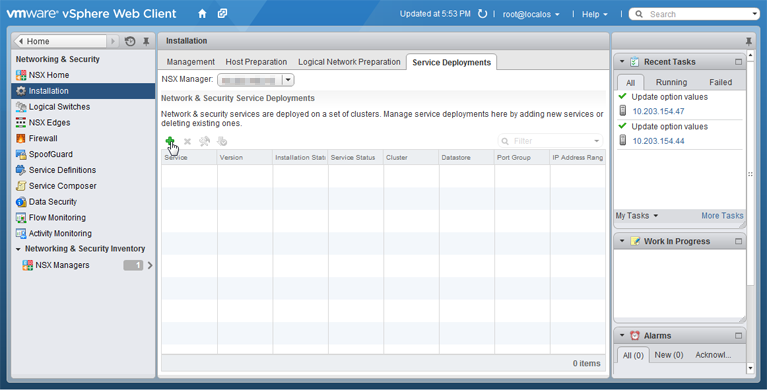
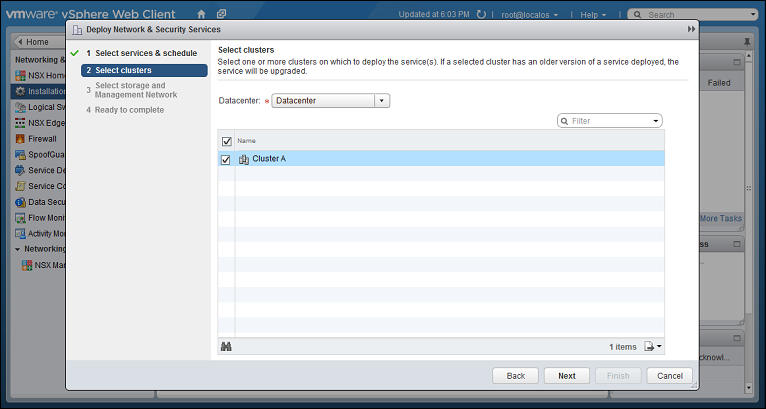
- In vSphere Web Client, go to Home > Networking & Security > Installation, then click the Service Deployments tab.
-
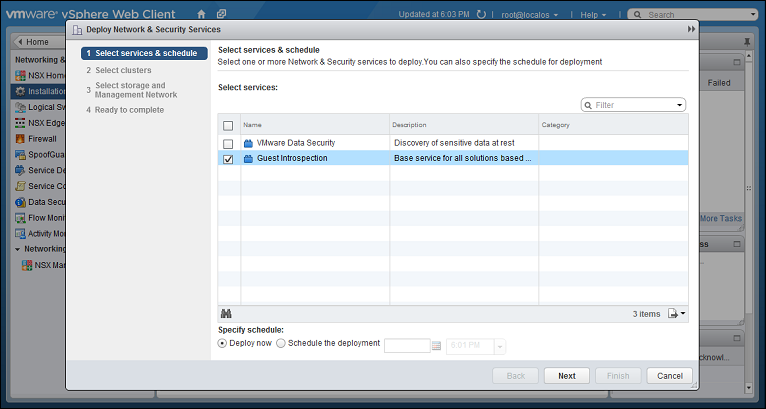
Click the green plus icon (
 ).
). The Deploy Network & Security Services window appears.
-
Select Guest Introspection, then click Next.
-
Select the cluster that contains the ESXi servers and VMs that you want to protect, then click Next.
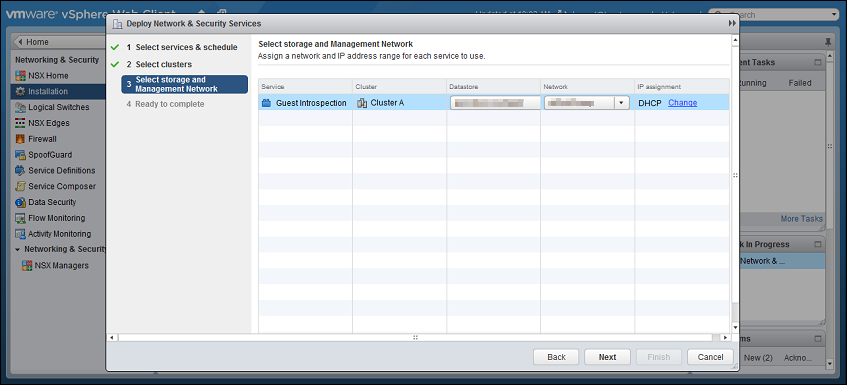
-
Select the datastore, the distributed port group used by your NSX cluster, and IP assignment method, then click Next.
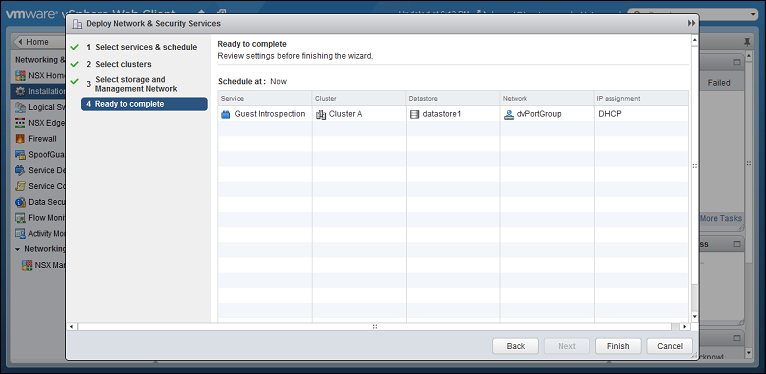
-
Review your settings, then click Finish.
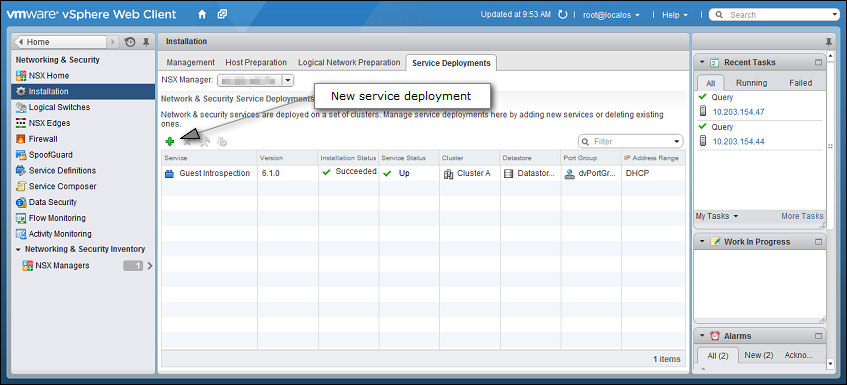
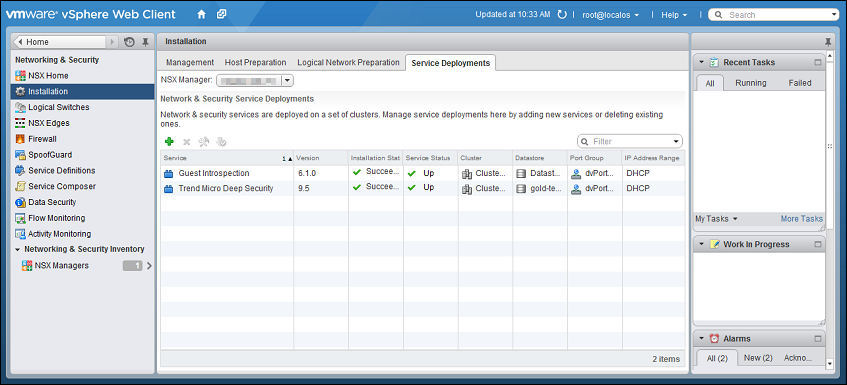
vSphere may take a few minutes to install the guest introspection service on your ESXi servers. When it is finished, Installation Status will display "Succeeded". To update the status, you may need to refresh the vSphere Web Client.

Step 5: Install the Deep Security Virtual Appliance on NSX-V
- In the vSphere Web Client, go to Home > Networking and Security > Installation > Service Deployments.
- Click the green plus sign ().
- In the new window that appears, select the Trend Micro Deep Security service and then click Next. If you do not see this service, it might be because you have not yet added your vCenter to Deep Security Manager. For details, see Step 2: Add vCenter to Deep Security Manager.
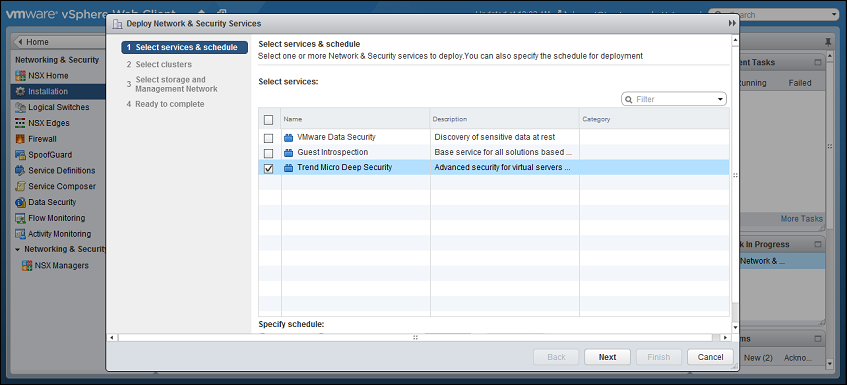
-
Click Finish.
When deployment is complete, the Trend Micro Deep Security service appears in the list of network and security service deployments in the cluster.
Step 6: Prepare for activation on NSX-V
In an upcoming step, you will be activating your VMs in Deep Security. To prepare for this activation, you can use Method 1, 2, or 3:
- Method 1: Create a 'Computer Created' event-based task
- Method 2: Create an 'NSX Security Group Change' event-based task
- Method 3: Synchronize your Deep Security policies to NSX
Consult the table to learn more about the methods.
| Deep Security Virtual Appliance deployment | |||||||||||||
| NSX for vSphere (NSX-V) 6.3.x - 6.4.x | NSX for vSphere (NSX-V) 6.4.x | NSX-T 2.4.x, 2.5.x | |||||||||||
|---|---|---|---|---|---|---|---|---|---|---|---|---|---|
| Method |
Standard OR NSX for vShield Endpoint (free) |
Advanced | Enterprise | NSX Data Center Standard | NSX Data Center Professional | NSX Data Center Advanced | NSX Data Center Enterprise Plus | NSX Data Center for Remote Office Branch Office | NSX Data Center Standard | NSX Data Center Professional | NSX Data Center Advanced | NSX Data Center Enterprise Plus | NSX Data Center for Remote Office Branch Office |
|
Method 1: Create a 'Computer Created' event-based task. With this method, any VMs that you newly create in your system are automatically activated and assigned a policy. |
✔ | ✔ | ✔ | ✔ | ✔ | ✔ | ✔ | ✔ | ✔ | ✔ | ✔ | ✔ | ✔ |
|
Method 2: Create an 'NSX Security Group Change' event-based task. With this method, new and existing VMs are automatically activated and assigned a policy when they are moved into a designated NSX security group. |
X | ✔1 | ✔1 | X | X | ✔1 | ✔1 | ✔1 | X | X | X | X | X |
|
Method 3: Synchronize your Deep Security policies to NSX. With this method, new and existing VMs are activated and assigned a policy when they are moved into a designated NSX security group. This is similar to method 2. However, unlike method 2, Deep Security policies are assigned through the VMware UI. |
X | ✔1 | ✔1 | X | X | ✔1 | ✔1 | ✔1 | X | X | X | X | X |
1 Requires VMware's Network Introspection Service.
Method 1: Create a 'Computer Created' event-based task
The instructions below are task-based. For more explanatory information on event-based tasks, see Automated policy management in NSX environments.
- In Deep Security Manager, click Administration at the top.
- On the left, click Event-Based Tasks.
- In the main pane, click New.
- From the Event drop-down list, select Computer Created (by System). The Computer Created (by System) event type is triggered when a new VM is created.
Click Next.
- Select Activate Computer and set it to 5 minutes.
- Select Assign Policy and select a policy from the drop-down list, for example, Windows Server 2016.You can click the arrows to view child policies. Click Next.
- Specify the conditions that restrict when the event-based task is triggered. Add this condition:
vCenter Name matches <your_vCenter_name>
- Add more conditions to further restrict when the event-based task is triggered. For example, if you have a naming convention for your VMs that includes a 'Windows' prefix on all Windows VMs, you would set:
Computer Name matches Windows*
Click Next.
- In the Name field, enter a name for the task that reflects the policy you assigned, for example, Activate Windows Server 2016.
- Select Task Enabled and then click Finish.
- Create additional event-based tasks, one per Deep Security policy you plan on assigning. The event-based task must have an event type of Computer Created (by System) and must be configured to activate the computer and assign a policy.
You have now set up your event-based tasks to activate and assign policies to newly-created VMs. As soon as a VM is created, all the Computer Created (by System) event-based tasks are reviewed. If the conditions in a task are met, the task is triggered, and the VM is activated and assigned the associated policy.
Method 2: Create an 'NSX Security Group Change' event-based task
The instructions below are task-based. For more explanatory information on event-based tasks, see Automated policy management in NSX environments.
First, determine whether NSX Security Group Change event-based tasks were already created for you (they should be present if you enabled Create an Event Based task to automatically activate VMs added to protected NSX Security Groups when you added vCenter to Deep Security Manager):
- In Deep Security Manager, click Administration at the top.
- On the left, click Event-Based Tasks.
- In the main pane, look for event-based tasks called Activate <your_vCenter_name> and Deactivate <your_vCenter_name>. Both have a TYPE of NSX Security Group Change. They may or may not exist.
If these event-based tasks exist, modify them as follows, otherwise, skip to the next procedure to create them.
- Double-click the Activate <your_vCenter_name> event-based task.
- Click the Actions tab.
- Select Assign Policy and then select a policy from the drop-down list, for example, Windows Server 2016.You can click the arrows to view child policies.
- Select the Conditions tab and specify the conditions that restrict when the event-based task is triggered. Leave the ones that are there and add ones to further restrict when the event-based task is triggered. For example, if you have a naming convention for your VMs that adds a 'Windows' prefix to all Windows VMs, you would set Computer Name matches Windows*. This configuration says, 'Only perform the actions in this event-based task if the VM name starts with Windows.'
- Optionally, under the General tab, change the name of the task to reflect the policy you assigned, for example, Activate Windows Server 2016.
- Select Task Enabled.
- Create additional event-based tasks, one per Deep Security policy you plan on assigning. The event-based task must have an event type of NSX Security Group Change and must be configured to activate the computer and assign a policy.
- Do not modify the Deactivate <your_vCenter_name> event-based task. This task says 'Only perform the actions in this event-based task if the VM is removed from an NSX security group'.
Create event-based tasks that activate VMs and assign policies:
- Click Administration at the top.
- On the left, click Event-Based Tasks.
- In the main pane, click New.
- From the Event drop-down list, select NSX Security Group Change. The NSX Security Group Change event type is triggered when a VM is added to (or removed from) an NSX security group that is associated with this event-based task.
Click Next.
- Select Activate Computer and set it to 5 minutes.
- Select Assign Policy and select a policy from the drop-down list, for example, Windows Server 2016.You can click the arrows to view child policies.
Click Next.
- Specify the conditions that restrict when the event-based task is triggered. Add these conditions:
- Appliance Protection Activated matches False.
- Appliance Protection Available matches True.
- NSX Security Group Name matches .+ (which means any)
- vCenter Name matches <your_vCenter_name>
- Add more conditions to further restrict when the event-based task is triggered. For example, if you have a naming convention for your VMs that includes a 'Windows' prefix on all Windows VMs, you would set:
- Computer Name matches Windows*.
This configuration says, 'Only perform the actions in this event-based task if the VM name starts with Windows'
Click Next.
- Computer Name matches Windows*.
- In the Name field, enter a name for the task that reflects the policy you assigned, for example, Activate Windows Server 2016.
- Select Task Enabled and then click Finish.
- Create additional event-based tasks, one per Deep Security policy you plan on assigning. The event-based task must have an event type of NSX Security Group Change and must be configured to activate the computer and assign a policy.
Create an event-based task that deactivates VMs, if it does not already exist:
- Click Administration at the top.
- On the left, click Event-Based Tasks.
- In the main pane, click New.
- From the Event drop-down list, select NSX Security Group Change.
Click Next.
- Select Deactivate Computer.
Click Next.
- Specify the conditions that restrict when the event-based task is triggered. Add these conditions:
- Appliance Protection Activated matches True.
- NSX Security Group Name matches ^$ (which means none)
- vCenter Name matches <your_vCenter_name>
- Click Next.
- In the Name field, enter a name for the task that reflects the action and vCenter name, for example, Deactivate computer - My vCenter.
- Select Task Enabled and then click Finish.
You have now set up your event-based tasks to activate and assign policies to VMs that you add to NSX security groups. As soon as a VM is added to a designated NSX group, all the NSX Security Group Name event-based tasks are reviewed. If the conditions in a task are met, the task is triggered, and the VM is activated and the associated policy assigned.
Method 3: Synchronize your Deep Security policies to NSX
The instructions below are task-based. For more explanatory information on synchronizing policies, see Synchronize Deep Security policies with NSX.
- Log in to Deep Security Manager.
- Make sure that all of the policies in Deep Security Manager have a unique name before they are synchronized with NSX. All the default ones have unique names.
- At the top, click Computers.
- On the left, right-click the vCenter where you want to enable synchronization and select Properties.
- On the NSX Configuration tab, select Synchronize Deep Security Policies with NSX Service Profiles. Click OK.
- Check that your policies are loading into vSphere:
- In the vSphere Web Client Home page, click the Networking & Security button. NSX Home appears.
- On the left, click Service Definitions.
- In the main pane, under the Services tab, right-click Trend Micro Deep Security and select Edit settings.
- In the main pane, select the Manage tab, and under that, select Profile Configurations.
- Make sure the Deep Security policies are loading. They appear as individual NSX profile configurations of the same name. Each profile configuration has an ID that starts with a 'P', for example, P1, P2, P3, and so on. The 'P' indicates they are based on Deep Security policies.

You have now added your Deep Security policies as profile configurations in NSX.
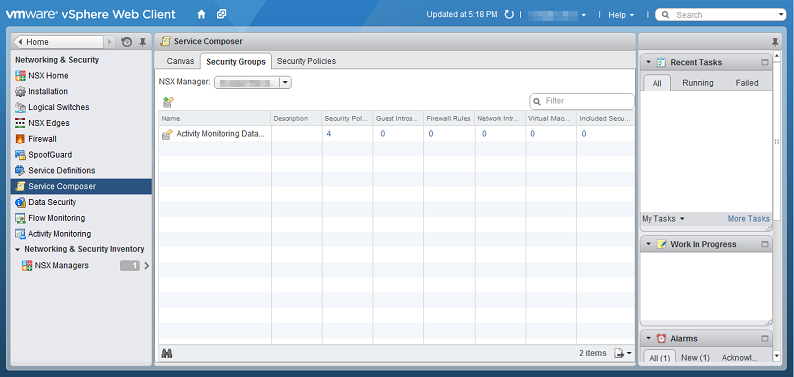
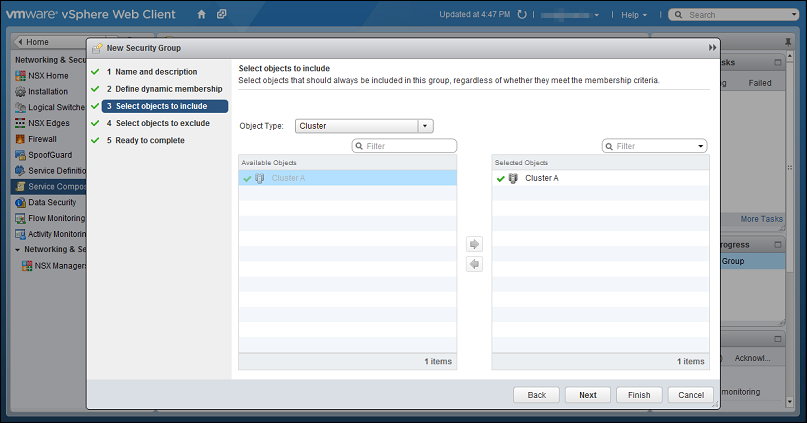
Step 7: Create NSX security groups and policies
First, create NSX security group(s):
- In vSphere Web Client, go to Home > Networking & Security > Service Composer > Security Groups.
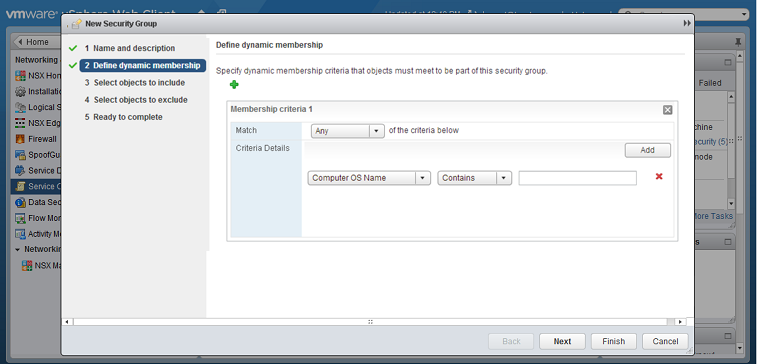
-
Click New Security Group(
 ):
):
-
Define Dynamic Membership: If you want to restrict membership in this group based on filtering criteria, enter those criteria here.
-
Select the objects that will be included. Follow this guidance:
- If you decided to use event-based tasks, you can add all your VMs to the security group if you want.
- If you decided to use policy synchronization, only add those VMs that correspond to the Deep Security policy you want to assign. For example, if you want to assign the Windows Server 2016 policy, only include Windows Server 2016 VMs.
- There are many ways to include or exclude objects in a NSX security group. For this example, we will include the NSX cluster that contains the ESXi hosts and VMs that we want to protect. In the Select objects to include options, select Cluster from the Object Type menu, and move the NSX cluster that contains the VMs to protect to the Selected Objects column.
If a VM is included in more than one security group, then when you go to Computers in Deep Security Manager and search for the VM's name, it will appear more than once in search results. For more information, please see Duplicate host records appear in Computer page when the host is located in more than one NSX security group. -
Click Finish to create the new security group and return to the Security Groups tab to see the newly listed security group.
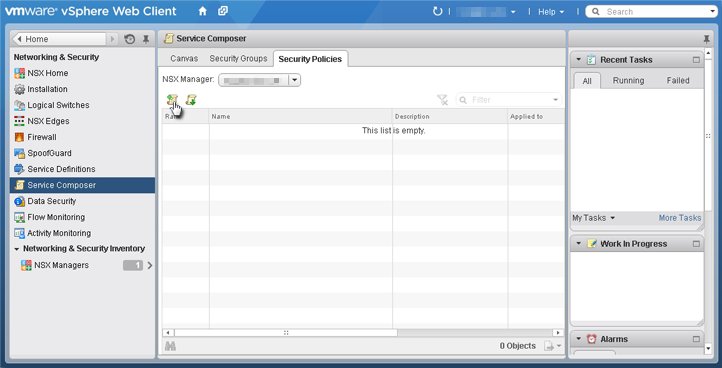
Next, create an NSX security policy:
- In vSphere Web Client, go to Home > Networking and Security > Service Composer > Security Policies.
- Click New Security Policy.
- Guest Introspection Services: Configure Guest Introspection Services if you are using the Anti-Malware or Intrusion Prevention modules.
If you do not install Guest Introspection, the Anti-Malware and Intrusion Prevention features will not work.
Click the green plus sign () to add an Endpoint Service. Provide a name for the Endpoint Service and select the following settings:
- Action: Apply
- Service Name: Trend Micro Deep Security
- Service Profile: Select one of the following:
- If you decided to use event-based tasks, select Default (EBT). This is a profile configuration that is configured to trigger event-based task(s) in Deep Security Manager.
- If you decided to use policy synchronization, select the profile configuration that matches the Deep Security policy that you want to apply.
- State: Enabled
- Enforce: Yes
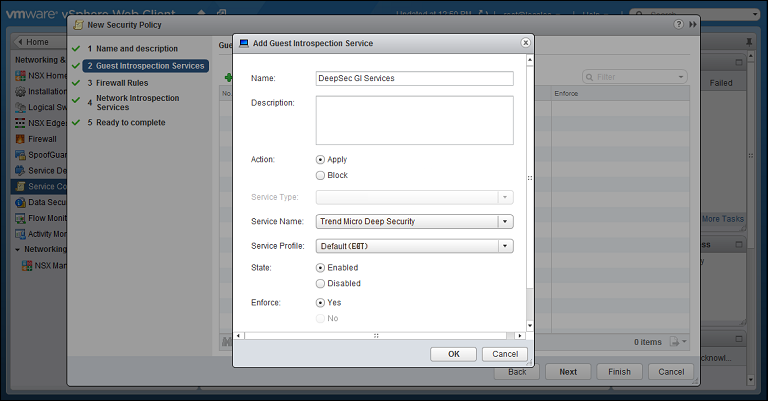
Click OK, then click Next.
- Firewall Rules: do not make any changes. Click Next.
- Network Introspection Services: Network Introspection Services are only available with NSX Advanced and Enterprise, and only need to be configured if you are using the Web Reputation, Firewall, or Intrusion Prevention modules. You will be adding two Network Introspection Services to the NSX Security Policy: a first one for outbound traffic, and a second one for inbound traffic.
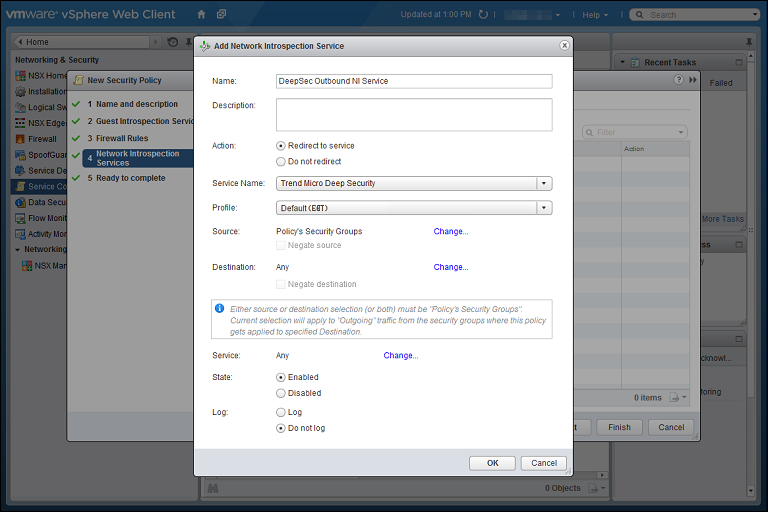
- For the first, outbound, service, in the Network Introspection Services options, click the green plus sign to create a new service. In the Add Network Introspection Service window, provide a name for the service (preferably one that includes the word "Outbound") and select the following settings:
- Action: Redirect to service
- Service Name: Trend Micro Deep Security
- Service Profile: Select the same NSX profile configuration as you did in step 4.
- Source: Policy's Security Groups
- Destination: Any
- Service: Any
- State: Enabled
- Log: Do not log
- For the second, inbound, service, in the Network Introspection Services options, click the green plus sign to create a new service. In the Add Network Introspection Service window, provide a name for the service (preferably one that includes the word "Inbound") and select the following settings:
- (NSX 6.3.x) Action: Redirect to service
OR
- (NSX 6.4.x) Redirect to service: Yes
- Service Name: Trend Micro Deep Security
- Service Profile: Select the same NSX profile configuration as you did in step 4.
- Source: Any
- Destination: Policy's Security Groups
- Service: Any
- State: Enabled
- Log: Do not log
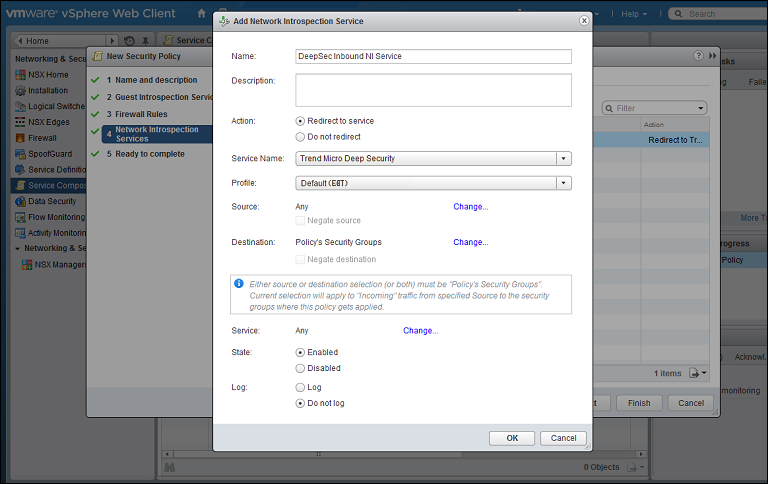
- (NSX 6.3.x) Action: Redirect to service
- Click OK in the Add Network Inspection Service window, and then click Finish to complete and close the New Security Policy window.
You have now created an NSX security policy for Deep Security.
- For the first, outbound, service, in the Network Introspection Services options, click the green plus sign to create a new service. In the Add Network Introspection Service window, provide a name for the service (preferably one that includes the word "Outbound") and select the following settings:
Next, associate the NSX security policy you just created with the NSX security group you also just created:
- Stay on the Security Policies tab of the Home > Networking & Security > Service Composer page in your vSphere Web Client.
- With the new security policy selected, click the Apply Security Policy icon (
 ).
). - In the Apply Policy to Security Groups window, select the security group that contains the VMs you want to protect and click OK.
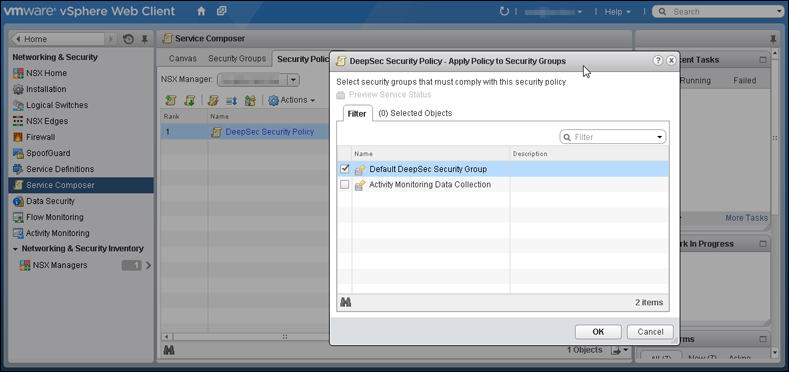
The NSX security policy is now applied to the VMs in the NSX security group.
As a final step, if you decided to use policy synchronization, create additional NSX security policies and groups:
This step is not required if you decided to use event-based tasks.
- For each Deep Security policy that you want to assign, create:
- an NSX security group with a name that reflects the Deep Security policy you plan to assign. For example, Linux Server Security Group.
- an NSX security policy (for example, Linux Server Security Policy) that has its Service Profile set to the Deep Security policy you want to assign.
You should now have multiple NSX security policies and groups. For example:
Linux Server Security Group
Linux Server Security PolicyWindows 10 Desktop Security Group
Windows 10 Desktop Security Policy...and so on.
- Associate each policy with the corresponding security group. For example, associate the Linux Server Security Policy with the Linux Server Security Group.
You have now created NSX security groups and policies. Any VMs that are added to these NSX security groups will be activated in Deep Security Manager, and assigned a Deep Security policy.
Step 8: Trigger an activation and policy assignment
Your VMs are now ready to be activated and assigned a policy.
If you chose Method 1: Create a 'Computer Created' event-based task, you'll need to manually synchronize the vCenter. Go to Deep Security Manager, right-click the vCenter on the left, and select Synchronize Now. Your existing VMs should now be protected.
If you chose Method 2: Create an 'NSX Security Group Change' event-based task, all VMs should be activated and assigned policy automatically now. To check, see the next step.
If you chose Method 3: Synchronize your Deep Security policies to NSX, all VMs should be activated and assigned policy automatically now. To check, see the next step.
Step 9: Check that VMs are activated and assigned a policy
Make sure your VMs in Deep Security Manager become activated, and are assigned a policy.
- In Deep Security Manager, click Computers at the top.
- On the left, expand Computers > <your_vCenter> > Virtual Machines.
- Check the TASK(S) and STATUS and columns. (Click Columns at the top to add them if they are not visible.) The TASK(S) column should indicate Activating, and your VMs should move from the Unmanaged (Unknown) status, to the Unmanaged (No Agent) status, to the Managed (Online) status. You may see the VMs move into the VMware Tools Not Installed status, but this is temporary.
- Check the POLICY column to make sure the correct Deep Security policy was assigned.
You have now deployed Deep Security Virtual Appliance and protected your VMs with it.
Next steps (how to add new VMs)
Follow the instructions below to learn how to add new VMs to your system and protect them with Deep Security.
To add a new VM if you chose Method 1: Create a 'Computer Created' event-based task:
- Create a new VM in vCenter. This triggers the Computer Created (by System) event-based task, which activates and assigns policy to the new VM.
To add a new VM if you chose Method 2: Create an 'NSX Security Group Change' event-based task
- Create or move the VM into one of the NSX security groups. This triggers the NSX Security Group Change event-based task, which activates and assigns policy to the new VM.
To add a new VM if you chose Method 3: Synchronize your Deep Security policies to NSX:
- Create or move the VM into one of the NSX security groups. This activates and assigns policy to the new VM.