Deep Security 10.1 has reached end of support. Use the version selector (above) to see more recent versions of the Help Center.
Manage and monitor computers
To manage and monitor the computers on your network, on Deep Security Manager, go to Computers. This page regularly refreshes itself to display the most current information. (You can modify the refresh rate on a per-user basis. Go to Administration > User Management > Users and then double-click on a user account to open its Properties window. On the Settings tab, in the Refresh Rate section, modify the page refresh rate.)
Computer icons:
-
 Ordinary computer
 -
 Deep Security Relay (a computer with a Relay-enabled Agent)
 -
 Deep Security Scanner (a computer with a Scanner-enabled agent)
 -
 Docker host (physical computer)
 -
 Azure virtual machine with Docker
 -
 Amazon EC2 with Docker
 -
 VMware virtual machine with Docker
 -
 Azure virtual machine with Scanner
 -
 Azure virtual machine with Scanner (started)
 -
 Azure virtual machine with Scanner (stopped)
 -
 Azure virtual machine with Scanner (suspended)
 -
 Amazon EC2 with Scanner
 -
 Amazon EC2 with Scanner (started)
 -
 Amazon EC2 with Scanner (stopped)
 -
 Amazon EC2 with Scanner (suspended)
Additional computer icons for vSphere environments (not available for Deep Security as a Service):
-
 ESXi server
 -
 Virtual computer (a virtual machine managed by VMware vCenter)
 -
 Virtual computer (started)
 -
 Virtual computer (stopped)
 -
 Virtual computer (suspended)
 -
 Virtual computer (with Relay enabled)
 -
 Virtual computer (started, Relay enabled)
 -
 Virtual computer (stopped, Relay enabled)
 -
 Virtual computer (suspended, Relay enabled)
 -
 Virtual computer (Scanner enabled)
 -
 Virtual computer (started, Scanner enabled)
 -
 Virtual computer (stopped, Scanner enabled)
 -
 Virtual computer (suspended, Scanner enabled)
 -
 Virtual Appliance
 -
 Virtual Appliance (started)
 -
 Virtual Appliance (stopped)
 -
 Virtual Appliance (suspended)
Preview panes
Clicking the Preview icon (![]() ) next to a listed computer expands a display area beneath it. The information displayed in the preview depends on the type of computer.
) next to a listed computer expands a display area beneath it. The information displayed in the preview depends on the type of computer.
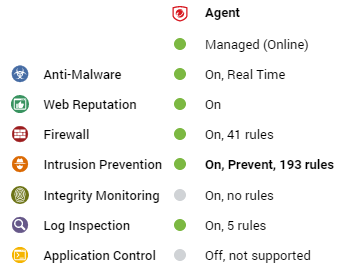
Ordinary computer
The preview pane for an ordinary computer displays the presence of an agent, its status, and the status of the protection modules.
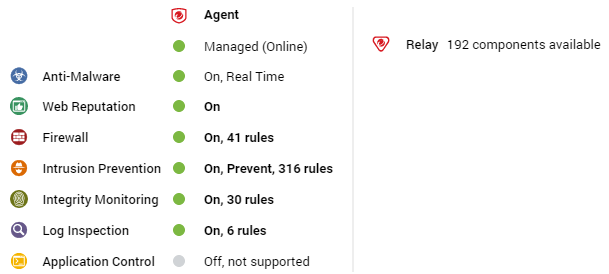
Relay
The preview pane for a Deep Security relay-enabled agent displays its status, the number of security update components it has available for distribution, and the status of the protection modules provided by its embedded Deep Security agent.
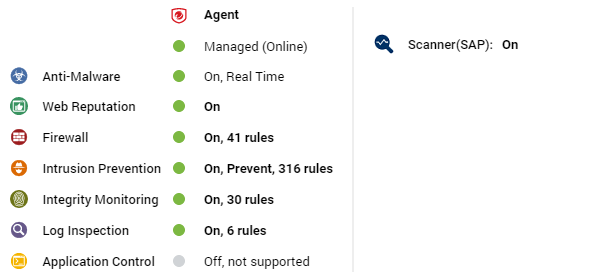
Deep Security Scanner
The preview pane for a Deep Security Scanner displays the presence of an agent or combined mode (agent and appliance), its status, the status of the protection modules, and the scanner status (SAP).
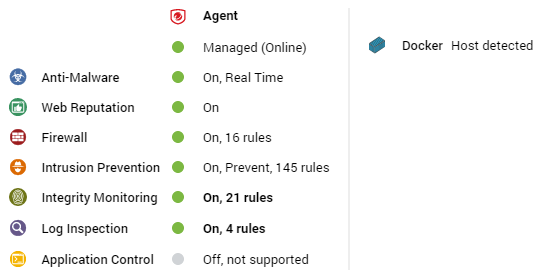
Docker hosts
The preview pane for a docker host displays the presence of an agent and its status, the status of the protection modules, and the Docker status.
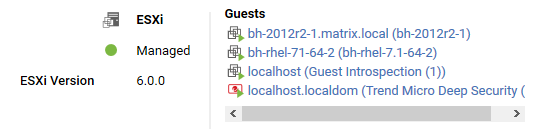
ESXi server
The preview pane for an ESXi server displays its status and the version number of the ESXi software. In the Guests area are displayed the presence of a Deep Security Virtual Appliance, and the virtual machines running on this host.
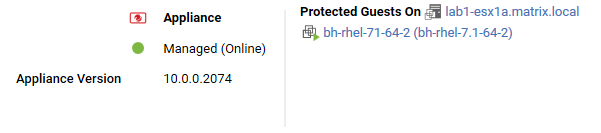
Virtual appliance
The preview pane for a Virtual Appliance displays its status and the version number of the Appliance. In the Protected Guests On area the protected virtual machines are displayed.
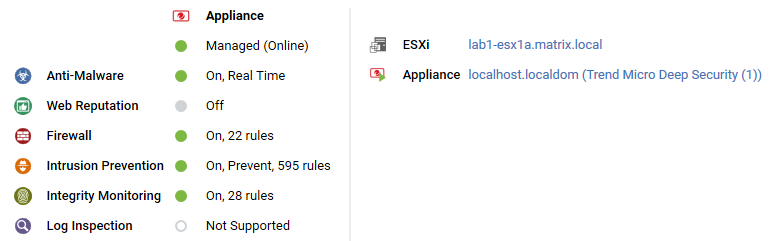
Virtual machine with agentless protection
The preview pane for a virtual machine displays whether it is being protected by a Virtual Appliance, an in-guest Agent, or both. It displays details about the components running on the virtual machine.
Adding computers to the manager
For more detailed instructions on adding computers to the Deep Security Manager see Add computers.
Define a new computer
Click Add in the toolbar and select Add Computer to open a New Computer Wizard. Type the hostname or IP address of the new computer and optionally select a policy to be applied to the new computer from the list. Clicking Next tells the manager to find the computer on the network.
- If the computer you specified is not found, the manager creates an entry for it in the Computers page, and you have to ensure that the manager can reach this computer and that the agent is installed and activated. You can then apply the appropriate policy to it.
- If the computer is found but no Agent is identified, the manager creates an entry for the computer on the Computers page. You have to install an agent on the computer and activate it.
- If the computer is found and an Agent is detected, the manager creates an entry in the Computers page. When you click Finishin the wizard, the manager activates the agent on the computer and applies the policy you selected.
Discover computers
Click Add in the toolbar and select Discover to display the Discover Computers dialog. During discovery, the manager searches the network for any visible computers that are not already listed. When a computer is found, the manager attempts to detect whether an agent is present. When discovery is complete, the manager displays all the computers it has detected and displays their status in the Status column. After discovery operations, a computer can be in one of the following states:
- Discovered (No Agent/Appliance):
The computer has been detected but no agent or appliance
 The Deep Securty Agent and Deep Security Virtual Appliance are the components that enforce the Deep Security policies that you have defined.
Agents are deployed directly on a computer.
Appliances are used in VMware vSphere environments to provide agentless protection. They are not available with Deep Security as a Service. is present. The computer may also be in this state if an agent or appliance is installed but has been previously activated and is configured for agent or appliance initiated communications. Because of the one-way communication from the agent or appliance, the manager will not know the status of the agent or appliance. In this case, you have to deactivate the agent or appliance on the computer and reactivate it from the manager.
The Deep Securty Agent and Deep Security Virtual Appliance are the components that enforce the Deep Security policies that you have defined.
Agents are deployed directly on a computer.
Appliances are used in VMware vSphere environments to provide agentless protection. They are not available with Deep Security as a Service. is present. The computer may also be in this state if an agent or appliance is installed but has been previously activated and is configured for agent or appliance initiated communications. Because of the one-way communication from the agent or appliance, the manager will not know the status of the agent or appliance. In this case, you have to deactivate the agent or appliance on the computer and reactivate it from the manager. - Discovered (Activation Required): The agent is installed and listening for communication from the manager, but has not been activated. This status may also indicate that the agent or appliance is installed and listening, and has been activated, but is not yet being managed by the manager. This situation can occur if this manager was once managing the agent or appliance, but the agent or appliance's public certificate is no longer in the manager's database. The computer could have been removed from the manager and then discovered again. To begin managing the agent or appliance on this computer, right-click the computer and select Activate/Reactivate. Once reactivated, the status changes to Online.
- Discovered (Deactivation Required): The agent or appliance is installed and listening, but it has already been activated by another manager. In this case the agent or appliance must be deactivated prior to activation by this manager.
- Discovered (Unknown): The computer has been detected but the presence or absence of an agent or appliance cannot be ascertained.
Add Active Directory
Deep Security Manager can connect to and synchronize with a Microsoft Active Directory. For detailed instructions on importing a list of computers from an Active Directory, see Add computer groups from Microsoft Active Directory.
Add VMware vCenter
Deep Security Manager supports a tight integration with VMware vCenter and ESXi server. You can import the organizational and operational information from vCenter and ESXi nodes and allow detailed application of security to an enterprise's VMware infrastructure. For detailed instructions on importing virtual computers from a VMware system, see Add a VMware vCenter.
Add AWS Account
Deep Security can connect to and manage AWS instances. For details, see Add AWS cloud accounts.
Add Azure Account
Deep Security can connect to and manage Microsoft Azure VMs. For details, see Add a Microsoft Azure account to Deep Security.
Add vCloud Account
Deep Security can connect to and manage VMware vCloud virtual machines. For details, see Add virtual machines hosted on VMware vCloud.
Search for a computer
Use the Search field to search for a particular computer among already discovered (i.e. listed) computers. For more sophisticated search options, use the Advanced Search option below it.
Advanced Search functions (searches are not case sensitive):
- Contains: The entry in the selected column contains the search string
- Does Not Contain: The entry in the selected column does not contain the search string
- Equals: The entry in the selected column exactly matches the search string
- Does Not Equal: The entry in the selected column does not exactly match the search string
- In: The entry in the selected column exactly matches one of the comma-separated search string entries
- Not In: The entry in the selected column does not exactly match any of the comma-separated search string entries
Export selected computers
Export your computers list to an XML or CSV file. Exporting is useful when you want to back up your computer information, integrate it with other reporting systems, or to migrate computers to another Deep Security Manager. (If you export, you do not have to re-discover and scan computers from the new manager.)
Activate or reactivate the agent or appliance on a computer
When a computer is unmanaged, the agent or appliance must be activated to move the computer into a managed state. On the Computers page, right-click the computer whose agent or appliance you want to activate or reactivate and select Activate/Reactivate from the Actions menu. (Alternatively, you can click the Activate or Reactivate button in the computer's Details window.)
Before activation, the agent or appliance will have one of these statuses:
- No Agent/Appliance: Indicates one of the following situations:
- No agent or appliance is running or listening on the default port.
- An agent or appliance is installed and running but is working with another manager and communications are configured as Agent/Appliance Initiated. In this case, the agent or appliance is not listening for this manager. To correct this situation, deactivate the agent from the computer.
- Activation Required: The agent or appliance is installed and listening, and is ready to be activated by the manager.
- Reactivation Required: The agent or appliance is installed and listening and is waiting to be reactivated by the manager.
- Deactivation Required: The agent or appliance is installed and listening, but has already been activated by another manager.
- Unknown: The computer has been imported (as part of an imported Computers list) without state information, or has been added by way of an LDAP directory discovery process.
After a successful activation, the agent or appliance state is Online. If the activation failed the computer status is Activation Failed with the reason for the failure in brackets. Click this link to display the system event for more details on the reason for the activation failure.
Check the status of a computer
This command checks the status of a computer without performing a scan or activation attempt.
Deactivate the agent or appliance on a computer
You may want to transfer control of a computer from one Deep Security Manager installation to another. If so, the agent or appliance has to be deactivated and then activated again by the new manager. Deactivating the agent or appliance can be done from the manager currently managing the agent or appliance. Deactivating an agent may also be done directly on the computer from the command line. If you are using Deep Security Virtual Appliance 9.0 or earlier, you can also deactivate an Appliance directly on the vSphere client by connecting to the Deep Security Virtual Appliance console and then selecting Reset Appliance.
Send an updated policy to a computer
When you use Deep Security Manager to change the configuration of an agent or appliance on a computer (apply a new intrusion prevention rule, change logging settings, etc.), the Deep Security Manager has to send the new information to the agent or appliance. This is a Send Policy instruction. Policy updates usually happen immediately but you can force an update by clicking Send Policy.
Download a Security Update
This command downloads the latest security update from the configured relay to the agent or appliance.
Roll back a Security Update
This command rolls back the latest security update for the agent or appliance.
Get Events
Override the normal event retrieval schedule (usually every heartbeat) and retrieve the event logs from the computer(s) now.
Clear Warnings/Errors
Use this command to clear all warnings and errors for the computer. This command is useful in these situations:
- If the agent for the computer has been reset locally
- If the computer has been removed from the network before you had a chance to deactivate or delete it from the list of computers
Upgrade the agent or appliance software on a computer
To upgrade an agent or appliance, you first need to import a newer version of the Agent or Appliance software package into the Deep Security Manager. You can import an agent or appliance software package from the Trend Micro Download Center (as described below) or you can manually import the software to the manager from a local directory (see Local Software).
- Go to Administration > Updates > Software > Download Center. This page lists all of the software packages available on the Trend Micro Download Center. Packages that you have already imported into Deep Security Manager have a green checkmark
(
 ) in the Imported column. They are also listed on the Administration > Updates > Software > Local tab. Packages that are out-of-date have
(
) in the Imported column. They are also listed on the Administration > Updates > Software > Local tab. Packages that are out-of-date have
( ) in the Imported column.
 - To update a package that is out of date, right-click the package name and click Import.
Once a package has been imported, you can use it to upgrade one or more Agents or Appliances.
- On the Computers page, right-click the computers whose agents or appliances you wish to upgrade and select Actions > Upgrade Agent/Appliance Software.
- If there are no installers of an appropriate platform and version (the version must be higher than the agent or appliance's) the following message will be displayed: "There are no authenticated agent or appliance Software Install Programs available for the selected computer(s) platform or version. Please add an appropriate agent or appliance Software Install Program using the Download Center or Local panel in Administration > Updates > Software before upgrading the Deep Security AgentsAppliances. Otherwise, the Upgrade Agent/Appliance Software dialog appears. In that dialog box, select the version of the agent or appliance that you want to install and specify when the upgrade will occur. You can choose to upgrade the agent or appliance now, or select Use a Schedule for Upgrade and specify the time window when the upgrade will be performed. If you choose to use a schedule, the manager will upgrade the agent to the specified version once; it does not continue to upgrade the agent to future versions.
Scan for Recommendations
Deep Security Manager can scan computers and then make recommendations for Security Rules. The results of a recommendation scan appear in the computer's Details window in the Rules pages. See the documentation for the Computer Details window for more information.
Clear Recommendations
Clear rule recommendations resulting from a recommendation scan on this computer. Clearing also removes the computer from those listed in an alert produced as a result of a recommendation scan.
Full Scan for Malware
Performs a full malware scan on the selected computers. The actions taken by a full scan depend on the Malware Manual Scan Configuration in effect on this computer. See Malware Scan Configurations.
Quick Scan for Malware
Scan critical system areas for currently active threats. Quick Scan looks for currently-active malware but does not perform deep file scans to look for dormant or stored infected files. On larger drives, Quick Scan is significantly faster than a Full Scan.
Scan computers for open ports
Scan for Open Ports performs a port scan on all selected computers and checks the Agent installed on the computer to determine whether its state is either Deactivation Required, Activation Required, Agent Reactivate Required, or Online. The scan operation, by default, scans ports 1-1024. This range can be changed in Computer or Policy editor![]() You can change these settings for a policy or for a specific computer.
To change the settings for a policy, go to the Polices page and double-click the policy that you want to edit (or select the policy and click Details).
To change the settings for a computer, go to the Computers page and double-click the computer that you want to edit (or select the computer and click Details). > Settings > General.
You can change these settings for a policy or for a specific computer.
To change the settings for a policy, go to the Polices page and double-click the policy that you want to edit (or select the policy and click Details).
To change the settings for a computer, go to the Computers page and double-click the computer that you want to edit (or select the computer and click Details). > Settings > General.
Cancel currently executing port scans
If you have initiated a set of port scans to a large number of computers or over a large range of ports and the scan is taking too long, use the Cancel Currently Executing Port Scans option to cancel the scans.
Scan for integrity
Integrity Monitoring tracks changes to a computer's system and files. It does by creating a baseline and then performing periodic scans to compare the current state of the computer to the baseline. For more information see Integrity monitoring settings.
Rebuild Integrity Baseline
Rebuilds a baseline for Integrity Monitoring on this computer.
Move a computer to a computer group
To move a computer to new computer group, right-click the computer and choose Actions > Move to Group
Assign a policy to a computer
The Assign a Policy to a Computer command opens a window with a list allowing you to assign a Policy to the computer. The name of the Policy assigned to the computer will appear in the Policy column on the Computers page.
Assign an Asset Value
Asset values allow you to sort computers and events by importance. The various security rules have a severity value. When rules are triggered on a computer, the severity values of the rules are multiplied by the asset value of the computer. This value is used to rank events in order of importance. For more information see Administration > System Settings > Ranking.
Assign a Relay Group
To select a Relay Group for this computer to Download Updates from, right-click the computer and choose Actions > Assign a Relay Group.
Delete a Computer
If you delete a computer, all information pertaining to that computer is deleted along with it. If you re-discover the computer, you will have to re-assign a Policy and whatever rules were assigned previously.
Examine events associated with a computer
Examine system and security-related Events associated with the computer.
Add a computer group
Creating computer groups is useful from an organizational point of view and it speeds up the process of applying and managing Policies. Right-click the computer group under which you want to create the new computer group and select Add Group.
Add computers and computer groups imported from a Microsoft Active Directory structure
Discover computers by importing from an LDAP directory (such as Microsoft Active Directory). Computers are imported, and synchronized according to the structure in the directory. For more information, see Adding Computers.
Remove a group
You can only remove a computer group if it contains no computers and has no sub-groups.
Move computers to a different group
You can move a computer from one computer group to another but keep in mind that Policies are applied at the computer level, not the computer group level. Moving a computer from one computer group to another has no effect on the policy assigned to that computer.
View or edit the properties of a computer group
The properties of groups include their name and description.