Deep Security 10.1 has reached end of support. Use the version selector (above) to see more recent versions of the Help Center.
Ensure your computers have the latest threat information
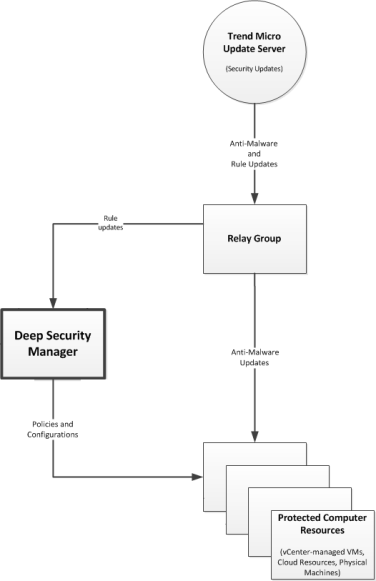
To ensure that your agents and appliances![]() The Deep Securty Agent and Deep Security Virtual Appliance are the components that enforce the Deep Security policies that you have defined.
Agents are deployed directly on a computer.
Appliances are used in VMware vSphere environments to provide agentless protection. They are not available with Deep Security as a Service. are using the latest threat information to defend your computers, you must periodically update Deep Security with the latest software and security updates. Relays retrieve security updates from Trend Micro and then distribute them to agents and appliances.
The Deep Securty Agent and Deep Security Virtual Appliance are the components that enforce the Deep Security policies that you have defined.
Agents are deployed directly on a computer.
Appliances are used in VMware vSphere environments to provide agentless protection. They are not available with Deep Security as a Service. are using the latest threat information to defend your computers, you must periodically update Deep Security with the latest software and security updates. Relays retrieve security updates from Trend Micro and then distribute them to agents and appliances.
To configure Security Updates, you will need to:
- Configure your Security Update source
- Organize your Relay-enabled Agents into Relay Groups
- Assign Relay Groups to your agents and appliances
- Special Case: Configure Updates on a Relay-enabled Agent in an Air-Gapped Environment
Configure your security update source
To view your current update source settings, go to Administration > System Settings > Updates.
In the Security Updates area, set your Update source. By default this will be the Trend Micro Update Server accessed over the Internet. Unless your support provider has told you to do otherwise, leave the setting as is.
You may have Agents installed on roaming computers that are not always in contact with a Deep Security Manager or a Relay. To allow Agents to use the Update source specified above when their Relay Group is not available, select the Allow Agents/Appliances to download Pattern updates directly from Primary Security Update Source if Relays are not accessible option. To allow Agents to update (either from a Relay or the Update server) when not in contact with a Deep Security Manager, select Allow Agents/Appliances to download Pattern updates when Deep Security Manager is not accessible. (You may want to uncheck this option on computers where you do not want to risk a potentially problematic Security Update when the computer is not in contact with a Manager and therefore possibly far away from any support services.)
Automatically apply Rule Updates to Policies: Trend Micro will occasionally issue an update to an existing Deep Security Rule. This setting determines whether updated Rules get sent to computers during a Security Update.
If your Relays must connect to a proxy to access the Internet (and Trend Micro Update Servers), go to Administration > System Settings > Proxies and define the proxies in the Proxy Servers section.
Manually initiate security updates
For a system-wide update, go to Administration > Updates > Security, and click the Check For Updates and Download button.
To perform Security Updates on specific agents and appliances, select the agent or appliance from the list of computers on the Computers page, then right-click and select Actions > Download Security Update.
To schedule a regular Check For Security Updates task, go to Administration > Scheduled Tasks, and create a new Scheduled Task of the Check For Security Updates type.
Organize your relays into relay groups
A Deep Security installation requires at least one Relay-enabled Agent. Relay-enabled Agents are organized into Relays Groups (even if there is only one Relay-enabled Agent in the group.) As soon as you activate a Relay-enabled Agent with the Manager, it is added to a Group called Default Relay Group. This Relay Group will always be there as a catch-all for new Relay-enabled Agents. Once activated, you can move your new Relay-enabled Agent from one Relay Group to another.
To view your current Relay Groups or to create new Relay Groups, go to Administration > Updates > Relay Groups.
The Update Source for a Relay-enabled Agent is assigned at the Group level. By default, a Relay Group is configured to get its updates from the Update source designated on the Administration > System Settings > Updates tab. However, a Relay Group can be configured to get its updates from another Relay Group, creating a hierarchy of Relay Groups.
For more information on Relay Groups, see How do relays work?.
Assign Relay Groups to your agents and appliances
Once your Relay Groups are established and configured to connect with an Update Source, you can assign the Relay Groups to your Agents and Appliances.
To assign a Relay Group to an agent or appliance, go to the Computers page, right-click on the computer and select Actions > Assign Relay Group. The list of available Relay Groups will appear and you can select from it.
Special Case: Configure Updates on a Relay-enabled Agent in an Air-Gapped Environment
In a typical environment, at least one Relay-enabled Agent is configured and able to download Updates from the Trend Micro Update Server and the rest of the Agents and Appliances connect to that Relay-enabled Agent for Update distribution.
However, if your environment requires that the Relay-enabled Agent is not allowed to connect to a Relay-enabled Agent in a Relay group at a higher level or to an Update server via the Internet, then an alternative method is available to import a package of Updates to a Relay-enabled Agent for distribution to other Deep Security Software components.
Using a Relay-enabled Agent to generate an Updates package
A Relay-enabled Agent that is able to download the latest updates from the Trend Micro Update Server can be instructed to generate an exportable package of Security Updates that can be imported to another air-gapped Relay-enabled Agent.
To create a Security Updates package, from the command line on the Relay-enabled Agent, enter:
dsa_control -b
The command line output will show the name and location of the .zip file that was generated.
Importing Updates to the Air-Gapped Relay-enabled Agent
Copy the .zip file generated by the command-line to the installation directory of the Relay-enabled Agent in the offline environment. (On Windows the default directory is "C:\Program Files\Trend Micro\Deep Security Agent". On Linux the default directory is "/opt/ds_agent".)
When a Security Update Download is initiated from the Deep Security Manager (either scheduled or manual), if any Relay-enabled Agent is unable to get the update from the configured Update Source location, it will automatically check for the presence of a Relay Updates .zip file in its installation directory. If it finds the zipped Updates package, the Relay-enabled Agent will extract and import the Updates.
Configuring an Update Source for an Air-Gapped Relay-enabled Agent
Relays periodically try to connect to another relay or Trend Micro Active Update server to request new updates. If your relays are usually disconnected from the Internet ("air-gapped") and therefore can't connect to Trend Micro Active Update, this will cause the update attempt to fail. To avoid alerts about update failures, you can configure the relay to connect to itself.
- In the Deep Security Manager, go to Administration > System Settings > Updates > Primary Security Update Source.
- In the Security Updates area, select Other Update Source and enter "https://localhost:[port]" where [port] is the configured port number for security updates.
- Click OK.