Deep Security 10.1 has reached end of support. Use the version selector (above) to see more recent versions of the Help Center.
Set up intrusion prevention
Intrusion prevention systems (IPS) protect your computers from being exploited by known and zero-day vulnerabilities.
When a new vulnerability is discovered in applications or operating systems, patches might not be available. Once patches are released, administrators might need time to test and deploy the patches. Until then, IPS rules can protect your computers by dropping traffic that is trying to exploit the vulnerability.
Protection is available for file sharing and messaging software such as Skype, but also web applications with vulnerabilities such as SQL injection and cross-site scripting (XSS). In this way, IPS can also be used as a lightweight web application firewall (WAF).
In this article:
1. Turn on intrusion prevention
4. Apply the intrusion prevention rules
Best practices for specific rules
How to enable IPS
You can enable IPS for individual computers, or for many computers (with a policy).
1. Turn on intrusion prevention
To enable IPS, go to Computer or Policy editor![]() You can change these settings for a policy or for a specific computer.
To change the settings for a policy, go to the Polices page and double-click the policy that you want to edit (or select the policy and click Details).
To change the settings for a computer, go to the Computers page and double-click the computer that you want to edit (or select the computer and click Details). > Intrusion Prevention > General. For Configuration, select either On or Inherited (On). Don't save yet until you select the enforcement mode.
You can change these settings for a policy or for a specific computer.
To change the settings for a policy, go to the Polices page and double-click the policy that you want to edit (or select the policy and click Details).
To change the settings for a computer, go to the Computers page and double-click the computer that you want to edit (or select the computer and click Details). > Intrusion Prevention > General. For Configuration, select either On or Inherited (On). Don't save yet until you select the enforcement mode.
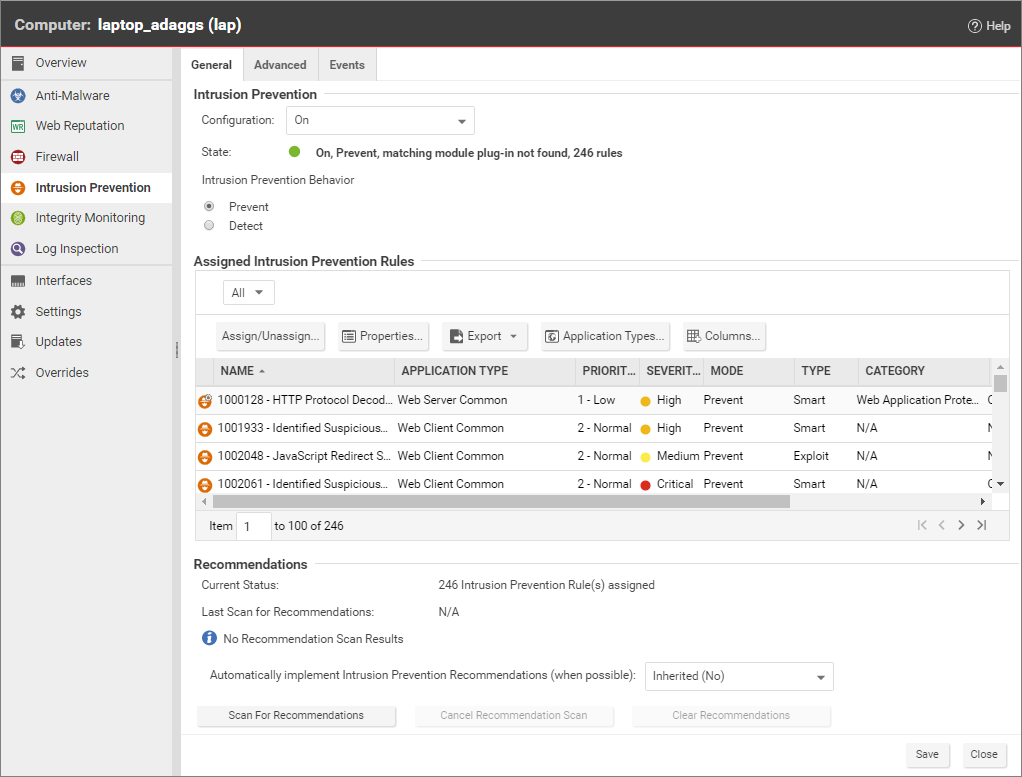
2. Set the enforcement mode
For the IPS action, you can select either Prevent or Detect, then click Save.
When you first apply new IPS rules, select Detect to verify that they don't accidentally block your normal traffic (false positives). In detect mode, the IPS rules will detect matching traffic and generate events, but won't block traffic. Later, if no false positives occur, you can select Prevent to start blocking attacks.
For more fine-grained control, when you assign IPS rules, you can override the general IPS action and configure specific rules to either prevent or detect.
3. Run a recommendation scan
Performance is best when you only assign the IPS rules that apply to that computer. To get recommendations about which rules would be appropriate, run a recommendation scan. In the Recommendations section, click Scan for Recommendations. Optionally specify whether or not Deep Security should apply the recommended rules.
To automatically periodically fine tune IPS rules, schedule recommendation scans.
4. Apply the intrusion prevention rules
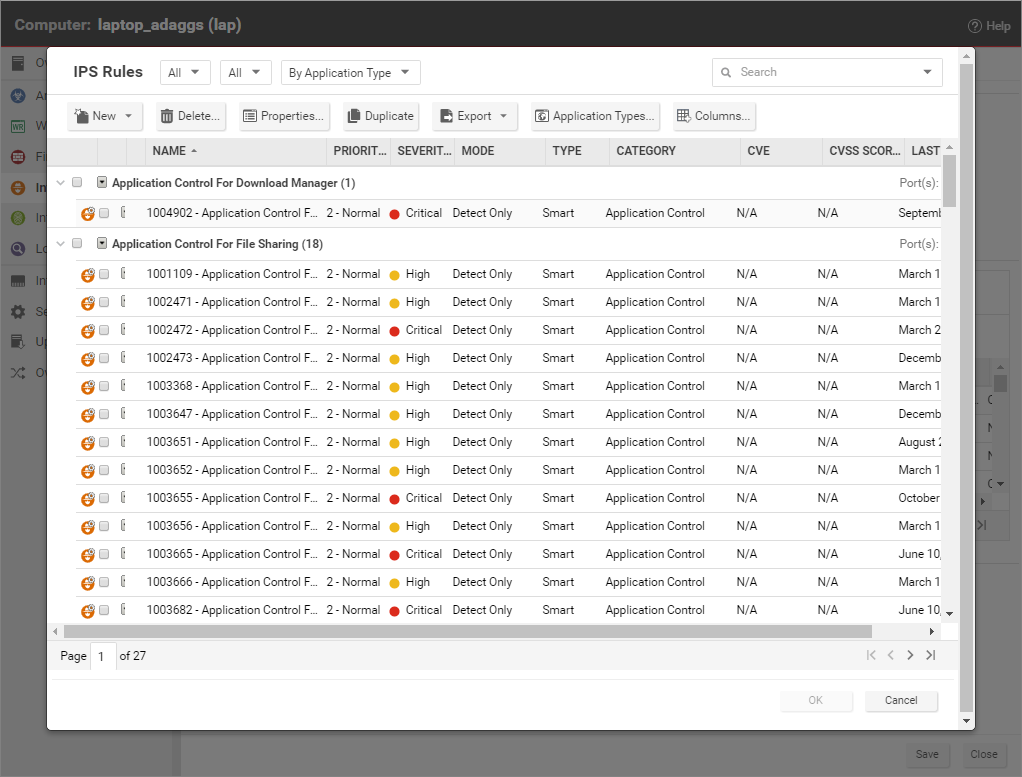
If you don't want the recommendation scan to automatically assign IPS rules, you can do that manually.
In the Assigned Intrusion Prevention Rules section, to add or remove IPS rules, click Assign/Unassign. This will display a window that shows all available intrusion prevention rules, and allows you select or deselect rules.
After you apply IPS rules, monitor CPU, RAM, and network usage to verify that system performance is still acceptable. If not, you can modify some settings and deployment aspects to improve performance. See Performance tips for IPS.
Setting Detect or Prevent for rules
You can set individual rules to either Prevent or Detect. If the Intrusion Prevention Behavior for the computer or policy is set to Detect, Deep Security ignores the setting for individual rules. If the computer or policy is set to Prevent, rules set to Prevent will block traffic, but rules set to Detect will only log the traffic.
Some rules issued by Trend Micro are set to detect-only by default. For example, mail client Intrusion Prevention rules are generally detect-only since they will block the download of all subsequent mail. Some rules are triggered only if a condition occurs a large number times, or a certain number of times within a certain period and so the individual condition shouldn't be prevented but an alert is raised if the condition recurs.
Some rules can also match legitimate traffic, causing false positives. By default, these rules are in detect-only mode. You must observe event logs while they are in detect mode to ensure that no false positives are being triggered with your specific network traffic. If a rule is causing false positives, unassign it or keep it in detect-only mode. But if no false positives are detected, you can change it to prevent mode.
- If a rule requires configuration, keep it in detect-only mode until you've configured the rule.
- Switch a rule into prevent mode only after configuration and testing.
If you don't do this, you might accidentally block legitimate traffic and interrupt network services.
Check intrusion prevention events
By default, the Deep Security Manager collects Firewall and Intrusion Prevention event logs from the Deep Security agents and appliances![]() The Deep Securty Agent and Deep Security Virtual Appliance are the components that enforce the Deep Security policies that you have defined.
Agents are deployed directly on a computer.
Appliances are used in VMware vSphere environments to provide agentless protection. They are not available with Deep Security as a Service. at every heartbeat. Once collected by the Deep Security Manager, event logs are kept for a period of time which can be set in Administration > System Settings > Storage. The default setting is one week.
The Deep Securty Agent and Deep Security Virtual Appliance are the components that enforce the Deep Security policies that you have defined.
Agents are deployed directly on a computer.
Appliances are used in VMware vSphere environments to provide agentless protection. They are not available with Deep Security as a Service. at every heartbeat. Once collected by the Deep Security Manager, event logs are kept for a period of time which can be set in Administration > System Settings > Storage. The default setting is one week.
The events generated by the Intrusion Prevention module are displayed in the Deep Security Manager console, under Events & Reports >Intrusion Prevention Events. Event tagging can help you to sort events.
You can manually apply tags to events by right-clicking the event and then clicking Add Tag(s). You can choose to apply the tag to only the selected event or to any similar intrusion prevention events.
You can also use the auto-tagging feature to group and label multiple events. To configure this feature in the Deep Security Manager, go to Events and Reports > Intrusion Prevention Events > Auto-Tagging > New Trusted Source. There are three sources that you can use to perform the tagging:
- Local Trusted Computer
- Trend Micro Certified Safe Software Service
- Trusted Common Baseline, which is a set of file states collected from a group of computers.
For more information on event tagging, see Apply tags to identify and group events.
5. Switch to prevent mode
If, after monitoring the Intrusion Prevention events for a period of time, you are satisfied that no false positives are being triggered, you can switch to Prevent mode. The rules will be applied to traffic and related log events are generated.
Best practices for specific rules
HTTP Protocol Decoding rule
The HTTP Protocol Decoding rule is the most important rule in the "Web Server Common" Application Type. This rule is responsible for decoding the HTTP traffic before the other rules inspect it. In addition, this rule also allows you to control various components of the decoding process.
This rule is required should you choose to use any of the Web Application Common or Web Server Common rules that require it. The Deep Security Manager automatically assigns this rule when it is required by other rules. As each web application is different, the policy that uses this rule should run in Detect mode for a period of time before switching to Prevent mode to determine if any configuration changes are required.
Quite often, changes are required to the list of illegal characters.
Refer to the following Knowledge Base articles for more details on this rule and how to tune it:
http://esupport.trendmicro.com/solution/en-us/1098016.aspx
http://esupport.trendmicro.com/solution/en-us/1054481.aspx
http://esupport.trendmicro.com/solution/en-us/1096566.aspx
Cross-site scripting and generic SQL injection rules
Two of the most common application-layer attacks are SQL injection and cross-site scripting (XSS). Cross-site scripting and SQL injection rules intercept the majority of attacks by default, but you may need to adjust the drop score for specific resources if they cause false positives.
Both rules are smart filters that need custom configuration for web servers. If you have output from a Web Application Vulnerability Scanner, you should leverage that information when applying protection. For example, if the username field on the login.asp page is vulnerable to SQL injection, ensure that the SQL injection rule is configured to monitor that parameter with a low threshold to drop on.
You can find details here:
http://esupport.trendmicro.com/solution/en-US/1098159.aspx
Inspecting SSL or TLS
Deep Security supports SSL inspection. When enabled, the IPS engine can decrypt SSL and TLS traffic in order to scan it for attacks that are inside the encrypted part of the packet. Filtering of SSL traffic is only supported by the Deep Security Agent, not the Deep Security Virtual Appliance.
-
Go to Computers.
Because SSL inspection requires the server's private key, which is specific to each server, it cannot be applied to a policy which may apply to many computers. Configure it for each computer individually.
- Double-click a computer where you want to inspect SSL or TLS.
- Go to Intrusion Prevention > Advanced.
-
Click View SSL Configurations, then click New.
Follow the wizard to configure which port numbers will be decrypted, and to select or upload the server's private key. For example, for an HTTPS web server, you will usually select the port named SSL (TCP port 443).
- Go to Computer or Policy editor
 You can change these settings for a policy or for a specific computer.
To change the settings for a policy, go to the Polices page and double-click the policy that you want to edit (or select the policy and click Details).
To change the settings for a computer, go to the Computers page and double-click the computer that you want to edit (or select the computer and click Details). > Intrusion Prevention.
You can change these settings for a policy or for a specific computer.
To change the settings for a policy, go to the Polices page and double-click the policy that you want to edit (or select the policy and click Details).
To change the settings for a computer, go to the Computers page and double-click the computer that you want to edit (or select the computer and click Details). > Intrusion Prevention. - In the Assigned Intrusion Prevention Rules table, right-click a rule with the “Web Server Common” application type, and then select Application Type Properties.
-
On the Configuration tab, deselect Inherited and Monitor responses from Web Server.
If you decide to use SSL inspection, to improve performance, you should disable the inspection of HTTP responses. All web attacks that IPS can detect are inside a client's HTTP request, not the server's HTTP response, so disabling inspection on responses will improve performance without decreasing security.
- Click OK and then Save.
Interface tagging
You can use “Interface Types” when you need to assign firewall or IPS rules to a specific interface when a machine has multiple network interfaces.
By default, Firewall and Intrusion Prevention rules are assigned to all interfaces on a computer. If, for example, there are special rules that you want to apply only to the wireless network interface, you can use Interface Types to accomplish this. To configure this, go to Policy > Interface Types > Network Interface Specificity.
When creating a policy, think about the difference in protection for different interfaces. Consider populating the Interface Type based on the different networks available to all potential protected machines.