Deep Security 10.1 has reached end of support. Use the version selector (above) to see more recent versions of the Help Center.
SSL data streams
The intrusion prevention module supports filtering of SSL traffic. The SSL dialog allows you to create SSL configurations for a given credential-port pair on one or more interfaces. Credentials can be imported in PKCS#12 or PEM format, and Windows computers have the option of using CryptoAPI directly. The credentials file must include the private key.
Start the SSL Configuration Wizard
Open the Details window of the computer you wish to configure, go to Intrusion Prevention > Advanced > SSL Configurations, and click on View SSL Configurations to display the SSL Computer Configurations window. Click New to display the first page of the SSL Configuration wizard.
1. Select Interface(s)
Specify whether this configuration will apply to all interfaces on this computer or just one.
2. Select Port(s)
Either enter the (comma-separated) ports you want this configuration to apply to, or select a Port List.
3. IP Selection
Specify whether SSL intrusion prevention analysis should take place on all IP addresses for this computer, or just one. (This feature can be used to set up multiple virtual computers on a single computer.)
4. Specify Source of Credentials
Specify whether you will provide the credentials file yourself, or whether the credentials are already on the computer. The credentials file must include the private key.
5. Specify Type of Credentials
If you have chosen to provide the credentials now, enter their type, location, and pass phrase (if required).
If you've indicated that the credentials are on the computer, specify the type of credentials to look for.
6. Provide Credential Details
If you are using PEM or PKCS#12 credential formats stored on the computer, identify the location of the credential file and the file's pass phrase (if required).
If you are using Windows CryptoAPI credentials, choose the credentials from the list of credentials found on the computer.
The following table contains a list of supported ciphers:
| Hex value | OpenSSL name | IANA name | NSS name | Deep Security Agent version |
| 0x00,0x04 | RC4-MD5 | TLS_RSA_WITH_RC4_128_MD5 | SSL_RSA_WITH_RC4_128_MD5 | 4.5 or higher |
| 0x00,0x05 | RC4-SHA | TLS_RSA_WITH_RC4_128_SHA | SSL_RSA_WITH_RC4_128_SHA | 4.5 or higher |
| 0x00,0x09 | DES-CBC-SHA | TLS_RSA_WITH_DES_CBC_SHA | SSL_RSA_WITH_DES_CBC_SHA | 4.5 or higher |
| 0x00,0x0A | DES-CBC3-SHA | TLS_RSA_WITH_3DES_EDE_CBC_SHA | SSL_RSA_WITH_3DES_EDE_CBC_SHA | 4.5 or higher |
| 0x00,0x2F | AES128-SHA | TLS_RSA_WITH_AES_128_CBC_SHA | TLS_RSA_WITH_AES_128_CBC_SHA | 4.5 or higher |
| 0x00,0x35 | AES256-SHA | TLS_RSA_WITH_AES_256_CBC_SHA | TLS_RSA_WITH_AES_256_CBC_SHA | 4.5 or higher |
| 0x00,0x3C | AES128-SHA256 | TLS_RSA_WITH_AES_128_CBC_SHA256 | TLS_RSA_WITH_AES_128_CBC_SHA256 | 9.5 SP1 or higher |
| 0x00,0x3D | AES256-SHA256 | TLS_RSA_WITH_AES_256_CBC_SHA256 | TLS_RSA_WITH_AES_256_CBC_SHA256 | 9.5 SP1 or higher |
| 0x00,0x41 | CAMELLIA128-SHA | TLS_RSA_WITH_CAMELLIA_128_CBC_SHA | TLS_RSA_WITH_CAMELLIA_128_CBC_SHA | 9.5 SP1 or higher |
| 0x00,0x84 | CAMELLIA256-SHA | TLS_RSA_WITH_CAMELLIA_256_CBC_SHA | TLS_RSA_WITH_CAMELLIA_256_CBC_SHA | 9.5 SP1 or higher |
| 0x00,0xBA | CAMELLIA128-SHA256 | TLS_RSA_WITH_CAMELLIA_128_CBC_SHA256 | TLS_RSA_WITH_CAMELLIA_128_CBC_SHA256 | 9.5 SP1 or higher |
| 0x00,0xC0 | not implemented | TLS_RSA_WITH_CAMELLIA_256_CBC_SHA256 | TLS_RSA_WITH_CAMELLIA_256_CBC_SHA256 | 9.5 SP1 or higher |
| 0x00,0x7C | not implemented | TLS_DHE_RSA_WITH_CAMELLIA_128_GCM_SHA256 | TLS_DHE_RSA_WITH_CAMELLIA_128_GCM_SHA256 | 4.5 or higher |
| 0x00,0x7D | not implemented | TLS_DHE_RSA_WITH_CAMELLIA_256_GCM_SHA384 | TLS_DHE_RSA_WITH_CAMELLIA_256_GCM_SHA384 | 4.5 or higher |
| 0x00,0x7E | not implemented | TLS_DH_RSA_WITH_CAMELLIA_128_GCM_SHA256 | TLS_DH_RSA_WITH_CAMELLIA_128_GCM_SHA256 | 4.5 or higher |
The following table contains a list of supported protocols:
| Protocol | Deep Security Agent version |
| SSL 3.0 | 4.5 or higher |
| TLS 1.0 | 4.5 or higher |
| TLS 1.1 | 9.5 SP1 or higher |
| TLS 1.2 | 9.5 SP1 or higher |
7. Name and Describe this Configuration
Give a name to and provide a description of this SSL configuration.
8. Look Over the Summary and Close the SSL Configuration Wizard
Read the summary of the configuration operation and click Finish to close the wizard.
Change Port Settings in the computer Details window to Monitor SSL Ports.
Finally, you need to ensure that the agent is performing the appropriate intrusion prevention filtering on the SSL-enabled port(s). Go to Intrusion Prevention Rules in the computer's Details window to see the list of intrusion prevention rules being applied on this computer. Sort the rules by Application Type. Scroll down the list to find the Application Type(s) running on this computer (in this example, we will use "Web Server Common").
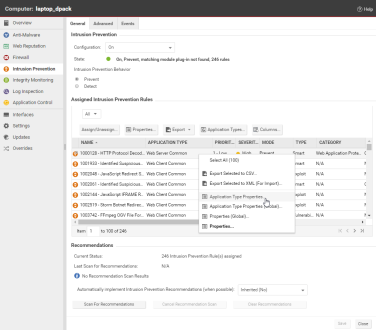
Right-click the "Web Server Common" Application Type heading and choose Application Type Properties (not Application Type Properties (Global)). This will display the Application Type's Properties window (in local edit mode).
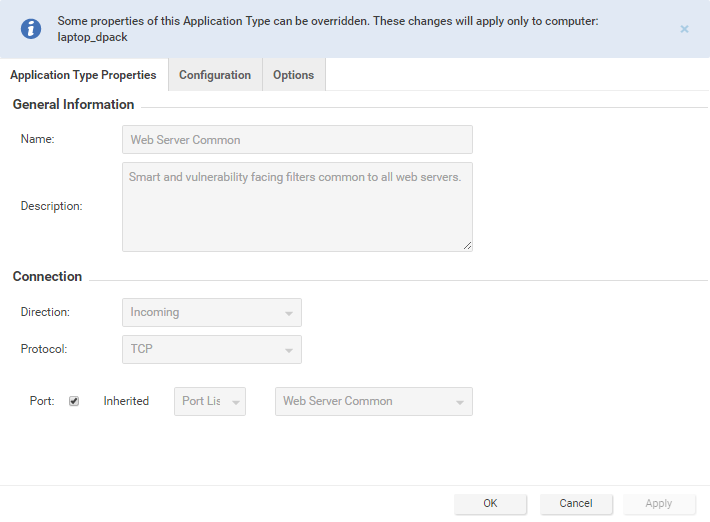
Instead of using the inherited "HTTP" Port List, we will override it to include the port we defined during the SSL Configuration setup (port 9090 in this case) as well as port 80. Enter ports 9090 and 80 as comma-separated values and click OK to close the dialog. (Since you selected Application Type Properties, the changes you made will only be applied to this computer. The "Web Server Common" Application Type will remain unchanged on other computers.)
This computer is now configured for filtering SSL encrypted data streams.